Quick Summary: Yes, you can extend drawer slides, often by adding an extension slide or adjusting the existing one. This DIY fix is crucial for better access and easier use of cabinets, desks, or even tool chests. Our guide makes this process beginner-friendly.
Ever struggled to reach the very back of a drawer? You know, where that one thing you need is always hiding? It’s frustrating when a drawer doesn’t open all the way, making it hard to use and possibly wasting valuable space. But don’t worry! This is a super common issue, and thankfully, it’s usually a pretty simple fix. You don’t need to be a master carpenter or a mechanic to get those drawers sliding out further. We’re going to walk through exactly how to extend drawer slides so you can finally get to whatever’s hiding in the abyss. Get ready to make your drawers more useful and your life a little easier!
Why Drawer Slides Get Stuck or Don’t Extend Fully
Drawer slides are neat pieces of hardware that let drawers open and close smoothly. They’re typically made of metal and have a few parts that slide against each other. Over time, these parts can wear down, get bent, or collect gunk. Sometimes, the drawer might just not have been installed with the right kind of slides for its depth. Other times, things like moisture, dirt, or even a slightly warped drawer box can make them stiff or prevent them from opening fully.
Think about it: the more weight a drawer carries, or the more often it’s used, the more stress those slides are under. Little bits of debris can get into the tracks, acting like sandpaper. If a slide gets even a tiny bit out of alignment, it can start to bind. It’s not usually anything serious, but it’s enough to make you wish you had more reach. The good news is, most reasons for limited extension are fixable without needing to replace the whole drawer or cabinet.
Understanding Different Types of Drawer Slides
Before we talk about extending them, let’s quickly look at the common types of drawer slides you’ll find. Knowing what you’re working with helps a lot!
- Friction Slides: These are the simplest, often found in older furniture. They’re basically two metal strips that rub directly against each other. They don’t extend very far.
- Roller Slides: These use plastic or metal rollers to help the drawer glide more smoothly. They offer better extension than friction slides and are quite common in basic cabinets and desks.
- Ball-Bearing Slides: These are the superheroes of drawer slides! They use tiny ball bearings nestled between metal channels. This allows for the smoothest operation and the greatest extension, often pulling out 75% to even 100% of the drawer’s length.
- Undermount Slides: These slides are hidden beneath the drawer box. They offer a clean, modern look and usually provide excellent extension and weight capacity.
Most often, when people talk about extending drawer slides, they’re referring to improving the extension of roller or ball-bearing slides, as these are designed for more robust movement and greater reach.
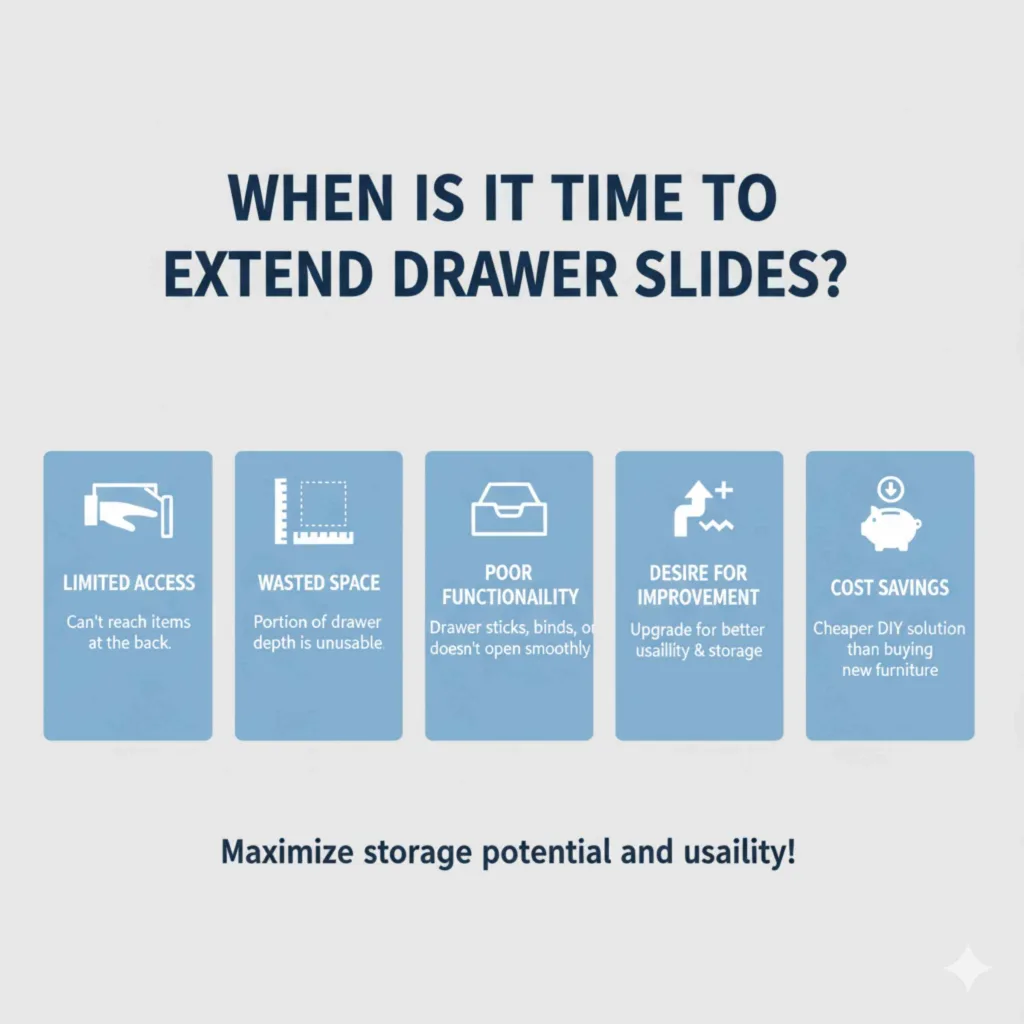
When is it Time to Extend Drawer Slides?
You might be thinking, “Why bother extending my drawer slides?” Here are a few signs that tell you it’s a good project to tackle:
- Limited Access: You can’t reach items at the back of the drawer without awkwardly leaning in or removing everything.
- Wasted Space: A significant portion of your drawer’s depth is unusable because the drawer won’t extend far enough.
- Poor Functionality: The drawer sticks, binds, or doesn’t open smoothly, making it a chore to use.
- Desire for Improvement: You want to upgrade your furniture for better usability and to maximize storage potential.
- Cost Savings: Instead of buying a whole new cabinet or desk just for better drawer access, extending the slides is a much cheaper DIY solution.
Tools You’ll Need to Extend Drawer Slides
Gathering the right tools makes any DIY job much smoother. For extending drawer slides, you likely won’t need a huge arsenal. Here’s a list of common items that will help:
- Measuring Tape: Essential for accurate measurements of your drawer and cabinet.
- Screwdriver Set: You’ll need Phillips head and possibly flathead screwdrivers to remove and attach slides. A cordless drill with screwdriver bits can speed this up.
- Pliers: Useful for gripping small parts or gently bending metal if needed.
- Safety Glasses: Always protect your eyes, especially when working with metal or around moving parts.
- Work Gloves: To protect your hands from splinters or sharp edges.
- Pencil or Marker: For marking measurements or screw locations.
- Optional Tools:
- Utility Knife: For scoring paint or caulk if slides are stuck.
- Putty Knife: To help gently pry apart components if they’re stuck.
- Level: To ensure new slides are installed straight.
- Block of Wood or Shims: To support drawers or cabinet faces while working.
How to Extend Drawer Slides: Step-by-Step Guide
Okay, let’s get to the good part! We’ll cover a couple of common ways to extend your drawer slides. The most effective way for full extension is often adding a longer slide, but sometimes minor adjustments can help.
Method 1: Replacing with Longer Ball-Bearing Drawer Slides (Best for Full Extension)
This method is usually the best bet for achieving true full-extension and significantly improving access. It involves removing the old slides and installing new, longer ones. This works for cabinets, desks, and even tool chests. For reference on how slides work, check out Rockler’s guide on installing drawer slides, a trusted resource for woodworking hardware.
- Empty and Remove the Drawer: First, take everything out of the drawer. Then, you need to get the drawer out of the cabinet. Most slides have a release lever or clip. You might need to pull the drawer out as far as it will go, locate this lever (often a small plastic or metal tab on either the inner or outer slide member), push it down or sideways, while gently pulling the drawer body away from the cabinet. If you’re unsure, consult the manufacturer’s documentation for your specific drawer slides.
- Remove Old Slides: With the drawer out, look at the cabinet frame and the side of the drawer box. The old slides are usually attached with screws. Carefully remove all screws holding the old slides to both the cabinet and the drawer. Keep track of these screws, or better yet, have your new screws ready.
- Measure for New Slides: This is critical! Measure the depth of the drawer cavity inside the cabinet. You need new slides that are at least 2 inches shorter than this measurement to allow clearance for the cabinet members and the drawer front. For example, if your cabinet opening is 20 inches deep, you’ll want slides around 18 inches long. You also need to consider the width of the drawer box and the cabinet opening.
- Choose New Slides: Purchase a new set of ball-bearing drawer slides. Make sure they are rated to support the weight you intend to put in the drawer. Look for slides that offer 100% extension if possible. You can find these at hardware stores, home improvement centers, or online retailers like Lee Valley Tools for quality options.
- Install Cabinet Members: Position the outer (cabinet) members of the new slides inside the cabinet opening. Use a level to ensure they are perfectly vertical and parallel. The front edge of the slide should be set back from the front of the cabinet face by a consistent amount, usually about 1/8 inch, to avoid rubbing. Mark your screw holes and pre-drill pilot holes if you’re screwing into hardwood. Attach the cabinet members securely with screws.
- Install Drawer Members: Attach the inner (drawer) members of the slides to the sides of the drawer box. Ensure they are parallel to the bottom of the drawer and are positioned at the correct height according to the slide manufacturer’s instructions. Again, mark, pre-drill, and screw securely.
- Test and Adjust: Carefully slide the drawer back into the cabinet. It should glide smoothly. If it binds, check that the slides are parallel and level on both sides. You might need to slightly adjust the positioning or re-drill holes.
Method 2: Adding Extension Brackets or Modifying Existing Slides
This is a less common but sometimes viable option, especially if you can’t replace the slides entirely or want a simpler, less invasive fix. This might not achieve full 100% extension but can add a few crucial inches.
What are Extension Brackets? These are typically thin metal strips that attach to the existing slide, effectively lengthening it. You might find these specifically labeled as “drawer slide extensions” or “add-on extensions.”
- Assess Compatibility: Check if your existing drawer slides are designed to accept extensions. Some are, while others are not. The slide might have pre-drilled holes or a specific profile that allows an extension bracket to be bolted on.
- Measure and Purchase: Measure the length of your current drawer slides. You’ll need extension brackets that are compatible in length and mounting style.
- Remove Drawer: As in Method 1, empty the drawer and carefully remove it from the cabinet.
- Attach Extension Bracket to Cabinet Member: If adding to the cabinet side, detach the current cabinet slide member from the cabinet. Bolt the extension bracket to the front of the cabinet slide member. Then, reattach the combined unit to the cabinet, ensuring it is level and parallel.
- Attach Extension Bracket to Drawer Member: If adding to the drawer side, detach the current drawer slide member from the drawer. Bolt the extension bracket to the front of the drawer slide member. Then, reattach the combined unit to the drawer.
- Reassemble and Test: Carefully reinsert the drawer and test its movement. This method can work, but it might increase the drawer’s wobble or reduce its weight-bearing capacity compared to a properly chosen longer slide.
Modifying Existing Slides (A Cautionary Note): In some very basic, non-ball-bearing slides, you might be able to slightly bend or adjust parts to gain a little more opening. However, this is generally not recommended for ball-bearing or high-quality slides, as it can easily damage them. If your slides are very old or simple, you might get a tiny bit more travel, but it’s often not worth the risk of breaking them. For most situations, replacing the slides is the reliable route.
Table: Pros and Cons of Extending Drawer Slides
Deciding whether to tackle this project can be easier with a quick rundown of the advantages and disadvantages:
| Method | Pros | Cons |
|---|---|---|
| Replacing with Longer Slides |
|
|
| Adding Extension Brackets |
|
|
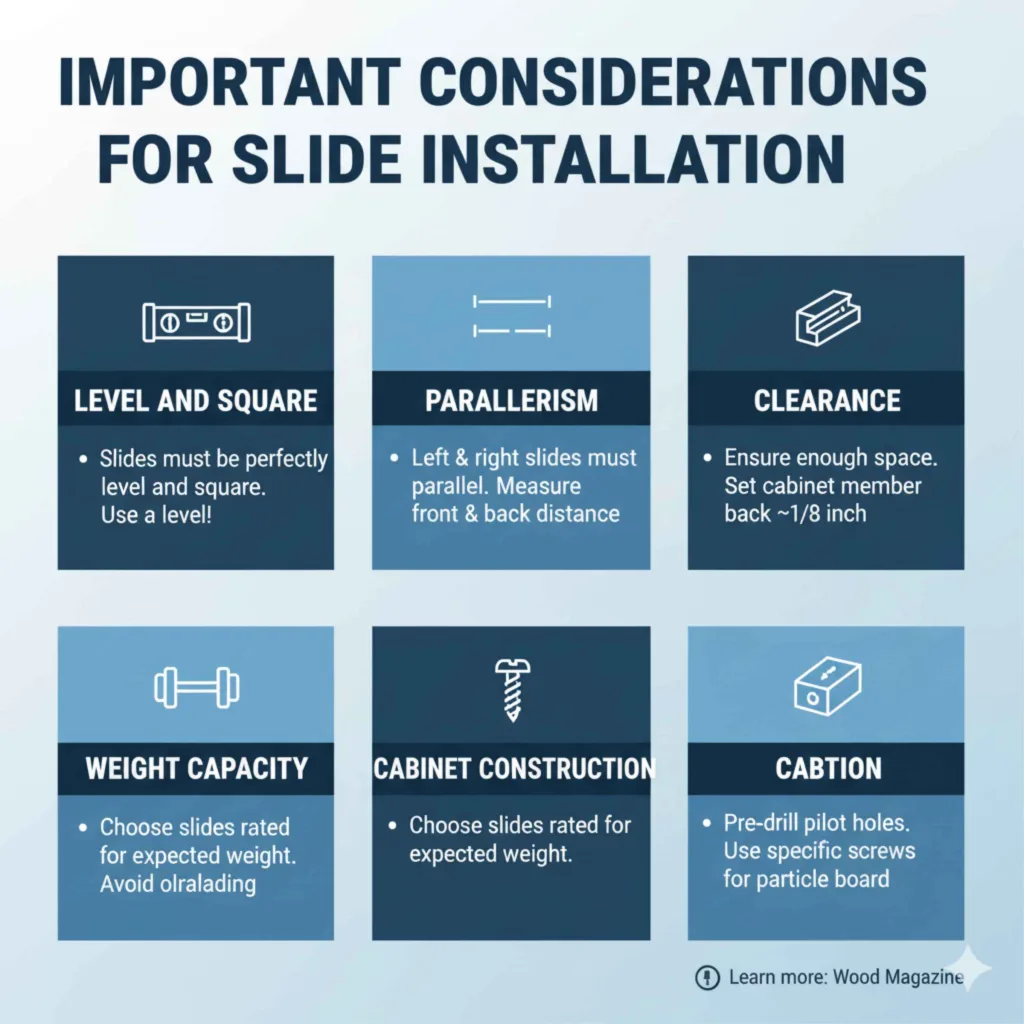
Important Considerations for Slide Installation
Getting drawer slides installed correctly is key to them working well. Here are a few things to keep in mind:
- Level and Square: The slides themselves (both cabinet members and drawer members) must be perfectly level and square. If they are even slightly off, the drawer will bind, stick, or not extend/retract smoothly. Use a level!
- Parallelism: The left and right slides must be perfectly parallel to each other. Measure the distance between them at the front and back to ensure consistency.
- Clearance: Ensure there’s enough clearance. New slides need space to travel. The cabinet member should usually be set back a tiny bit from the face frame (around 1/8 inch) to prevent rubbing.
- Weight Capacity: Choose slides rated for the weight you expect to put in the drawer. Overloaded slides will not function properly and can break.
- Cabinet Construction: The material of your cabinet (particle board, plywood, solid wood) will affect how well screws hold. Pre-drilling appropriate pilot holes for your material is essential. For particle board, use specific screws or inserts if possible. Learn more about cabinet construction basics from resources like Wood Magazine.
Troubleshooting Common Issues
Even with careful installation, you might run into a snag. Here’s how to deal with common problems:
- Drawer Sticks: Almost always means the slides aren’t perfectly parallel, level, or square. Double-check your measurements and installation. Sometimes a slightly bent slide can also cause this.
- Drawer Won’t Close Fully: This could be an obstruction, or the slides might be at an angle causing them to bind at the end of their travel.
- Slides Are Loose: Ensure all screws are tightened securely into the cabinet and drawer. If the material is soft, screws might strip.
- Ball Bearings Falling Out: If you disassembled ball-bearing slides improperly, bearings can fall out. Many modern slides have captive bearings or come with instructions on how to separate and reassemble them without losing parts. If bearings are lost, the slide will likely not function correctly.
Can I Safely Extend Existing Drawer Slides?
Yes, in some cases, it’s possible to add a few inches of extension to existing drawer slides using extension brackets. However, the most effective and reliable way to significantly extend drawer slide travel is to replace the existing slides with longer ones that are designed for full or 100% extension. This ensures smooth operation and proper support.
FAQ: Your Drawer Slide Questions Answered
Q1: How much longer can I realistically make my drawer slides?
A: When replacing slides, you can often extend them to be as long as the cabinet opening minus about 2 inches. This means if your cabinet is 20 inches deep, you could potentially use 18-inch slides for near full extension. Using extension brackets usually adds only a few inches.
Q2: Do I need special tools to remove drawer slides?
A: Typically, no. A standard screwdriver set is usually all you need for screws. Some slides have release levers that might need a small flathead screwdriver or just your finger to operate. Safety glasses are a good idea.
Q3: My drawer slides have a lot of play or wobble. What’s wrong?
A: Wobble often means the slides aren’t installed perfectly parallel to each other or that the screws have loosened. Ensure they are securely fastened and that the left and right slides are the same distance apart at the front and back.
Q4: Can I use a longer slide than the cabinet depth?
A: No, you must choose slides that are shorter than the interior depth of your cabinet opening. The slide mechanism itself takes up space, and you need a little clearance at the back and the front for proper function.
Q5: Will extending my drawer slides make them weaker?
A: Replacing with high-quality, correctly rated longer slides will not make them weaker; in fact, they might be stronger and smoother. Using add-on extension brackets can potentially reduce weight capacity or stability, so choose carefully.
Q6: How do I know if I have ball-bearing slides?
A: Ball-bearing slides usually have a distinct set of channels with visible ball bearings running between them. They typically extend the furthest (75-100%) and offer the smoothest action. Roller slides will have wheels, and friction slides will just be two flat metal pieces rubbing together.
Conclusion
Fixing and extending your drawer slides might sound like a daunting task, but as we’ve seen, it’s a very achievable DIY project. By understanding the different types of slides, using the right tools, and following a methodical approach, you can dramatically improve the functionality of your drawers. Whether you choose to replace your old slides with longer, smoother ball-bearing ones for maximum extension or employ a simpler bracket fix, the result is the same: easier access, better organization, and the satisfaction of a job well