
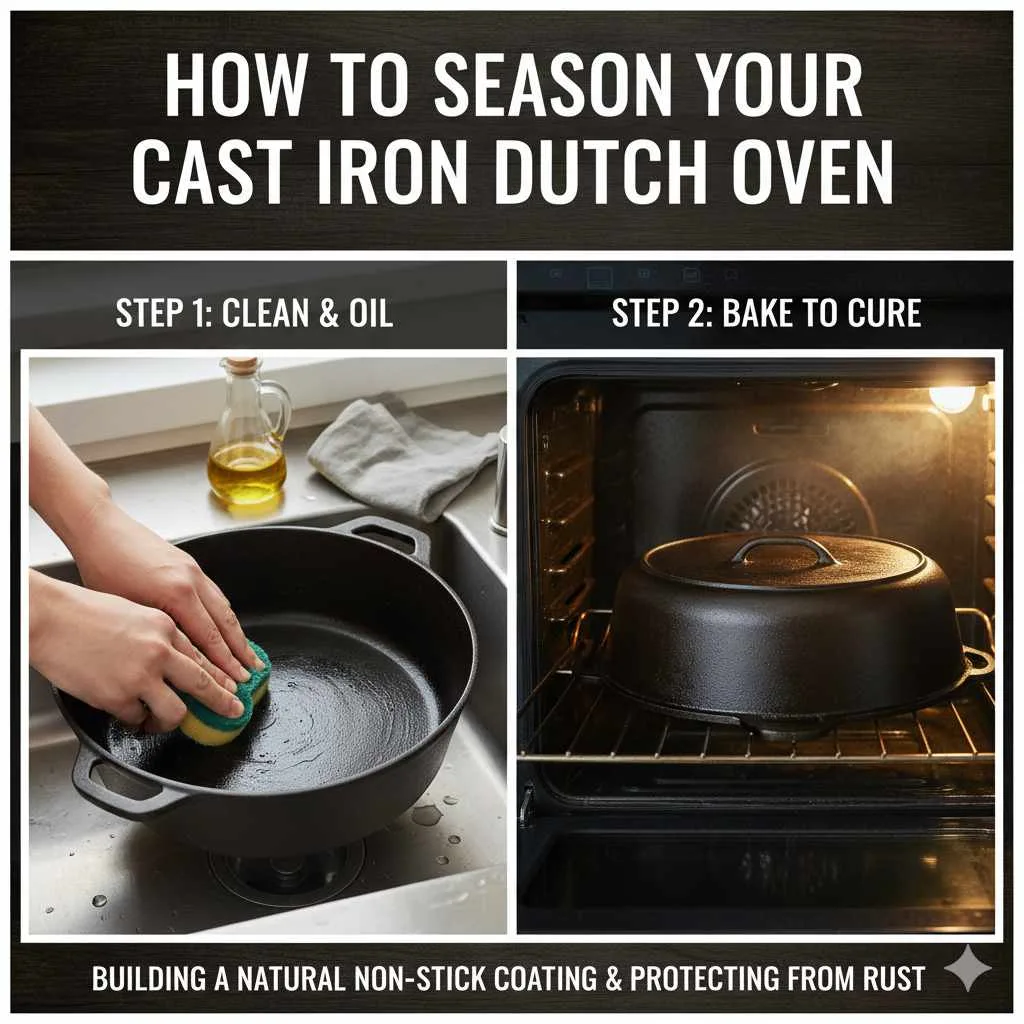
To season a Dutch oven, apply a thin layer of cooking oil to all its surfaces, bake it upside down in a hot oven for an hour, and repeat the process a few times. This creates a natural, non-stick surface that prevents rust and improves cooking performance, making your Dutch oven a joy to use for years to come.
Is your beautiful new Dutch oven looking a little… bare? Or perhaps you’ve inherited a cast iron gem that’s seen better days? Don’t worry! Getting your Dutch oven ready for its culinary adventures, or restoring it to its former glory, is simpler than you might think. Many home cooks feel a little intimidated by cast iron, but seasoning it is a key step that unlocks its full potential. It’s not about being a professional chef; it’s about giving your beloved pot the care it deserves.
Think of seasoning as giving your Dutch oven a protective shield. This process builds up a natural, non-stick surface that gets better with every use. It also prevents that unwelcome guest, rust, from making an appearance. We’re going to walk through this step-by-step, making it easy to understand and follow. By the end, you’ll have a seasoned Dutch oven ready to braise, bake, and serve up some delicious meals!
Why Seasoning Your Dutch Oven Matters
Seasoning might sound like a fancy cooking term, but for a Dutch oven, it’s foundational. It’s the process of baking oil into the metal. This isn’t just about making food slide off easily; it’s about protecting your investment and enhancing its performance. Let’s break down the “why”:
- Natural Non-Stick Surface: Over time, repeated seasoning builds up a layer of polymerized oil. This layer acts like a natural Teflon, making it easier to cook delicate foods without sticking.
- Rust Prevention: Cast iron can rust if exposed to moisture. Seasoning creates a barrier that repels water, keeping your Dutch oven pristine.
- Improved Cooking: A well-seasoned Dutch oven heats more evenly, leading to better cooking results.
- Longevity: Proper seasoning is crucial for the longevity of your Dutch oven. It ensures that it can be passed down through generations, becoming a treasured family item.

What Kind of Dutch Oven Needs Seasoning?
This is a great question, and the answer depends on the material of your Dutch oven:
- Enameled Cast Iron Dutch Ovens: These are the ones you often see in vibrant colors. The enamel coating is a glassy layer that is already non-stick and rust-resistant. Therefore, enameled Dutch ovens do NOT need to be seasoned. In fact, seasoning them can damage the enamel. Stick to gentle cleaning and direct cooking!
- Bare (Un-enameled) Cast Iron Dutch Ovens: These are typically black and have a matte finish. This is the type of Dutch oven that absolutely requires seasoning. Whether it’s brand new or a seasoned veteran that needs a refresh, seasoning is your friend.
So, if you have a beautiful, glossy interior in your Dutch oven, you can skip this whole process! If it’s raw, dark metal, then let’s get ready to season!
Essential Tools and Materials You’ll Need
Before we dive into the steps, let’s gather what you’ll need. Having everything ready makes the process smooth and enjoyable:
- Bare Cast Iron Dutch Oven: Of course!
- Dish Soap: Just a small amount for the initial cleaning.
- Stiff Brush or Scrubber: For cleaning away any factory coating or residue.
- Clean, Lint-Free Cloths or Paper Towels: For applying oil and wiping away excess.
- High Smoke Point Cooking Oil: This is key! Great options include:
Grapeseed oil
Flaxseed oil (though it can be prone to flaking if not done perfectly)
Canola oil
Vegetable oil
Shortening
Avoid olive oil, as its smoke point is too low. For more on oils and their smoke points, check out resources like Food Network’s guide on oil smoke points. - Aluminum Foil: To catch any drips in the oven.
- Oven Mitts: For safe handling of a hot Dutch oven.
Step-by-Step Guide: How to Season a Bare Cast Iron Dutch Oven
Ready to give your bare cast iron Dutch oven the care it deserves? Follow these simple steps. We’ll cover seasoning a new pot and re-seasoning an older one.
Step 1: Initial Cleaning (For New Dutch Ovens)
Most new bare cast iron Dutch ovens come with a protective coating from the manufacturer. You need to remove this before you start seasoning.
- Rinse the Dutch oven under warm water.
- Use a small amount of dish soap and a stiff brush or scrubber to clean the entire interior and exterior of the pot. Don’t be afraid to scrub a bit to remove any waxy residue.
- Rinse thoroughly with warm water.
- Dry the Dutch oven IMMEDIATELY and completely with a clean, lint-free cloth. Cast iron can rust quickly, so this is a critical step. You can even place it on a warm stovetop for a few minutes to ensure every bit of moisture is gone.
Step 2: Applying the Oil
Now, let’s get to the actual seasoning. This is where the magic happens!
- Ensure your Dutch oven is completely dry.
- Pour a small amount of your chosen high smoke point oil into the Dutch oven (about a tablespoon).
- Using a clean, lint-free cloth or paper towel, spread a VERY thin, even layer of oil all over the interior cooking surface, the lid, and the exterior. You want to coat every nook and cranny.
- Here’s the crucial part: Using a clean part of the cloth or a new paper towel, wipe off the oil as if you’re trying to remove it all. You want just a microscopic layer left behind. Too much oil will result in a sticky, uneven seasoning.
Step 3: Baking the Dutch Oven
It’s oven time! This step requires patience and a hot oven.
- Preheat your oven to a high temperature. A common recommendation is between 400°F and 500°F (200°C and 260°C). The exact temperature can depend on your oil’s smoke point, but generally, the higher the better for polymerization.
- Prepare your oven by lining the bottom rack with aluminum foil. This will catch any potential oil drips and make cleanup easier.
- Place the Dutch oven UPSIDE DOWN on the middle rack of the preheated oven. If you’re seasoning the lid separately, place it upside down on the top rack or on a separate baking sheet. Placing them upside down helps any excess oil drip away, preventing pooling.
- Bake for at least 1 hour. You will likely notice some smoke and smell as the oil polymerizes. This is normal, but ensure your kitchen is well-ventilated (open a window or turn on the vent fan).
Step 4: Cooling and Repeating
Patience is a virtue, especially when it comes to seasoning cast iron.
- After 1 hour, turn off the oven.
- Leave the Dutch oven inside the oven to cool down completely. This gradual cooling prevents thermal shock, which could crack the cast iron.
- Once completely cool, check the surface. It should have a slightly darker, matte sheen.
- Repeat steps 2 through 4 at least 2-3 more times. For a really robust seasoning, you might repeat it 5-6 times. The more layers you build, the more durable and non-stick your Dutch oven will become.
Maintaining Your Seasoned Dutch Oven
Seasoning is not a one-time event; it’s an ongoing process to keep your Dutch oven in prime condition. Here’s how to maintain that beautiful seasoning once it’s established:
Cleaning After Use
- Avoid Harsh Soaps: For regular cleaning after use, avoid using dish soap, especially in large quantities, as it can strip away the seasoning. A quick rinse with hot water and a gentle scrub with a brush or sponge is usually sufficient.
- Scrape Gently: If food is stuck, use a wooden spoon or a nylon scrubber. Avoid metal utensils that can scratch the seasoning.
- Immediate Drying: This is non-negotiable. Wash and dry your Dutch oven immediately after use, ensuring no moisture remains. Placing it on a warm stovetop for a few minutes is an excellent way to ensure it’s bone dry.
- Light Oiling: After drying, apply a very thin coat of cooking oil to the interior surface with a paper towel. This helps protect the seasoning and prevent rust.
Storage
Store your Dutch oven in a dry place. If you store the lid on, place a paper towel between the lid and the pot to allow air circulation and absorb any residual moisture.
Re-Seasoning When Needed
Over time, especially if you’ve accidentally used too much soap, cooked acidic foods, or notice rust spots, your seasoning might start to wear off. Don’t panic! You can easily re-season your Dutch oven by following the steps outlined above, starting with a thorough scrubbing to remove any rust or uneven patches.
Troubleshooting Common Seasoning Issues
Even with the best intentions, things can sometimes go awry. Here are some common problems and how to fix them:
Sticky or Gummy Surface
Cause: Too much oil was applied during seasoning, and it didn’t fully polymerize.
Solution: The easiest fix is to bake the Dutch oven again at a high temperature (450-500°F / 230-260°C) for an hour, upside down, to burn off the excess oil. You might need to do this a couple of times. Afterward, reapply a very thin layer of oil and bake again. If it’s severely sticky, you might need to scrub it down with steel wool and start the seasoning process over.
Uneven Color or Patchiness
Cause: Inconsistent oil application or oven hot spots.
Solution: This is usually cosmetic and doesn’t affect performance. Over time and with continued use, the patches will even out. If it bothers you, you can try re-seasoning, paying extra attention to ensuring a uniform, paper-thin oil application and rotating the pot during baking.
Rust Spots
Cause: The Dutch oven was not dried completely, was stored in a humid environment, or the seasoning wore off.
Solution: For light rust, scrub the affected area with steel wool or a stiff brush until the rust is gone. Wash, dry thoroughly, and then re-season that area (or the entire pot) according to the instructions. For heavy rust, you might need to soak the affected area in a mild vinegar solution for a short period, scrub, rinse, dry, and then proceed with re-seasoning. You can find more detailed rust removal tips from resources like the National Park Service on cast iron care.
Food Sticking
Cause: Insufficient seasoning, seasoning has worn off, or cooking at too low a temperature for certain foods.
Solution: Ensure your Dutch oven is well-seasoned. If it’s continually sticking, it’s time for a re-seasoning session. Also, ensure you’re preheating your pan adequately before adding food. Sometimes, a tiny amount of oil or fat added during cooking can help, even in a well-seasoned pot.

Quick Comparison: Bare vs. Enameled Cast Iron Durability
To recap and help you identify your Dutch oven type, here’s a quick look at their characteristics:
| Feature | Bare Cast Iron Dutch Oven | Enameled Cast Iron Dutch Oven |
|---|---|---|
| Seasoning Required? | Yes, essential for non-stick and rust prevention. | No, enamel is a pre-applied non-stick coating. |
| Surface Feel | Slightly rough, matte finish. | Smooth, glossy, porcelain-like finish. |
| Rust Susceptibility | High if not seasoned and dried properly. | Very Low; enamel protects the iron. |
| Food Sticking | Can vary; improves with seasoning and use. | Very low; naturally non-stick. |
| Cleaning | Gentle scrubbing, minimal soap, immediate drying. | Dishwasher safe (check manufacturer), can use soap, less concern about immediate drying. |
| Ideal For | Robust cooking, searing, deep frying, camping. | Braising, simmering, acidic sauces, elegant presentation. |
| Maintenance | Requires regular seasoning and care. | Minimal maintenance beyond cleaning. |
Frequently Asked Questions (FAQ)
Q1: How often should I season my bare cast iron Dutch oven?
A1: If your Dutch oven is new, season it 3-5 times before its first use. After that, re-season it whenever you notice the surface looking dull, food starts sticking, or you see rust spots. Regular cooking, especially with fatty foods, enhances the seasoning over time.
Q2: Can I season my Dutch oven on the stovetop?
A2: Yes, you can do a stovetop seasoning, which is good for touch-ups. Heat the oven to medium-high, apply a thin layer of oil, and rub it in until it just begins to smoke. Let it cool and repeat. However, for a thorough, even, and durable seasoning, oven seasoning is generally more effective.
Q3: My Dutch oven feels rough after seasoning. Is that normal?
A3: A perfectly seasoned cast iron surface isn’t perfectly smooth like non-stick pans. It should feel slightly textured but not sticky or rough like sandpaper. If it feels excessively rough or bumpy, you may have applied too much oil or not wiped it off sufficiently. Try baking it at a high temperature to cure the oil, then wipe it down while still warm.
Q4: Can I cook acidic foods like tomato sauce in my bare cast iron Dutch oven?
A4: It’s generally recommended to avoid cooking highly acidic foods in a bare cast iron Dutch oven for extended periods, especially when the seasoning is new or light. Acidity can break down the seasoning over time, leading to a metallic taste in your food and potentially exposing the iron to rust. Enameled Dutch ovens are perfect for acidic dishes.
Q5: What’s the difference between seasoning and cooking with oil?
A5: Seasoning is the process of baking thin layers of oil into the pores of the cast iron at high temperatures, causing the oil to polymerize and become a hard, non-stick layer. Cooking with oil is simply using oil as a cooking medium. While cooking with oil helps maintain and build seasoning slightly, it’s not a substitute for the rigorous oven seasoning process.
Q6: My seasoned Dutch oven has a black residue when I wipe it. Is that bad?
A6: A little bit of black residue can be normal, especially when the seasoning is new. It’s usually just excess seasoning or carbonized food particles. Wipe it away with a clean cloth. If you get a lot of black gunk, it might indicate that the seasoning isn’t fully polymerized or that you’re using too much soap during cleaning.
Conclusion
Taking the time to season your bare cast iron Dutch oven is a rewarding endeavor. It transforms a raw piece of metal into a remarkably versatile, durable, and beloved cooking tool that brings warmth and flavor to your kitchen. From those initial cleaning steps to the repeating rounds in the oven, each part of the process contributes to a beautiful, natural non-stick surface that gets better with age.
Remember, whether you have a brand-new pot or one that needs a little TLC, the seasoning process is within your reach. And for those gorgeous enameled Dutch ovens, no seasoning needed – just pure cooking joy! With these essential tips and a little patience, your Dutch oven will be ready to tackle everything from comforting stews and hearty roasts to crusty bread and delightful desserts. Happy cooking!


Leave a Reply