Tired of worrying about your motorcycle bouncing around on the trailer? Tying it down securely is simpler than you think! This guide provides clear, step-by-step instructions and essential tips to ensure your bike arrives safely and without damage. You’ll learn the right tools and techniques to confidently transport your motorcycle, making your journey worry-free.
A motorcycle is more than just a machine; it’s a symbol of freedom and adventure. When it’s time to move it, whether it’s to a new home, a race, or a faraway adventure spot, the way you secure it matters immensely. We’ve all heard stories or seen pictures of bikes that didn’t travel well, resulting in costly repairs and a lot of frustration. The thought of your prized possession shifting or tipping during transit can be a real worry, especially if you’re new to trailering. But here’s the good news: with the right knowledge and a few simple tools, safely tying down your motorcycle on a trailer is entirely achievable. This guide is designed to demystify the process, offering clear, actionable steps that even a beginner can follow with confidence. We’ll walk you through everything you need to know, from choosing the right gear to the best methods for securing your bike, ensuring it arrives at its destination just as beautifully as it left.
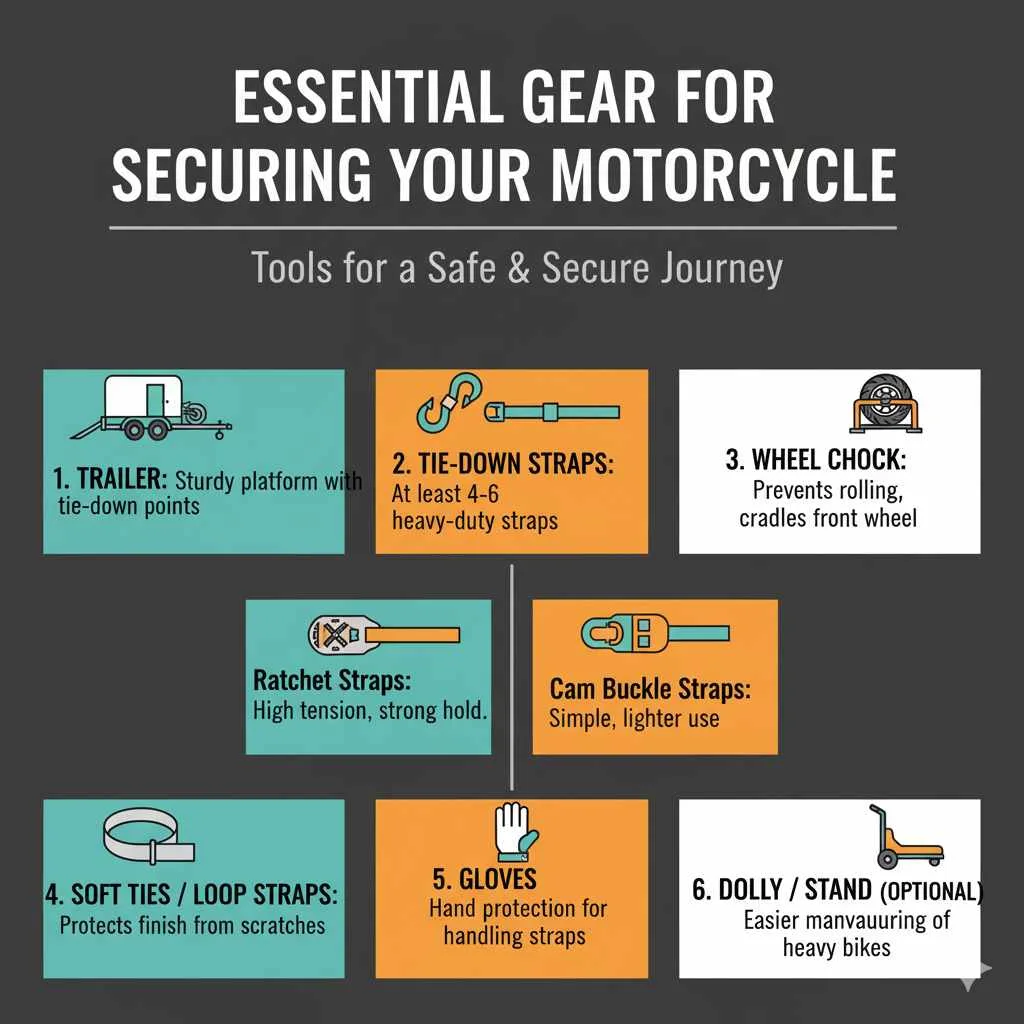
Essential Gear for Securing Your Motorcycle
Before you even think about loading your motorcycle, gathering the right equipment is key. Using the proper tools will not only make the job easier but, more importantly, will ensure your bike stays put and is protected. It’s like choosing the right paintbrushes for a masterpiece – the tools make all the difference in the final outcome!
Here’s what you’ll need:
Trailer: A sturdy trailer designed for motorcycle transport is ideal. Look for one with a good weight capacity and a stable deck. Some trailers come with built-in wheel chocks and tie-down points, which are a bonus!
Tie-Down Straps: This is arguably the most crucial item. You’ll need at least four, preferably six, heavy-duty motorcycle tie-down straps.
Ratchet Straps: These are excellent for beginners as they offer strong tension and are easy to use. Look for straps with a weight rating well above your motorcycle’s weight. A rating of at least 1000 lbs per strap is a good starting point, but higher is always better for peace of mind.
Cam Buckle Straps: These are lighter and simpler to use than ratchet straps, but they don’t provide the same level of tension. They are best used in conjunction with other securing methods.
Wheel Chock: A good wheel chock is a game-changer. It’s a device that cradles the front wheel, preventing the motorcycle from rolling forward or backward. You can get standalone chocks that bolt to the trailer or a chock that is integrated into a drag-bar system.
Soft Ties or Loop Straps: These are protective fabric loops that wrap around frame components or handlebars to prevent the tie-down straps from scratching or damaging your motorcycle’s finish or delicate parts.
Dolly or Motorcycle Stand (Optional): For some motorcycles, especially heavier ones, a stand or a dolly can help you maneuver and position the bike on the trailer more easily before securing it.
Gloves: Protecting your hands is always a good idea when working with tie-down straps and metal components.
Step-by-Step: How to Tie Down Your Motorcycle Like a Pro
Even if this is your first time, following these steps will give you the confidence to secure your ride properly. Think of it like arranging your furniture for a beautiful, functional living space – placement and support are everything!
Step 1: Prepare Your Trailer
Clean the trailer deck to remove any debris that could cause a slip or damage your tires. Ensure all your tie-down points are secure and in good condition. If you have removable tie-down points, place them strategically where they will provide the best leverage and support for your bike.
Step 2: Position the Motorcycle
Carefully ride or push your motorcycle onto the trailer. If using a wheel chock, position it so the front tire is snugly secured within it. The motorcycle should be centered on the trailer for balanced weight distribution. If you’re not using a chock, ensure the bike is upright and stable before proceeding. It’s often easiest to have a helper guide you or even push the bike if you’re not comfortable riding it on.
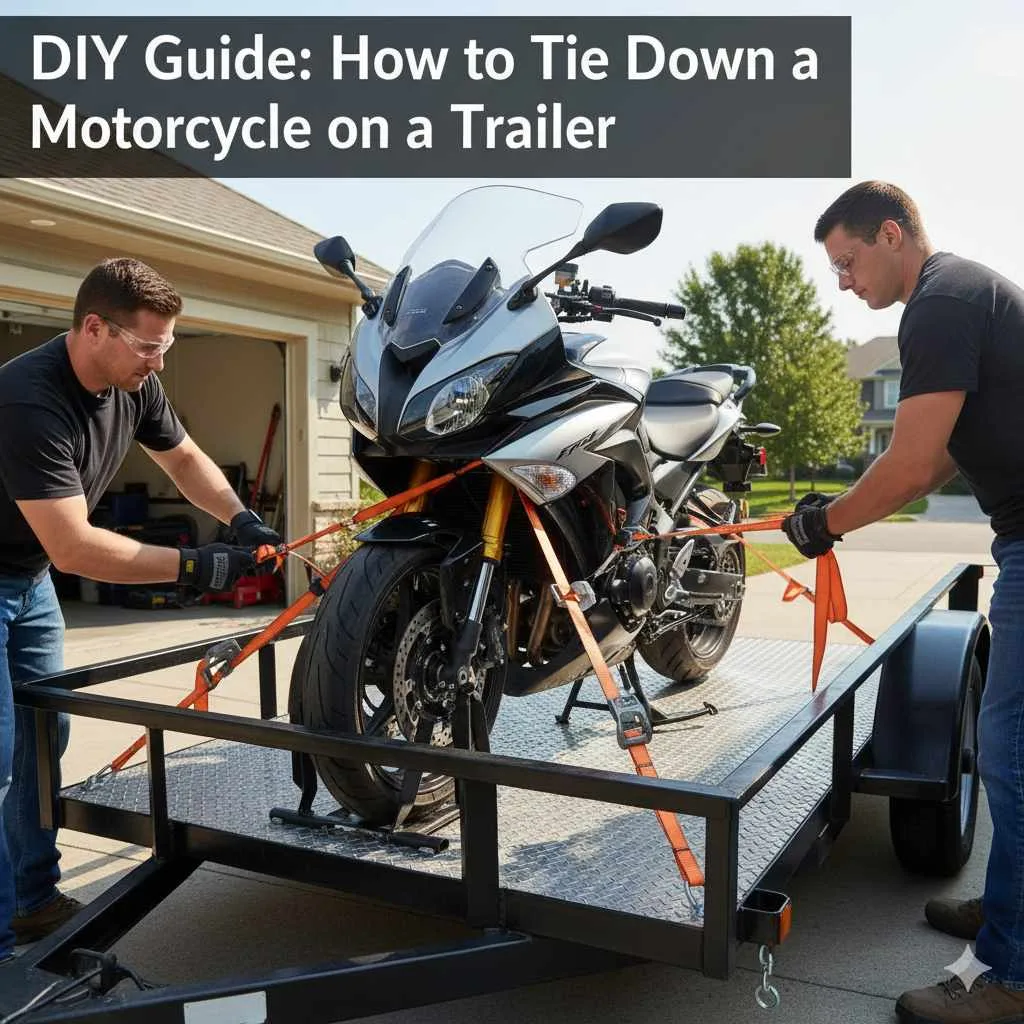
Step 3: Attach the Front Tie-Downs
This is where the magic happens! You’ll want to create a secure “X” pattern with your tie-downs.
1. Find Anchor Points: Locate strong, non-movable parts of your motorcycle’s frame or triple tree for the front tie-downs. Avoid attaching to handlebars if they are not directly mounted to the triple tree, as they can bend. The triple tree itself or the frame just below it are ideal.
2. Use Soft Ties: Wrap your soft ties around the chosen anchor points (like the forks or the frame just below the triple tree). This protects your motorcycle’s finish.
3. Connect the Straps: Clip your ratchet straps to these soft ties.
4. Attach to Trailer: Connect the other end of the ratchet straps to secure tie-down points on the trailer, ideally located forward and slightly outward from the motorcycle. This creates a downward and outward pull.
5. Tension Gradually: Begin tightening the ratchet straps, ensuring you apply even pressure on both sides. You want the front suspension to compress slightly – about one-third to one-half of its travel. This compression is what holds the bike stable. This is a key principle: you’re not just holding it, you’re using the bike’s own suspension to keep it firmly planted.
Step 4: Secure the Rear Tie-Downs
While the front tie-downs do the heavy lifting of keeping the bike from moving forward, rear tie-downs add crucial stability and prevent side-to-side wobble.
1. Find Anchor Points: Look for sturdy points on the rear frame or passenger footpeg mounts. Avoid tying to plastic bodywork or the license plate bracket.
2. Use Soft Ties: Again, use soft ties to protect your bike’s finish.
3. Connect and Tension: Attach your remaining tie-down straps to these points and then to secure tie-down points on the rear of the trailer. These straps should typically be pulled slightly backward and outward.
4. Apply Moderate Tension: The rear tie-downs don’t need as much tension as the front. Their primary job is to prevent any lateral movement, so just enough to keep the rear stable is sufficient.
Step 5: Double-Check Everything
This is a non-negotiable step. A quick walk-around might seem like enough, but a thorough check is vital for true peace of mind.
Strap Condition: Ensure no straps are twisted or rubbing against sharp edges.
Tightness: Give each strap a good tug. They should feel taut and secure.
Bike Stability: Gently try to rock the motorcycle. It should feel solid with minimal side-to-side or front-to-back play.
Wheel Chock: Confirm the front tire is firmly seated in the chock.
Trailer Lights: If you’re towing on public roads, make sure all your trailer lights are working correctly. Check out resources from the National Highway Traffic Safety Administration (NHTSA) for general towing safety guidelines.
Step 6: The Initial Test Drive
Before embarking on a long journey, it’s wise to conduct a short test drive, ideally on slower, less trafficked roads. Drive for about 15-30 minutes, then pull over at a safe spot and re-check all your tie-downs. You might find that some straps have loosened slightly due to the initial settling of the suspension. Re-tension them as needed.
Pro Tips for Superior Motorcycle Trailering
As with any home project or DIY endeavor, a few extra touches can elevate your results from good to outstanding. These tips are like adding decorative pillows and throws to a new sofa – they refine the whole look and feel!
Use Six Straps: While four straps are the minimum, using six offers superior security. Two on the front forks, two on the rear frame, and two on the handlebars can provide exceptional stability.
Distribute Tension Evenly: Always aim for equal tension on opposing straps. This prevents uneven pressure on the motorcycle’s frame or suspension.
Never Tie to Moving Parts: Avoid attaching straps to suspension components that are designed to move freely, unless you are specifically compressing the suspension as part of the tie-down process (like with the front forks).
Protect Your Motorcycle: Always use soft ties or protective padding where straps meet your bike’s paint, chrome, or delicate parts.
Consider a Trailer Salt Guard: If you’re traveling in winter or through areas where salt is used on roads, a salt guard or shield for the front of your trailer can prevent corrosive salts from damaging your motorcycle.
Regularly Inspect Tie-Down Straps: Over time, straps can fray or get damaged by UV light. Before each use, inspect them for wear and tear. Replace any straps that show signs of damage. Reputable manufacturers often have detailed care and maintenance guides for their products.
Weight Distribution is Key: Ensure your motorcycle is balanced on the trailer. If you’re transporting multiple bikes, position them to distribute the weight evenly.
Consider a Motorcycle Docking System: For frequent transporters, a docking system like the Condor Pit Stop or similar can offer an even more secure and easier way to load and tie down your bike, often just requiring one or two straps as secondary security.
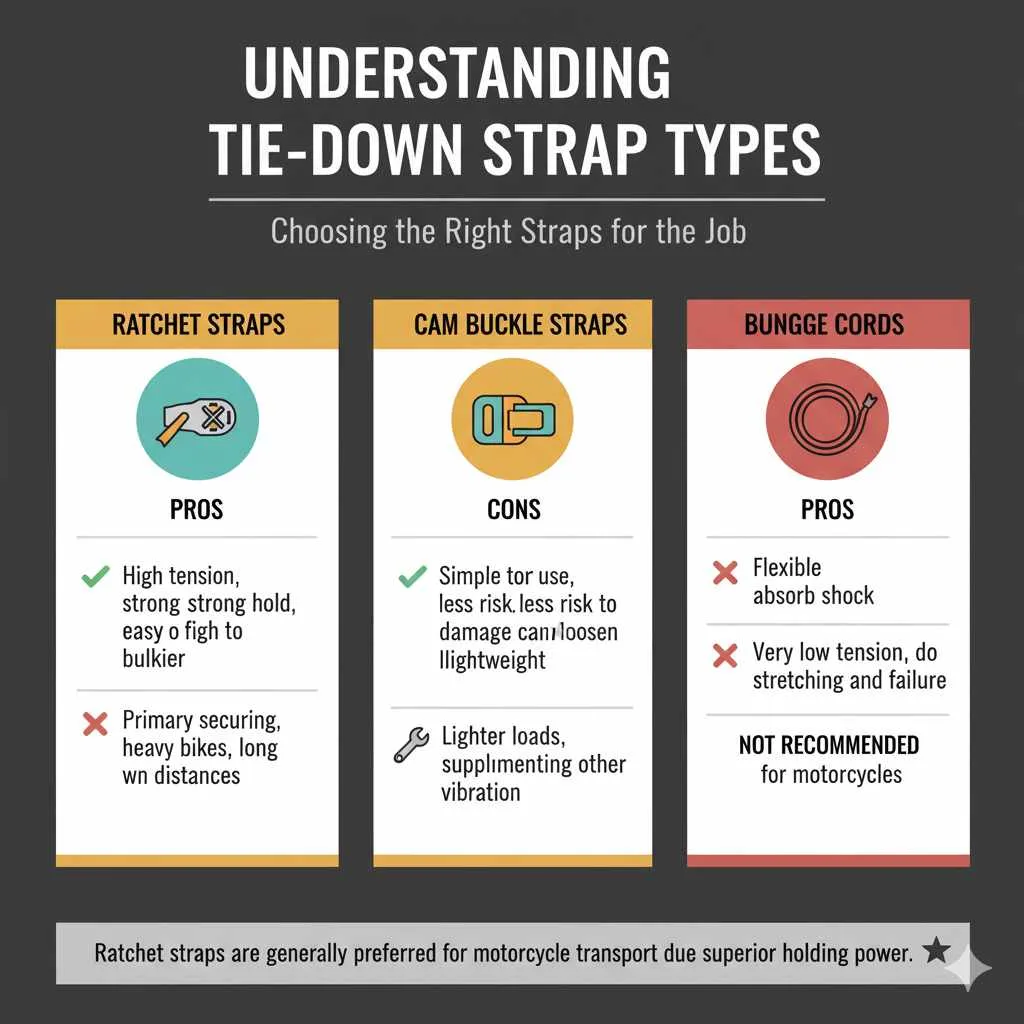
Understanding Tie-Down Strap Types
Not all tie-down straps are created equal. Knowing the differences can help you choose the best ones for your needs, much like selecting the right fabric for a custom upholstery project.
| Strap Type | Pros | Cons | Best Use Cases |
| :————- | :———————————————————————— | :——————————————————————————— | :————————————————————————— |
| Ratchet Straps | High tension, strong hold, easy to tighten securely. | Can overtighten and damage components if not careful, can be bulkier. | Primary securing for fronts and rears; ideal for heavy bikes and long distances. |
| Cam Buckle Straps | Simple to use, less risk of overtightening and damage, lightweight. | Lower tension capacity, can loosen over time with vibration, requires constant checks. | Securing lighter loads, supplementing other straps, securing items on top of other cargo. |
| Bungee Cords | Flexible, absorb shock well, inexpensive. | Very low tension, prone to stretching out and failure, not suitable for heavy loads. | Not recommended for securing motorcycles on a trailer, maybe for very light, secondary items. |
For motorcycle transport, ratchet straps are generally the preferred choice due to their superior holding power and adjustability. However, using a combination of strap types can sometimes be beneficial if done correctly.
FAQs: Your Motorcycle Tie-Down Questions Answered
Here are some common questions beginners have about safely transporting their motorcycles.
Q1: How many tie-down straps do I really need?
A: For most motorcycles, a minimum of four heavy-duty straps is recommended. Two each for the front and two for the rear. However, using six straps (two on the front, two on the rear, and two on the handlebars) provides the most secure setup and is highly recommended for peace of mind.
Q2: Where are the best places to attach straps on my motorcycle?
A: For the front, aim for the triple tree, forks, or sturdy frame parts just below the triple tree. Use soft ties to protect these areas. For the rear, look for subframe components or strong frame rails. Avoid plastic body panels, exhaust pipes, or anything that might bend or break.
Q3: How tight should I make the straps?
A: The front straps should compress the front suspension by about one-third to one-half of its travel. This is crucial because the compressed suspension helps hold the bike in place. The rear straps need to be snug enough to prevent side-to-side movement but don’t require significant tension.
Q4: What’s the difference between a wheel chock and just tying it down?
A: A wheel chock is a device that physically holds the front wheel in place, preventing the motorcycle from rolling. Tie-down straps secure the bike to the trailer frame. Using both a wheel chock and* tie-down straps is the safest and most effective method for motorcycle transport.
Q5: Can I use bungee cords to tie down my motorcycle?
A: Absolutely not. Bungee cords stretch, can break under load, and do not provide the consistent, strong tension required to safely secure a motorcycle. Stick to purpose-built ratchet or cam buckle tie-down straps.
Q6: Do I need to tie down my motorcycle on a trailer if I’m only going a short distance?
A: Yes, it’s always recommended. Even short trips can involve bumps, swerves, or sudden stops that can cause an unsecured motorcycle to shift, potentially leading to damage or an accident. Safety first, always!
Q7: How often should I check my tie-down straps while driving?
A: It’s a good practice to check your tie-downs at the first stop after about 15-30 minutes of driving, and then again at regular intervals during longer trips, especially after hitting rough roads or significant changes in speed. Also, give them a visual inspection before every use.
Conclusion: Ride with Confidence
Transporting your motorcycle doesn’t have to be a stressful ordeal. By understanding the importance of the right gear and following these straightforward steps, you can ensure your bike is secured safely and reliably. Remember those key elements: a sturdy trailer, good quality tie-down straps (with soft ties!), a reliable wheel chock, proper placement, and gradual tensioning. The peace of mind you gain from knowing your motorcycle is held firmly in place is invaluable. Take your time, double-check your work, and always prioritize safety. With this knowledge, you’re well-equipped to get your motorcycle to its destination in perfect condition, ready for its next adventure. Happy trails!