Easily tie down your kayak securely for transport with the essential cam strap method. This step-by-step guide using simple tools ensures your kayak stays put on your vehicle, giving you peace of mind on every adventure.
Ever worried about your kayak shifting during a drive? It’s a common concern, but thankfully, securing your kayak doesn’t have to be complicated. With the right approach, you can feel confident that your beloved boat is safe and sound. This guide breaks down the essential method for tying down a kayak, making it simple for anyone to master.
We’ll walk you through each step, making sure you have all the information you need. Get ready to transport your kayak with ease and enjoy your paddling trips even more!
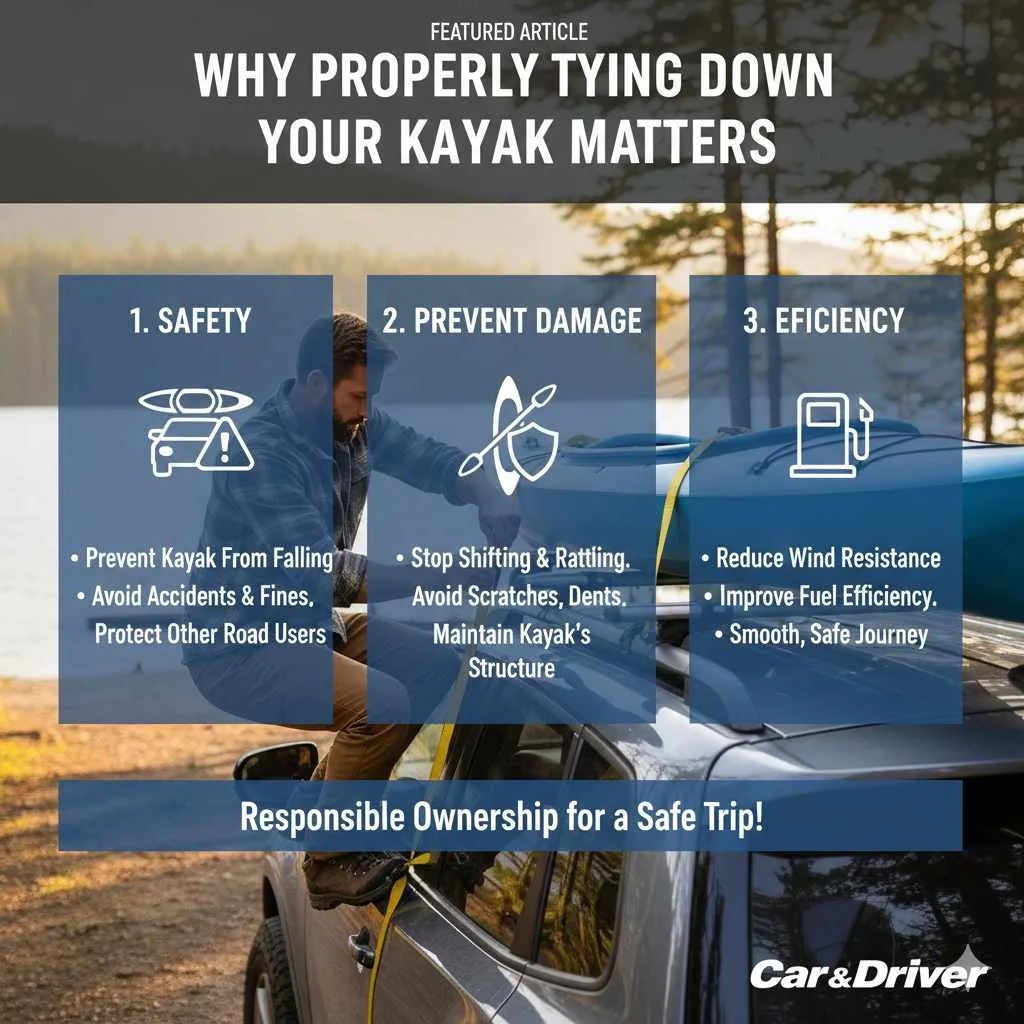
Why Properly Tying Down Your Kayak Matters
Transporting a kayak might seem straightforward, but improper tie-downs can lead to a variety of problems. The most obvious is the risk of your kayak becoming loose and falling off your vehicle, which is incredibly dangerous for you and other road users. A loose kayak can cause accidents, significant damage to your vehicle and the kayak, and heavy fines.
Beyond safety, correctly tied-down kayaks are less likely to be damaged during transit. Shifting and rattling can cause scratches, dents, and structural stress to your kayak’s hull. A secure tie-down also reduces wind resistance, which can improve your vehicle’s fuel efficiency. Think of it as protecting your investment and ensuring your kayak is ready for its next adventure without any post-trip repairs.
This isn’t just about following rules; it’s about responsible ownership and ensuring every outing starts and ends smoothly and safely. Let’s explore the best way to achieve this.
Essential Gear for Tying Down Your Kayak
Before you start, gather the right tools. Having these on hand will make the process smooth and efficient. You won’t need anything overly specialized, which is great news for beginners!
What You’ll Need:
- Cam Straps: These are the star of the show. Look for straps specifically designed for cargo, typically 1” or 1.5” wide and at least 6-10 feet long, depending on your vehicle and kayak size. They have a metal cam buckle that locks the strap securely.
- Crossbars or Roof Rack System: Essential for most vehicles. These securely attach to your car and provide a stable platform for your kayak. Ensure they are rated to carry the weight of your kayak.
- Bow and Stern Straps (Optional but Recommended): These add extra security, especially for longer distances or rougher roads. They attach from the front and rear of the kayak to secure points on your vehicle’s chassis or bumper.
- Padding (Optional): If your crossbars are hard or you’re transporting a delicate kayak, consider foam blocks or pipe insulation to cushion the hull.
- Gloves (Optional): Cam straps can sometimes be rough on your hands, especially when cinched down tightly.
Having good quality cam straps is key here. You want straps that are durable and have a reliable locking mechanism. For a reliable source for kayaking gear, check out reputable online retailers or your local outdoor adventure shop. For information on choosing a roof rack system that’s right for your car, resources like transportation.gov offer general guidance on safely transporting items.
The Essential Cam Strap Method: Step-by-Step
This method is the most common and effective way to tie down a kayak. It utilizes cam straps to cinch the kayak down tightly to your roof rack system. Let’s go through it together!
Step 1: Position Your Kayak on the Roof Rack
Carefully lift your kayak and place it onto your vehicle’s crossbars. For stability, it’s often best to place the kayak upside down (deck down) if the hull is rounded, or right-side up if the hull is flat. Ensure the kayak is centered on the rack system and is not overhanging too much on either side. A good starting point is to have equal overhang front and back, or slightly more overhang at the rear.
If you have a particularly long or heavy kayak, consider getting a friend to help you lift it. Proper lifting techniques can prevent injury and make the process much easier.
Step 2: Prepare the Cam Straps
Take one cam strap and thread its free end through the slot in one of the cam buckles. Make sure the strap is oriented so that when you pull it, the buckle will tighten and lock. The strap should feed through the buckle from the bottom up, then back through the top opening.
You’ll typically feed one end of the strap under your kayak’s hull and then loop it around the crossbar. Some roof rack systems have specific tie-down points, while others require you to loop the strap around the bar itself. Ensure the strap lies flat against the hull and doesn’t twist.
Step 3: Secure the First Cam Strap
Bring the free end of the strap up and over the kayak’s hull. Loop it around the crossbar on the other side if your rack system allows, or simply bring it towards the buckle. Pull the strap taut to remove any slack. Then, pull the free end of the strap firmly downwards. You should feel the cam buckle engage and tighten the strap around the crossbar and kayak. You want it snug, but not so tight that you’re deforming the kayak’s hull severely.
The goal is to create firm pressure that prevents the kayak from shifting. Listen for the buckle clicking or feeling the tension increase. If the strap feels loose, you haven’t tightened it enough. Many straps have a release mechanism on the buckle; familiarize yourself with how to loosen it for the next step.
Step 4: Repeat for the Second Crossbar
Now, grab your second cam strap and repeat the process for the other crossbar. Thread the strap through the buckle, position it so it goes under the kayak and over to the other side, and cinch it down firmly. Ensure both straps are equally tight and holding the kayak securely to the roof rack.
Check both straps to ensure they are tight and the buckles are properly engaged. The kayak should feel stable and not wiggle when you push on it.
Step 5: Add Bow and Stern Lines (Highly Recommended)
For maximum security, especially on longer trips or at higher speeds, bow and stern lines are a crucial addition. These lines run from the front (bow) and back (stern) of your kayak to strong anchor points on your vehicle.
For the Bow Line:
- Locate a secure attachment point on the front of your vehicle. This could be a dedicated tow hook, a stout piece of the frame, or a strong loop under the bumper. Avoid attaching to plastic parts.
- Loop one end of a bow line (a separate strap or rope, often with a carabiner or hook) through the bow handle of your kayak.
- Attach the other end of the line to your vehicle’s anchor point. Adjust the tension so it’s snug but not pulling the kayak forward forcefully.
This prevents the kayak from lifting up in the wind.
For the Stern Line:
- Repeat the process for the stern of the kayak, finding a secure attachment point on the rear of your vehicle.
- Connect the stern line to the rear handle of the kayak and the vehicle anchor point.
- Ensure both bow and stern lines are taut, providing a triangular support system for your kayak.
These lines significantly reduce stress on your main roof rack straps and provide an important safety backup.
You can find suitable bow and stern tie-down kits at most outdoor or marine supply stores. For guidance on identifying secure anchor points on your vehicle, consult your vehicle’s owner’s manual or a trusted automotive resource. The U.S. Department of Transportation’s Vehicle Safety resources are a good starting point for general knowledge about cargo.
Step 6: Final Check and Adjustments
Before you drive off, perform a thorough check. Gently rock the kayak from different angles. It should not slide or shift noticeably. Check the cam buckles to ensure they are still tight and haven’t loosened. Make sure no straps are dangling where they could get caught in the wheels or create excessive drag.
It’s also a good idea to re-tighten your straps after the first 15-30 minutes of driving, as the kayak and straps can settle. Periodically check them at rest stops during your journey. This simple check can prevent big problems.
Alternative Methods and Considerations
While the cam strap method is the most popular, other options exist, and some situations may require adjustments.
Using Ratchet Straps
Similar to cam straps, ratchet straps offer even more tensioning power. They use a gear mechanism to tighten, which can be beneficial for heavy kayaks or when extreme security is needed. However, be very cautious not to overtighten, as ratcheting too hard can damage your kayak’s hull or even your car’s roof.
Pros of Ratchet Straps:
- Can achieve very high tension.
- Good for heavy loads.
Cons of Ratchet Straps:
- Risk of overtightening and damaging gear.
- Can be slightly more complex to release than cam straps.
Kayak Kayak Rack Systems
Dedicated kayak rack systems, such as J-cradles or stackers, offer more specific support for your kayak. These systems cradle the boat, often reducing the need for extremely tight straps and providing superior stability.
Pros of Kayak Racks:
- Provides dedicated, shaped support.
- Reduces hull stress.
- Can make loading easier.
Cons of Kayak Racks:
- Higher initial cost.
- May require installation.
- Can take up roof space if carrying multiple boats.
Transporting Without a Roof Rack
In some cases, you might need to transport a kayak without a traditional roof rack, like with a short-distance move using a trailer or a pickup truck. In a pickup truck bed, use straps to secure the kayak to the tie-down points inside the bed. If the kayak overhangs the tailgate, a red flag is often legally required. Always ensure the kayak is lower than the cab of the truck to prevent wind from catching it and lifting it.
For trailers, use the trailer’s tie-down points and ensure the kayak is well-secured to the trailer frame.
Tips for Maintaining Your Tie-Down Gear
Your tie-down straps and lines are crucial safety equipment, so keeping them in good condition is important. After each use, rinse your cam straps and other hardware with fresh water, especially if you’ve been in saltwater.
Inspect your straps regularly for any signs of wear and tear, such as fraying, cuts, or damage to the buckles. Sunlight can also degrade strap material over time, so store them out of direct UV exposure when not in use. If you notice any significant damage or wear, it’s time to replace them. Never use damaged straps for transporting your kayak.
Common Mistakes to Avoid
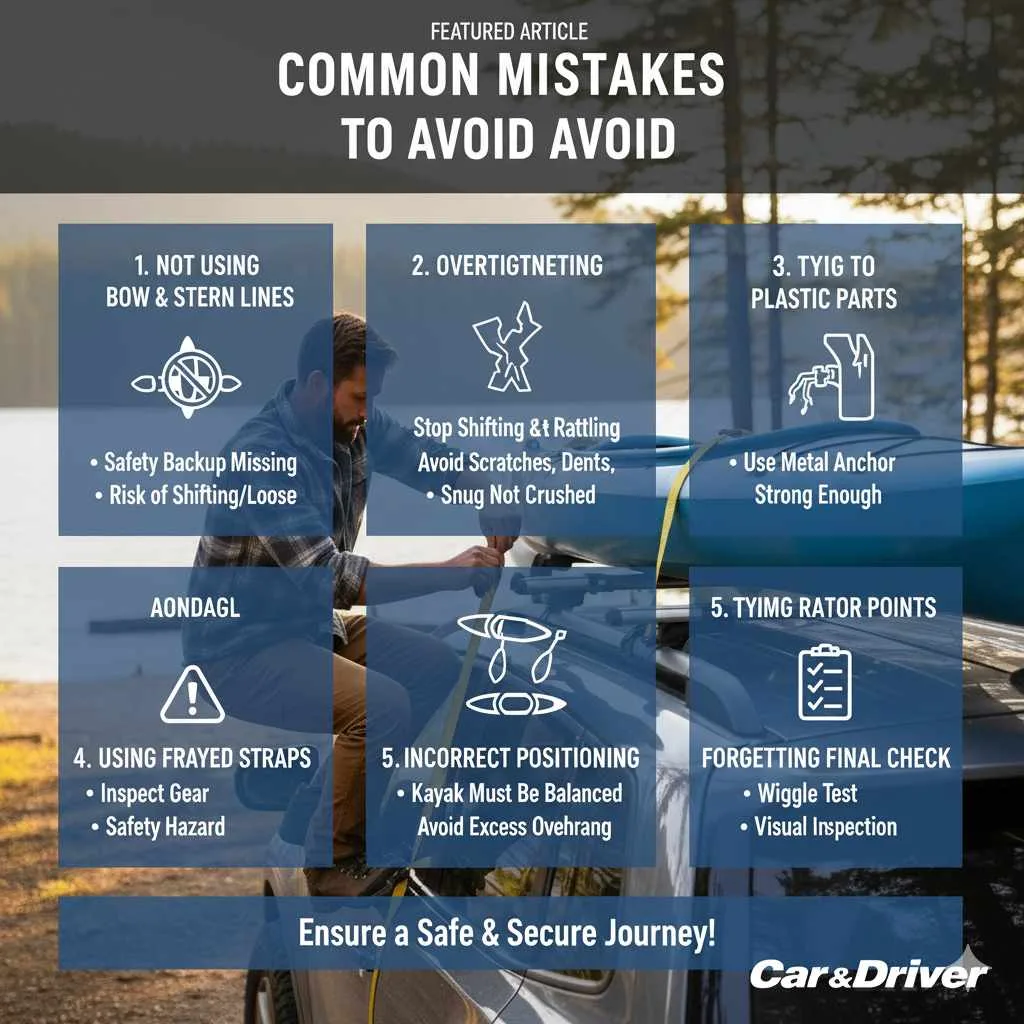
Even with clear instructions, beginners can sometimes make mistakes. Being aware of these can help you tie down your kayak with confidence:
- Not using bow and stern lines: While straps to the roof rack are essential, bow and stern lines are a vital safety backup. Not using them increases the risk of your kayak shifting or coming loose in unexpected situations.
- Overtightening straps: Squeezing the hull excessively can permanently damage your kayak. Aim for snug and secure, not crushed.
- Tying to plastic parts: Always connect your straps to solid, metal anchor points on your vehicle. Plastic bumpers or trim are not strong enough.
- Using frayed or damaged straps: Always inspect your gear before use. A worn-out strap is a safety hazard.
- Incorrect kayak positioning: Make sure the kayak is balanced on the rack and not excessively overhanging, which can affect handling and safety.
- Forgetting a final check: Always do a wiggle test and visual inspection before hitting the road.
Understanding these potential pitfalls will help you ensure a safe and secure journey every time you transport your kayak.
FAQ
Q1: How tight should cam straps be when tying down a kayak?
Cam straps should be tight enough to prevent any movement of the kayak on the roof rack but not so tight that they significantly deform the kayak’s hull. You should feel firm resistance when you try to wiggle the kayak, but you shouldn’t be able to visibly crush the plastic.
Q2: Can I use rope instead of cam straps?
While technically possible, using rope requires learning specific knots (like a taut-line hitch or trucker’s hitch) to achieve secure tension, and it can be harder to get consistently tight and reliable holds compared to cam straps. Cam straps are generally recommended for their ease of use and security.
Q3: How long should my cam straps be?
The length you need depends on the width of your vehicle and the thickness of your kayak. Straps that are 6 to 10 feet long are typically sufficient for most car-to-kayak setups. It’s better to have slightly too long a strap than too short. Always ensure the strap has enough length to go around the crossbar and still have plenty to cinch down.
Q4: Do I need a special roof rack for a kayak?
While you can strap a kayak directly to basic crossbars, specialized kayak racks (like J-cradles or saddles) offer more stability and peace of mind, especially for heavier kayaks or longer trips. However, the essential cam strap method works with most sturdy crossbar systems.
Q5: What if my kayak hangs off the back of my vehicle?
If your kayak overhangs the tailgate of a truck or the rear of an SUV, you must use a red flag to make the overhang visible to other drivers. Check your local traffic laws, as there are often specific regulations about cargo overhang.
Q6: How often should I check my straps while driving?
It’s recommended to do a quick visual check of your straps and tie-downs shortly after you start driving (e.g., after 15-30 minutes) and then again during any stops you make. Straps can sometimes settle and loosen slightly.
Q7: Can I tie down a kayak on its side?
Some kayaks can be transported on their sides, especially in J-cradles designed for this. If strapping directly to crossbars, it’s generally best practice to transport the kayak upside down (deck down) or right-side up, depending on the hull shape. Transporting on its side directly on bars without appropriate cradles can put undue stress on the hull and is not recommended by most manufacturers.
Conclusion
Tying down your kayak might seem like a small detail, but it’s a vital step for safe and enjoyable adventures on the water. By mastering the essential cam strap method, you’ve gained a skill that will serve you well for every trip. Remember to always use quality gear, perform thorough checks, and prioritize safety.
With your kayak securely on your vehicle, you’re ready to explore new waterways, enjoy the peace of nature, and create lasting memories. Happy paddling, and safe travels!