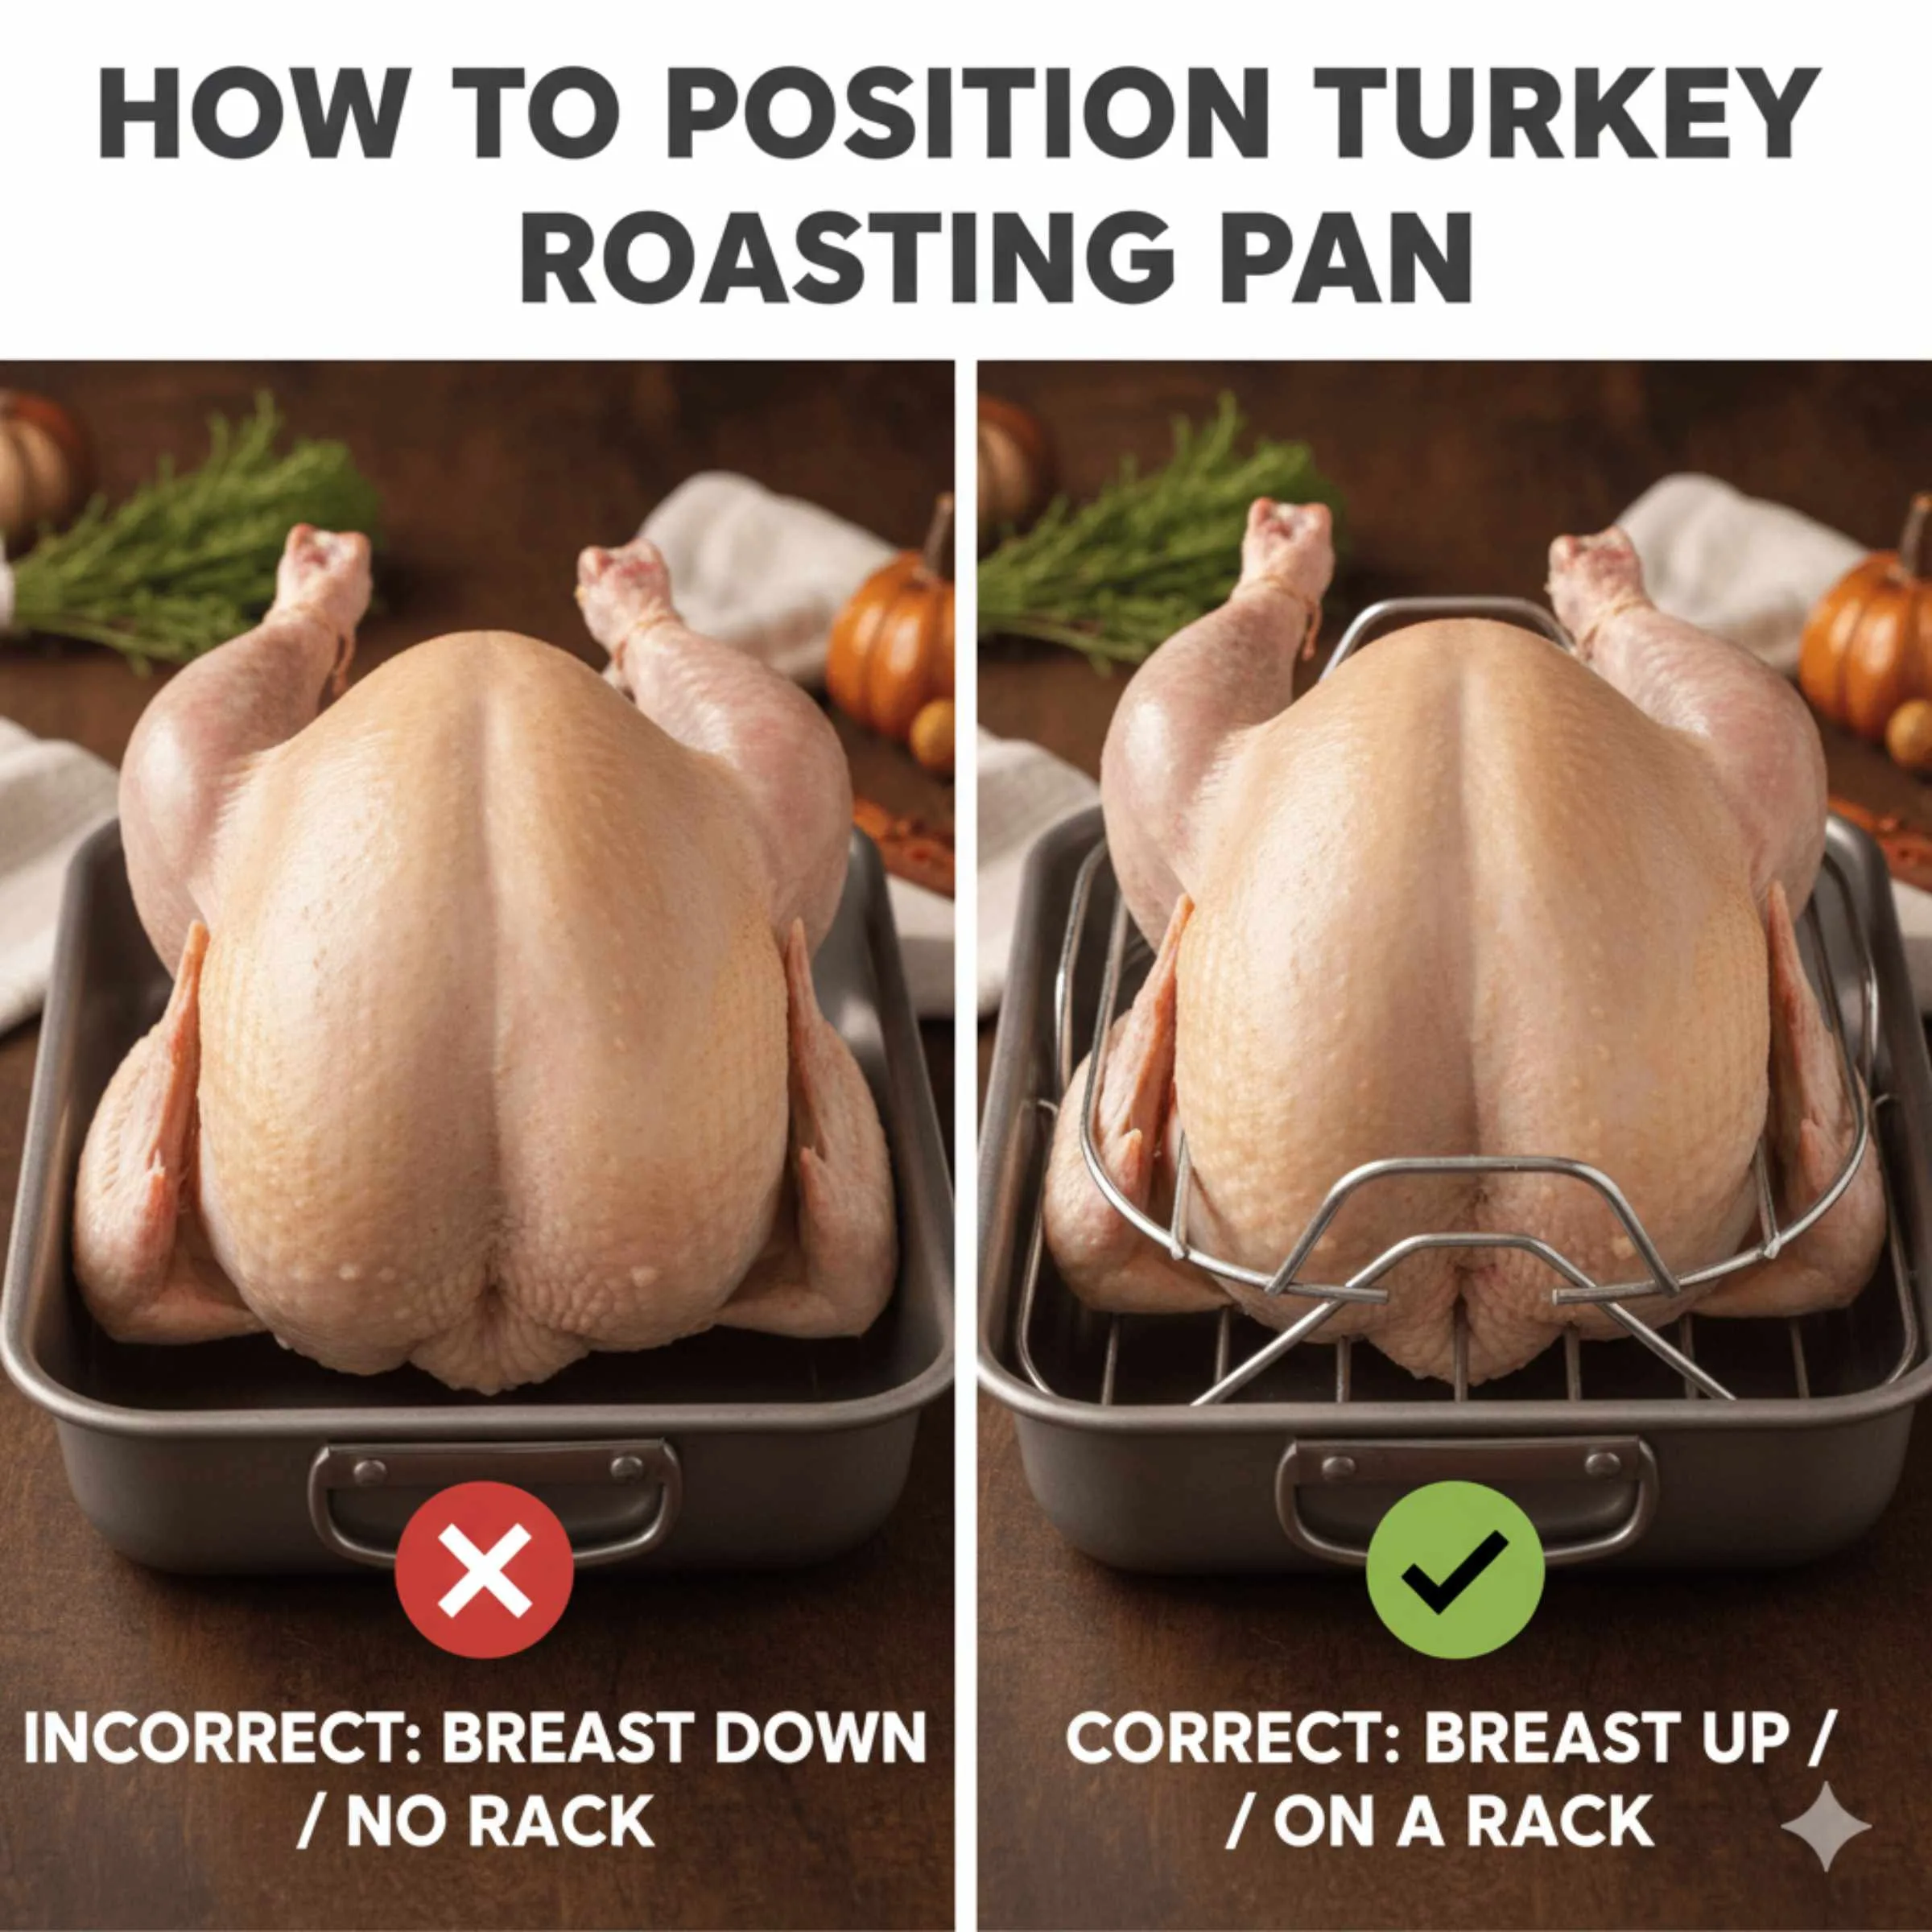
The proven best way to position a turkey in a roasting pan is breast-side up for even browning. However, many experts now recommend starting breast-side down for the first part of cooking to keep the delicate breast meat moist, then flipping carefully halfway through using a sturdy rack and helping hands.
Have you ever opened the oven door, looked at your beautiful turkey, and sighed because one side is dark brown and the other still looks a bit pale? It happens to everyone! Getting the bird perfectly positioned in the roasting pan is a small step that makes a huge difference in how evenly it cooks and how juicy it turns out. You want that golden-brown skin everywhere, right? Don’t worry; this isn’t rocket science, and we are going to walk through the time-tested placements step-by-step. By the end of this guide, you’ll feel totally confident handling that bird like a pro. Let’s get that turkey ready for its close-up!
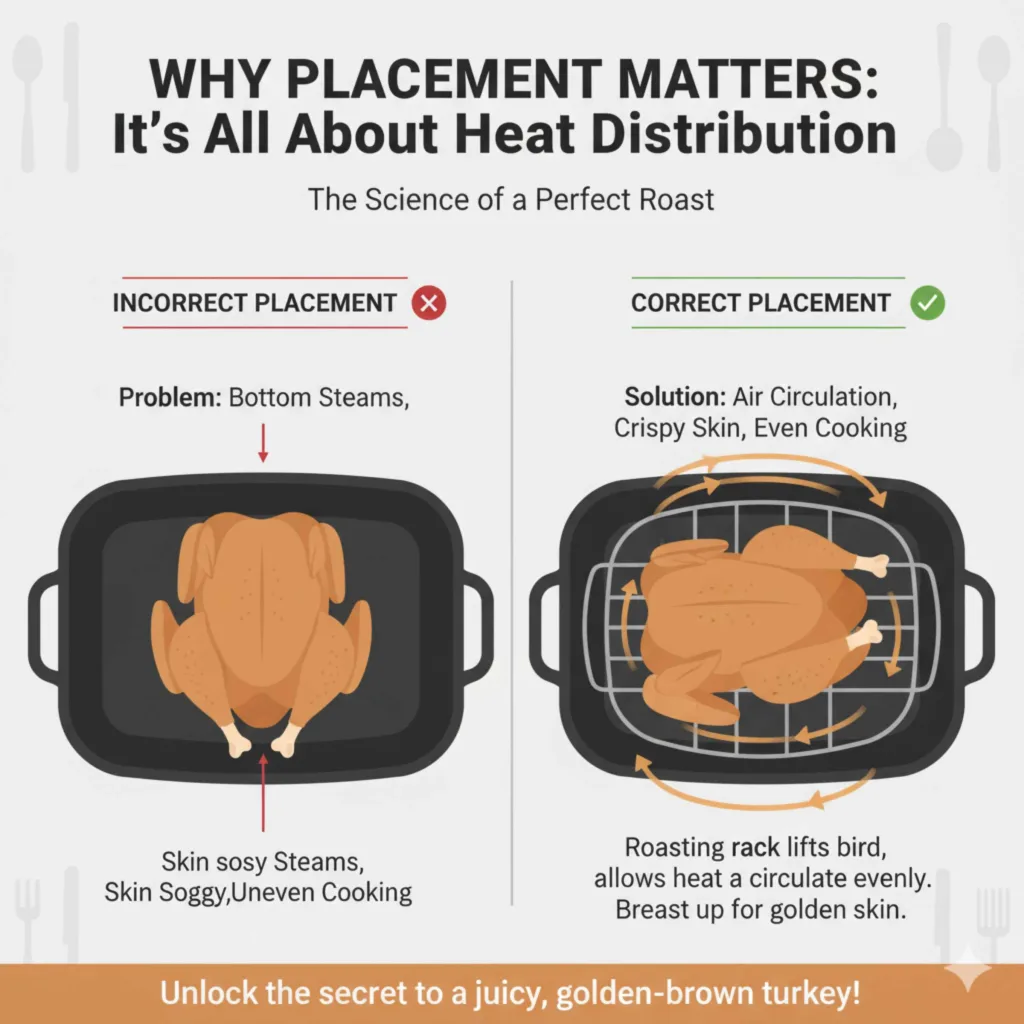
Why Placement Matters: It’s All About Heat Distribution
When roasting a bird as big as a turkey, heat management is everything. Unlike a small chicken, a turkey has very different parts that cook at different rates. The breast meat is leaner and dries out fast, while the legs and thighs need more time to reach a safe internal temperature.
Your roasting pan setup directly controls how heat reaches those different areas. If you just set the turkey flat on the bottom of the pan, two things usually happen:
1. The bottom gets steamed and soft instead of crispy because it sits in its own juices.
2. The parts touching the metal heat up faster, leading to uneven cooking.
Proper positioning uses a roasting rack to lift the bird off the bottom, allowing air to circulate. This means heat hits all sides more evenly, leading to a better finish and safer cooking.
Essential Gear Checklist Before You Position the Turkey
Before we even think about placing the turkey, let’s make sure you have the right tools. Having these ready ensures the process is smooth, safe, and that you don’t struggle trying to lift a heavy, slippery bird.
Tools You Will Need:
- Sturdy Roasting Pan: Look for one with high sides to catch drips.
- Roasting Rack: This is non-negotiable! The rack lifts the turkey, allowing air circulation underneath. Without it, the bottom steams.
- Sturdy Oven Mitts: Safety first—hot pans present serious burn risks.
- Meat Thermometer or Probe: Essential for checking doneness accurately (temperature checks are crucial for food safety, as noted by the USDA).
- Kitchen Twine (Optional but Recommended): For trussing (tying up the legs and wings).
- A Helper (For large birds): Lifting a 15-pound bird is much easier with two sets of hands.
Step 1: Prepare the Turkey (Trussing and Seasoning)
You can’t position the turkey until it is prepped. A properly trussed bird cooks more evenly because all the parts are tucked in neatly, preventing thin areas (like wing tips) from burning before the center is done.
How to Truss Your Turkey Simply:
- Dry the Skin: Pat the entire turkey, inside and out, thoroughly dry with paper towels. This is the secret to crispy skin!
- Tuck Flaps: Tuck the neck skin flap under the bird’s body cavity, if possible.
- Tie the Legs: Cross the legs together and tie them tightly with kitchen twine. This keeps the cavity opening small.
- Tuck Wings: Tuck the wing tips up and underneath the bird, securing them close to the body.
Step 2: Prepare the Roasting Pan
The base layer of your preparation sets the stage for everything that follows. This setup promotes moisture retention and flavor.
Creating the Flavor Base (Aromatics):
Do not place the turkey directly onto the empty metal rack. We want flavor and steam generation!
- Rough Chop Vegetables: Use sturdy root vegetables like carrots, celery, and onions. You don’t need beautiful cuts; they are just there to prop up the rack and add flavor to the drippings.
- Add Liquid: Pour about 1 to 2 cups of liquid into the bottom of the pan—chicken broth, water, or white wine works great. This liquid prevents the drippings from burning intensely and creates steam, which helps keep the environment moist.
- Place the Rack: Set your roasting rack directly on top of these vegetables.
Step 3: The Proven Best Positioning Techniques Explained
Now we address the main event: how to position the turkey in the roasting pan. There are two main schools of thought, and the best choice often depends on how much time you have and how concerned you are about breast dryness.
Technique A: The Traditional (Breast-Side Up)
This is what most recipes call for, and it’s fantastic if you want gorgeous, browned skin from the start.
Pros and Cons of Breast-Up
| Pros | Cons |
|---|---|
| Perfectly browned skin on the breast early on. | The breast meat is exposed to the hottest, driest air first and can dry out. |
| Simpler to baste the top surface continuously. | Requires careful draping of foil later to shield the breast. |
How to Execute Breast-Up:
Carefully lift the trussed turkey and set it directly onto the roasting rack. The cavity opening should face up toward the oven ceiling. Ensure the legs are generally pointing towards the back of the oven (this is often the hotter side). If you use this method, you MUST plan on tenting the breast loosely with aluminum foil after the first 60-90 minutes of cooking.
Technique B: The Modern Favorite (Breast-Side Down – The Flip Method)
This technique is increasingly popular among professional chefs because it uses the fattier, tougher thigh meat to shield the lean breast meat from the direct heat for the first half of cooking. This results in unbelievably juicy breast meat.
Pros and Cons of Breast-Down:
| Pros | Cons |
|---|---|
| Breast meat stays significantly moister and juicier. | The breast skin won’t brown until the final flip. |
| Thighs and legs, which need more heat, are exposed initially. | Requires the careful step of flipping the bird halfway through cooking. |
How to Execute Breast-Down (And The Crucial Flip):
- Initial Placement: Lift the turkey and place it breast-side down onto the roasting rack. The back of the bird will be facing up.
- Cook Time 1: Roast according to your recipe until the internal temperature in the thigh registers about 145°F to 150°F (usually about halfway through the total cooking time).
- The Flip (Use a Helper!): This is the trickiest part. Turn off the oven (or at least crack the door). Using heavy-duty oven mitts, carefully slide the rack out just enough to grab it firmly. If you have a helper, have them stabilize the pan while you grasp the trussed legs and carefully roll the entire bird over onto its back (breast-side up).
- Finish Cooking: Return the pan to the oven and continue cooking until the breast reaches 165°F. This final stage ensures the breast skin browns beautifully.
Dustin’s Pro Tip on Flipping: If you are nervous about flipping a piping hot turkey, skip the full flip. Instead, place the turkey breast-side up, but strategically prop it up! You can use rolled-up balls of heavy-duty aluminum foil or even sturdy vegetable pieces placed directly under where the neck meets the body. This creates a slight angle, exposing the thighs more to the oven heat without requiring a full roll.
Optimizing Heat Flow: The Secrets of a Perfect Roast
Regardless of which initial position you choose (up or down), maximizing the benefits of your roasting setup comes down to airflow and heat management throughout the cooking process.
Understanding Oven Hot Spots
Most home ovens do not heat perfectly evenly. One side is usually hotter than the other. This is why placing the turkey with the legs pointing toward the back (the typical hotter zone) in the initial stage can be beneficial, especially if you are cooking breast-side up.
To combat this, plan on rotating your pan 180 degrees halfway through the cooking process. This rotation ensures that both sides of the bird get exposed to the hottest and coolest parts of your oven. For safety and reliability, always consult guidelines from organizations like the USDA Food Safety and Inspection Service regarding safe cooking temperatures.
The Role of the Rack Material
The material of your rack subtly affects cooking. A heavy-duty metal rack conducts heat directly to the underside of the bird, aiding in crisping. If you are using a V-rack (which has sides you can lean the bird against that curve around the turkey), this helps maintain the shape but remember that the parts touching the metal may brown faster.
The Best Position for High-Heat Roasting
If you are using a high-heat method (roasting at 425°F for a shorter time), the breast-side down method is strongly recommended. The higher heat blasts the underside first, and when you flip it, the direct heat hits the skin, giving you incredible crispness without drying out the structure underneath beforehand.
Roasting Rack Alternatives (If You Don’t Have One)
Sometimes you are ready to cook, but that essential rack seems to have vanished! Don’t panic. We need a simple way to elevate the bird an inch or two above the bottom of the pan.
Make Your Own Support Structure:
- The Vegetable Bed: As mentioned earlier, this is the best substitute. Cut large, sturdy vegetables (like carrots, onions, celery, or even halved potatoes) into thick logs, about 1.5 inches high. Arrange them side-by-side to create a “raft” for the bird to sit on.
- The Foil Ring: Tear off a long, very wide strip of heavy-duty aluminum foil. Fold it several times lengthwise until you have a strong, thick “rope” about 2 inches wide. Form this rope into a circle or oval and place it in the pan. Set the turkey on top of the foil ring. This mimics the function of a rack by elevating the bird and still allows some air under the bottom.
Note: No matter what you use underneath, always ensure the bottom of the turkey is not sitting directly in a pool of liquid. The liquid creates steam, which softens the skin.
The Importance of Trussing vs. Not Trussing
While we discussed trussing earlier as part of the prep, it directly impacts positioning. A trussed turkey holds its shape better in the pan, especially when flipping.
| Trussed Bird | Untrussed Bird |
| :— | :— |
| Legs are bound, keeping the body compact. | Flapping wings and dangling legs cook unevenly. |
| Easier to lift and flip safely. | Wings and legs can drag or get caught during movement. |
| Achieves a more uniform final shape. | Thinner parts (wing tips, tail area) burn quicker. |
If you choose the breast-side down method, trussing is even more critical because you need that bird to roll over neatly without falling apart.
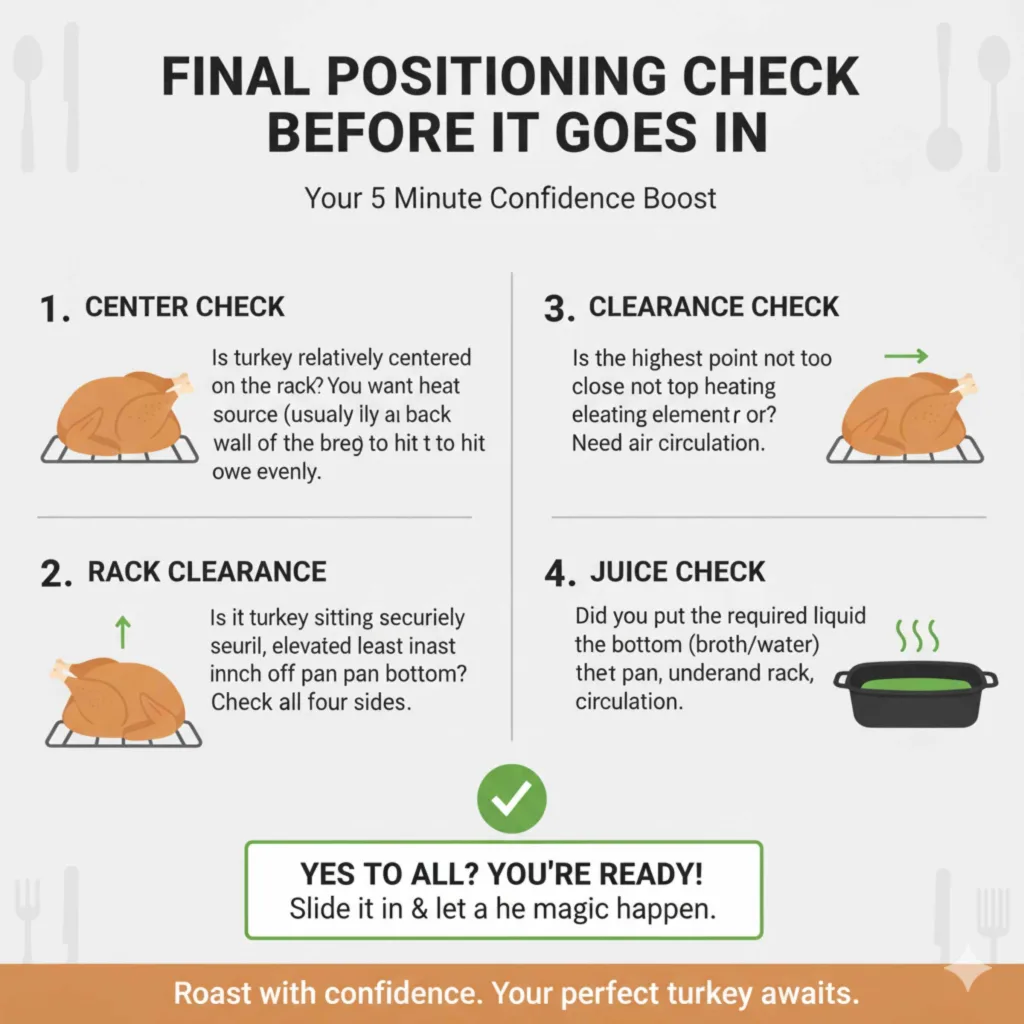
Final Positioning Check Before It Goes In
You’ve prepped, you’ve positioned (up or down), and the oven is preheated. Take five minutes for this final check. This is where confidence comes in!
1. Center Check: Is the turkey relatively centered on the rack? You want the heat source (usually the back wall of the oven) to hit the bird evenly.
2. Rack Clearance: Is the turkey sitting securely on the rack, elevated at least an inch off the pan bottom? Check all four sides.
3. Clearance Check: Is the turkey positioned so that the highest point (usually the breast) is not too close to the top heating element of your oven or the oven door? You need air circulation above and below.
4. Juice Check: Did you put the required liquid (broth/water) in the bottom of the pan, underneath the rack?
If you answered yes to all these checks, you have successfully placed your turkey in the roasting pan using a proven, effective method. Now, you can slide it in and let the magic happen!
FAQ: Beginner Questions on Turkey Roasting Placement
Q1: Should I put the turkey breast-side up or down?
Both positions work, but many chefs recommend starting breast-side down for the first half of cooking to shield the white meat and keep it juicy. You flip it halfway through to brown the skin.
Q2: What do I put under the roasting rack in the pan?
You should put thick-cut vegetables (carrots, onions, celery) and 1 to 2 cups of cooking liquid (like broth or water). This creates steam and adds flavor to your drippings.
Q3: Can I put the turkey directly on the oven rack without a pan?
No, this is not recommended. The drippings will burn right onto your oven bottom, create a lot of smoke, and the bottom of the turkey will cook unevenly without the support structure of a rack or creative vegetable support.
Q4: How do I know when to flip the turkey if I positioned it breast-side down?
Flip the turkey when the internal temperature of the thigh meat reaches between 145°F and 150°F. This usually happens about halfway through the total estimated cooking time needed for your bird’s weight.
Q5: Why is my turkey skin not crisping up?
This is often because the bird steamed. Ensure you are using a rack to lift the turkey off the pan juices, and pat the turkey skin completely dry before seasoning. If roasting breast-side up, removing foil toward the end of cooking helps, too.
Q6: Do I need to baste the turkey, and does placement affect basting?
Basting helps keep the outside skin moist, but it’s not strictly necessary if you cook it correctly within a moist oven environment. If your turkey is breast-side up, baste the top every 45 minutes. If breast-side down, you don’t need to baste until after you flip it.
Conclusion: Confidence in Placement and Cooking
You now have the knowledge to stop guessing when it comes to positioning your turkey. Whether you opt for the traditional breast-up method, remembering to tent that delicate meat, or you choose the popular breast-down flip method for guaranteed juiciness, the core principle remains the same: use a rack, elevate the bird, and promote even heat circulation.
Cooking a large bird can feel intimidating, but mastering the initial placement is a huge win. Remember, even heat distribution equals even cooking, and even cooking means less stress for you and a more delicious meal for everyone at the table. Next time you approach that roasting pan, you’ll do so with the calm assurance of a seasoned cook. Go ahead, confidently slide that bird into the oven—you’ve got this handled!