To make a crafting table, you need four wooden planks of any type. Open your inventory, place one plank in each slot of the 2×2 crafting grid, and then move the resulting crafting table icon to your inventory hotbar. This simple tool unlocks all further building!
Hey there, fellow DIY enthusiast! Dustin Hall here. If you’re just starting out on your building journey, you’ve probably hit a small roadblock: you can only make basic items. To really get going—to build better tools, better shelter, or that cool workbench you’ve been dreaming of—you need one essential item: the Crafting Table. It sounds like a big step, but trust me, it’s the easiest thing you’ll build. Many folks get stuck right here, staring at their limited inventory slots, wondering what the secret is. Don’t worry! We are going to walk through this, step-by-step, so you can quickly unlock the full potential of your building projects. Let’s get your first crafting table built right now!
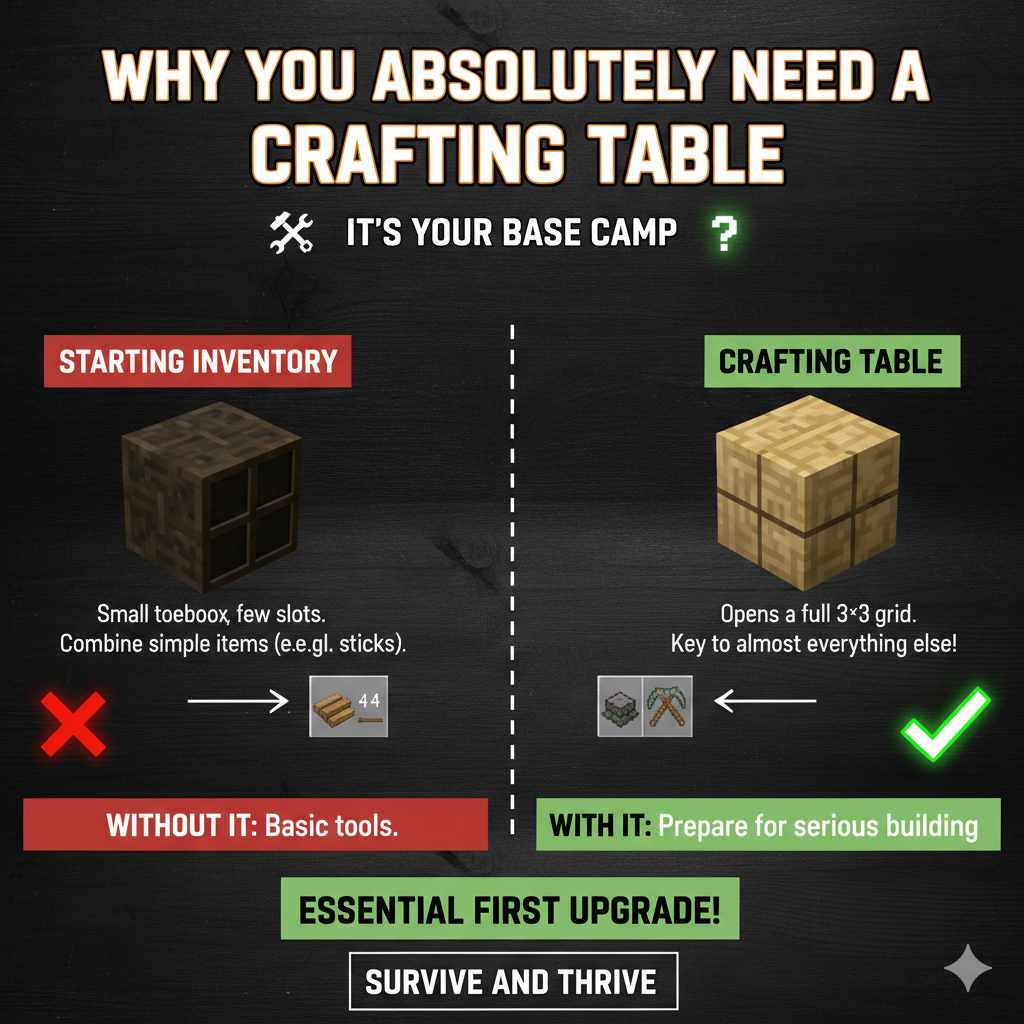
Why You Absolutely Need a Crafting Table (It’s Your Base Camp)
Think of your basic character inventory like a small toolbox. It only has a few slots—usually four—arranged in a neat 2×2 square. This little square lets you combine simple items, like making sticks from planks. But what happens when you need to make something bigger, like a pickaxe or a furnace? You need more space!
The Crafting Table solves this immediately. When you place it down in the world and interact with it, it opens up a full 3×3 crafting grid. That extra space is the key to crafting almost everything else you will ever need. It transforms your ability to survive and thrive.
Without it, you are stuck making only the most basic tools. With it, you can prepare for serious building. It’s the essential first upgrade in any crafting game!
Gathering Your Materials: The Recipe Breakdown
The beauty of the Crafting Table is its simplicity. It requires only one type of resource, but you need four pieces of it. This is designed to be the very first thing you create after punching down your first few trees.
Step 1: Find Wood and Turn It Into Planks
Your journey starts with trees. You need to gather raw wood logs. Walk up to any tree—it doesn’t matter the type (Oak, Birch, Pine, etc.)—and punch it until a block of wood drops. You’ll need to collect at least one log to start, but grab a few extra just in case!
Once you have the raw wood logs in your inventory, you need to process them into planks. This is done right inside your basic 2×2 inventory crafting grid:
- Open your inventory screen (usually by pressing ‘E’ on a keyboard, or the relevant button for your system).
- Locate the small 2×2 crafting area.
- Place one raw Wood Log into any of the four slots.
- Observe the output slot—it will show you Wooden Planks. One log makes four planks!
- Move the resulting planks into your main inventory.
Pro Tip: Since you need four planks to make the table, you only need one wood log. However, always aim to get at least 12-16 planks total right away, as you’ll need them for the next tools.
Step 2: The Final Assembly
Now that you have your wooden planks, the final step is incredibly easy. We are going to use the same 2×2 grid you just used to make the planks.
This is the official recipe for the Crafting Table:
- You need exactly four Wooden Planks.
- Place one Plank in the top-left square of the 2×2 grid.
- Place one Plank in the top-right square.
- Place one Plank in the bottom-left square.
- Place one Plank in the bottom-right square.
When you fill all four slots of the 2×2 grid with wooden planks, the result in the output box will be one Crafting Table. Grab it, and you’re ready for the next phase of your build!
Placing Your New Crafting Table
Having the item in your inventory is just half the battle. You need to place it in the world so you can use that wonderful 3×3 grid.
Using the Hotbar
The hotbar is the row of 9 slots at the very bottom of your screen. This is where you keep the items you use most often.
- Select the Crafting Table in your hotbar (usually by pressing the corresponding number key, 1 through 9).
- Look at the ground where you want to place it. You should see an outline appear.
- Make sure the spot is clear of obstacles, like tall grass or water.
- Use your “Place Block” button (often the right-click mouse button or the left trigger on a controller).
Congratulations! You now have a permanent workstation. To access the 3×3 grid, walk up to the placed table and interact with it (usually by right-clicking again).
What Can You Craft Now? The Next Steps
That 3×3 grid opens up a world of possibilities. Since you are building your first table, your immediate next goal should be making better tools. Having stone tools is a massive upgrade over using your bare hands. To get stone tools, you first need a wooden pickaxe to mine stone, but that requires the Crafting Table!
Here is a quick look at the essential recipes unlocked by using your new table:
| Tool/Item | Recipe (3×3 Grid) | Primary Use |
|---|---|---|
| Sticks | Two planks stacked vertically (one above the other). | Handles for tools and torches. |
| Wooden Pickaxe | Three planks across the top row, two sticks stacked vertically in the center column below the planks. | Mines stone, coal, and iron ore. |
| Furnace | Eight Cobblestone blocks filling every slot except the center one. | Smelting ores into ingots; cooking food. |
| Chest | Eight planks filling every slot except the center one. | Secure long-term storage for items. |
Notice that Sticks and the Wooden Pickaxe are crucial early items. You need sticks to make the handles for your pickaxe and shovel. The pickaxe is your ticket to mining the stone needed for the Furnace and better tools.
Building Your First Pickaxe (The Real First Upgrade)
To maximize your efficiency, let’s quickly cover the next logical step: the Wooden Pickaxe.
- Get Sticks: Use your Crafting Table (3×3 grid) to place two planks vertically. Make at least four sticks.
- Place Materials: In the 3×3 grid, place three Wooden Planks in a straight line across the top row.
- Add Handles: Place one Stick directly below the center plank, and another Stick directly below that first stick, creating a vertical line of two sticks in the middle column.
- Craft: Collect your Wooden Pickaxe!
With this pickaxe, you can now safely mine stone blocks (usually found just under the top layer of dirt). Mining stone lets you build better furnaces and upgrade to stone tools, which break blocks much faster than wood.
Understanding Crafting Grids: 2×2 vs. 3×3
It’s important for new builders to understand why the Crafting Table is so necessary. The difference between the two grids affects what you can create. Think of it like using a small notepad versus a large drafting table.
The 2×2 Inventory Grid (The Basics)
This grid is limited. It can only handle recipes where all the ingredients fit neatly into four slots. This usually means combinations of two different materials or simple stacking.
- Pro: Always accessible, even without a table.
- Con: Cannot craft complex items like tools, armor, or machinery.
The 3×3 Crafting Table Grid (The Powerhouse)
The extra five slots provide the necessary spatial layout for complicated items. Tools require a specific shape—materials on top for the head, and sticks beneath for the handle. You cannot replicate that shape in a 2×2 grid.
For those interested in the structural mechanics and spatial organization of crafting systems, resources like the National Park Service site on structures, while focused on historical buildings, offer great analogies on how foundational elements (like a table) enable complex construction.
- Pro: Unlocks nearly every item in the game, essential for progression.
- Con: Requires you to carry the physical table block with you or place it down.
Troubleshooting Common Crafting Table Issues
Even with something this simple, sometimes things go wrong. If you’ve followed the steps and the table isn’t appearing, here are the most common snags:
- Using Logs Instead of Planks: Did you try to put raw wood logs into the 2×2 grid to make the table? If you used the logs directly, the output slot will be empty. Remember: Logs → Planks (in 2×2), then Planks → Crafting Table (in 2×2).
- Not Filling All Four Slots: The Crafting Table recipe is rigid. You must have one plank in every single one of the four slots. Leaving one empty means no output.
- Placing Errors: If you are trying to craft with the table and it’s not working, make sure you are standing right next to the placed table and interacting with it properly to open the 3×3 interface.
- Inventory Space: Make sure you have an empty slot in your inventory to receive the Crafting Table once it’s made. If your inventory is full, the item will hover over the output slot and you won’t be able to grab it!
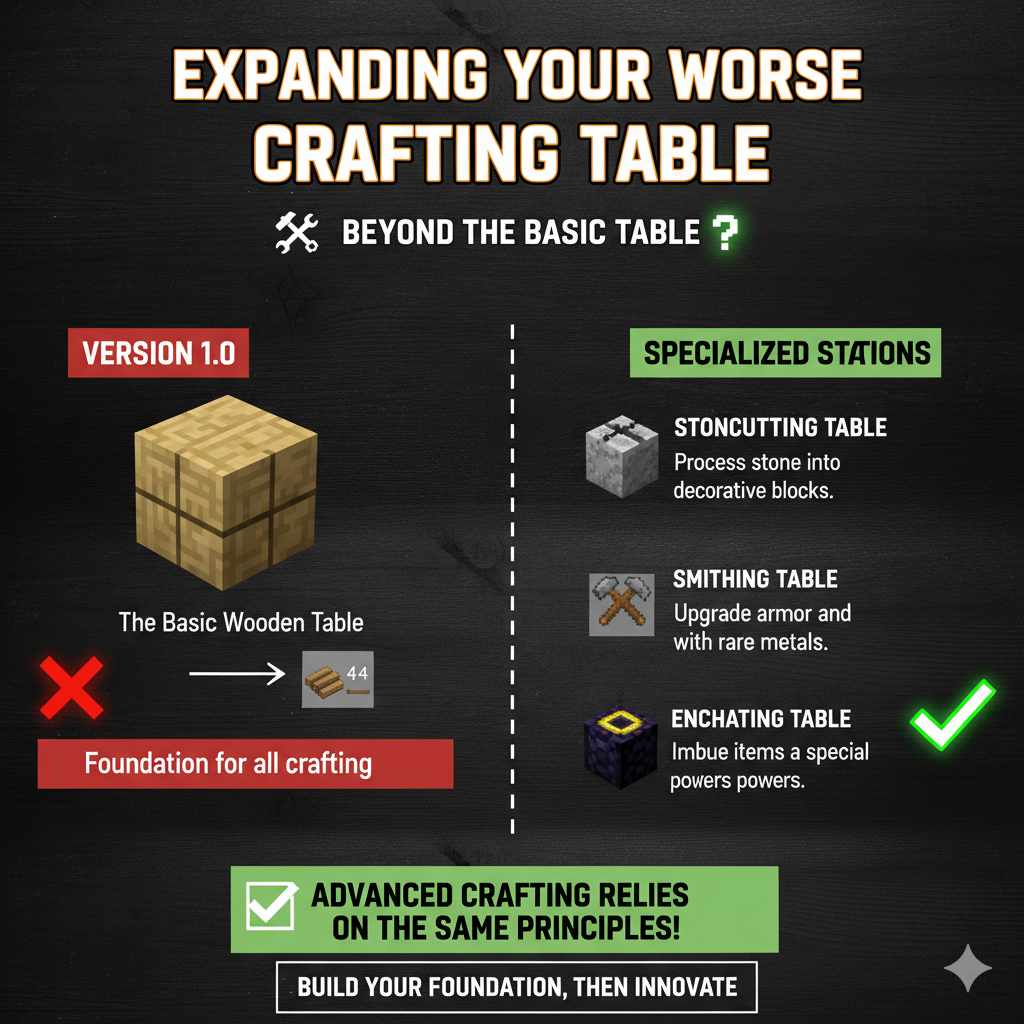
Expanding Your Workshop: Beyond the Basic Table
Once you have your first table, your building journey really begins. Think of the basic wooden Crafting Table as Version 1.0. As you advance, you’ll find resources that allow you to build upgraded or specialized crafting stations.
While the standard wooden table is universal, later game progression often involves stations that speed up crafting or allow for enchantments or brewing. For example:
- Stonecutting Table: Used to process stone blocks into smoother, decorative variants.
- Smithing Table: Used specifically for upgrading armor and tools using rarer metals.
- Enchanting Table: Requires rare materials like obsidian and lapis lazuli to imbue items with special powers.
These advanced stations have their own recipes, but every single one of them requires the foundational knowledge you gained by crafting that very first wooden table. They rely on the principle of placing specific materials in a specific order within a grid.
Tips for Efficient Early-Game Material Management
Since gathering wood is the first task, let’s make that process smooth. Efficiency early on saves you time later when you really need to focus on shelter or food.
| Action | Why It Matters | Dustin’s Quick Tip |
|---|---|---|
| Punching Trees | It yields the very first resource needed for everything. | Always punch the base of the tree until the top segment breaks naturally, maximizing log collection. |
| Inventory Sorting | Keeps your planks and logs separate from raw materials like dirt or seeds. | Keep your finished planks in the first row of your inventory for quick access to the 2×2 crafting grid. |
| Tool Priority | Saves breaking time later. | Make the Pickaxe immediately after the table. Stone is more important than wood or dirt. |
Remember, the goal of the initial phase is to move from manual labor (punching) to mechanized work (using tools). That transition hinges entirely on successfully creating this first crafting surface.
Frequently Asked Questions (FAQ) for Beginner Crafters
Q1: Do I have to use the same type of wood plank for the Crafting Table?
A: No, you do not! You can mix and match. You can use one Oak plank, one Birch plank, one Pine plank, and one Dark Oak plank, and it will still correctly result in one Crafting Table. The material type doesn’t matter, only that you use four wooden planks total.
Q2: Once I place the Crafting Table, can I move it later?
A: Yes, you can! Unlike some other built structures, the Crafting Table is a movable block. To pick it up, you must use the correct tool—usually a pickaxe or an axe, depending on the game version—to break the block. Once broken, it returns to your inventory, and you can place it somewhere else.
Q3: Why can’t I make an Iron Pickaxe with my wooden Crafting Table?
A: The standard wooden Crafting Table allows you to craft most items, but certain high-tier items require a specialized station. Iron tools require an Iron Pickaxe to mine the ore, and sometimes specific workstations like the Smithing Table are needed for advanced assembly, depending on the crafting system you are following.
Q4: Does the Crafting Table have any durability or wear out?
A: In most standard versions of crafting games, the Crafting Table does not have durability. It is a permanent block. You only lose it if you physically break it with a tool and forget to pick it up, or if lava/water damages the area where it sits.
Q5: How do I switch back to the 2×2 crafting grid if I’m using the table?
A: You don’t actively switch back. When you interact with the Crafting Table block, you always get the 3×3 grid. If you want to use the 2×2 grid, you must open your main character inventory screen, away from the table block.
Q6: What if I accidentally placed the Crafting Table in a bad spot?
A: Don’t panic! Simply equip a tool (like an axe or pickaxe) and destroy the block. It will drop back into your inventory (provided you have space). Then, you can relocate it safely. This is much safer than trying to build around a poorly placed obstacle.
Conclusion: You Are Now Fully Equipped
Building your first Crafting Table is more than just making one block; it’s unlocking your potential. You’ve gone from relying on your limited four-slot inventory to having a full 3×3 workspace. This simple wooden block is the gateway to everything—better tools, stronger armor, advanced cooking, and ultimately, a much safer and more comfortable base.
Remember the recipe: four planks, filling the entire 2×2 square in your inventory. Keep those planks handy, and always prioritize making that wooden pickaxe next. With that, you are set to gather stone and move into the next stage of construction. You’ve got the know-how, the steps are clear, and you’ve already proven you can handle the first big hurdle. Keep experimenting, keep building, and you’ll be mastering the workshop in no time. Happy crafting!