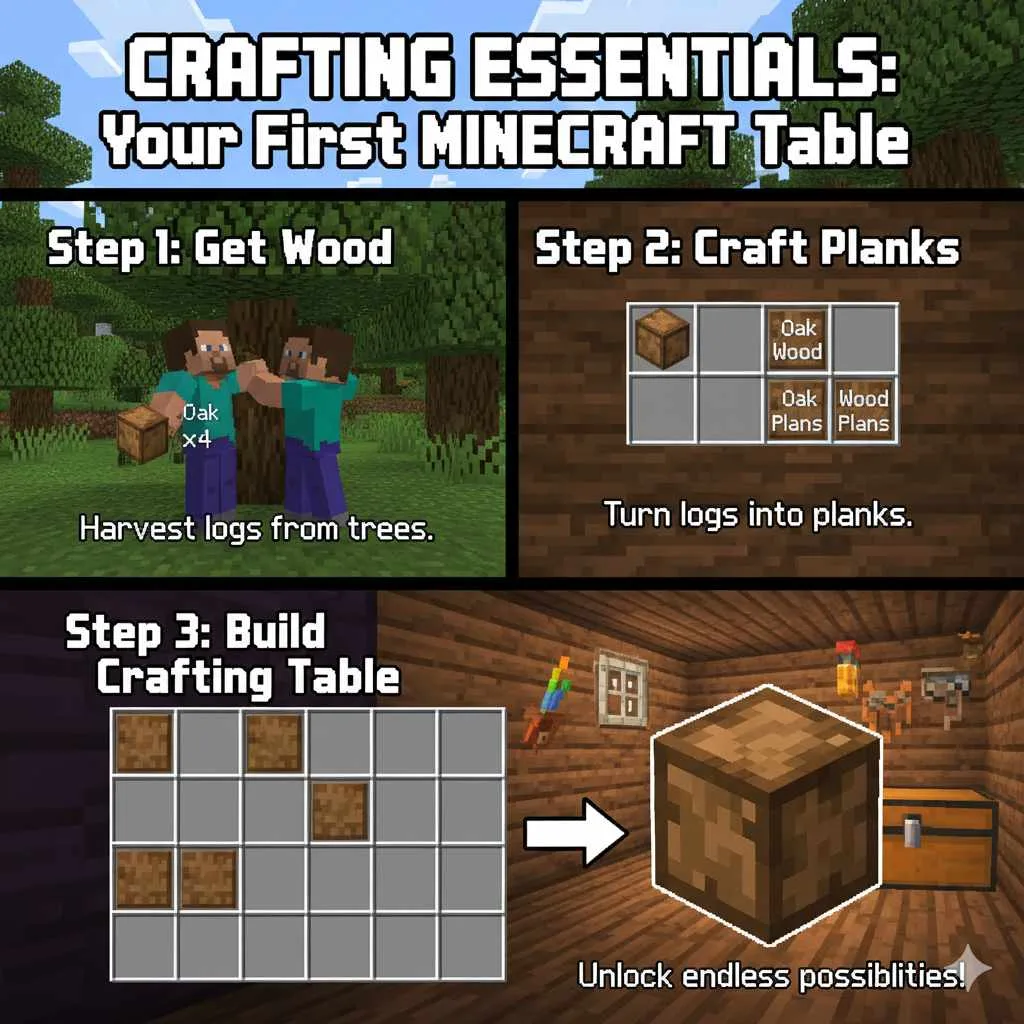
To make a crafting table in Minecraft, you need four wooden planks. Gather logs from trees, convert them into planks in your inventory, and then arrange the four planks in a 2×2 grid in your crafting area to create the essential crafting table.
Welcome, fellow home enhancers! Are you diving into the wonderful world of Minecraft and feeling a little lost on how to get started with building and creating? It’s completely normal to feel that way when you’re beginning a new adventure. The very first step to crafting anything in Minecraft is mastering a fundamental building block: the crafting table. Without it, your creative potential stays locked away. Don’t worry, it’s surprisingly simple, and I’m here to guide you through it, step by careful step. Let’s unlock all the amazing builds and items you can create, starting with this crucial first piece!
Your First Steps to Crafting: Gathering Materials
Embarking on your Minecraft journey is an exciting time, filled with endless possibilities. To begin transforming your world, you’ll need to gather some basic materials. The very first thing you’ll want to get your virtual hands on is wood. Wood forms the foundation for many of your early game needs, including the all-important crafting table.
Finding the Right Trees
Trees are abundant in most Minecraft biomes, making them an easy resource to find. Look around your starting area for any kind of tree – oak, birch, spruce, jungle, acacia, dark oak, or even the strange crimson and warped trees in the Nether (though we’ll stick to the Overworld for now!). Their distinct leaf colors and bark patterns make them easy to spot.
Harvesting Wood Logs
Once you’ve found a tree, approach its trunk. To harvest wood, you’ll need to punch the tree trunk. Yes, that’s right, with your bare hands! Aim your cursor at a block of the tree trunk and hold down your left mouse button (or the corresponding button on your controller). You’ll see the block start to crack and eventually break, dropping a “log” item. Continue this process until you’ve gathered a few logs. For one crafting table, you’ll need at least one log. However, it’s always a good idea to gather a few extra for future projects.
Think of harvesting wood like gathering your initial supplies for any creative project. Just as an artist needs canvases and paints, or a baker needs flour and sugar, a Minecraft explorer needs wood to start building and crafting their dream world.

From Logs to Planks: Essential Transformation
Logs are great for some early-game uses, but for many crafting recipes, including the crafting table, you’ll need wooden planks. Fortunately, converting logs into planks is incredibly straightforward.
Using Your Inventory Crafting Grid
Every player in Minecraft has a small, 2×2 crafting grid accessible directly from their inventory screen. To open your inventory, press the ‘E’ key on your keyboard (or the corresponding button on your gaming console). You’ll see your character, your equipped armor, and a few item slots. Above these, you’ll find the 2×2 crafting grid.
This is your first taste of Minecraft’s intuitive crafting system. It’s designed to be simple enough for anyone to understand, much like setting up a basic workspace in your home before starting a new DIY project. You just need the right materials in the right place.
To convert logs into planks, simply drag one wood log from your inventory into any of the four slots in the 2×2 crafting grid. On the right side of the grid, you’ll see the result: wooden planks. Each wood log yields four wooden planks. Click on the planks to collect them and move them into your main inventory. Repeat this process with any additional logs you’ve gathered if you wish.
Why Planks? The Versatile Building Block
Wooden planks are the true workhorses of early Minecraft. They are used in countless recipes, from tools and weapons to doors and decorative blocks. Their versatility makes them one of the most fundamental resources you’ll consistently rely on.
Crafting the Crafting Table: The Big Moment!
Now that you have your wooden planks, you’re ready to create the most important item for further crafting: the crafting table. This is where the magic truly begins, allowing you to craft everything from iron swords to cozy beds and elaborate structures.
The 2×2 Rule
This is where the crafting table recipe truly shines in its simplicity. To create a crafting table, you need four wooden planks. The key aspect of this recipe is that the planks can be of any type of wood – oak planks, birch planks, spruce planks, or a mix of different types. Minecraft doesn’t discriminate when it comes to your plank palette for this basic item!
Recipe: Crafting Table
This table is a visual representation of the required ingredients and their placement in your inventory’s 2×2 crafting grid. Remember, the exact type of wood planks does not matter for this recipe!
| Slot 1 | Slot 2 | Slot 3 | Slot 4 |
|---|---|---|---|
| Wooden Plank | Wooden Plank | Wooden Plank | Wooden Plank |
To craft the table, place one wooden plank in each of the four slots in your 2×2 inventory crafting grid.
Placing Your Crafting Table
Once you’ve successfully crafted the crafting table, it will appear in the output slot to the right of your grid. Click on it to move it into your inventory. Now, you’ll need to place it in the world to use it.
To place the crafting table, close your inventory screen (press ‘E’ again). Select the crafting table in your hotbar (the row of item slots at the bottom of your screen) by scrolling through your items or pressing the corresponding number key. Then, aim your cursor at a block on the ground where you want to place it and right-click. Voila! Your crafting table is ready for action.
Utilizing Your Crafting Table: Unlocking More Recipes
Having a crafting table is like opening the door to a workshop. It expands your crafting capabilities from the basic 2×2 grid to a much larger 3×3 grid, allowing for infinitely more complex and useful recipes.
Accessing the 3×3 Grid
To use your crafting table, stand near it and right-click on it. This will open a new crafting interface. This interface features a larger 3×3 grid, giving you many more placement options for your ingredients. This is where you’ll spend a significant amount of your time in Minecraft, as almost everything useful beyond basic tools comes from this expanded crafting space.
The 3×3 grid is the heart of Minecraft’s crafting system. It’s where you combine different materials to create items that will help you survive, explore, and build your dreams. Think of it as upgrading your home’s toolkit from a few basic hand tools to a full workbench with specialized equipment.
A Glimpse at What’s Next
With your crafting table in hand, you can now create a whole host of essential items. Here are just a few examples of what becomes available:
- Wooden Tools: Pickaxes, shovels, axes, and hoes made from wood. These are crucial for mining stone, digging dirt, chopping wood faster, and farming.
- Stone Tools: Once you mine some cobblestone with your wooden pickaxe, you can craft stone tools, which are more durable and efficient.
- Furnace: This allows you to smelt ores into ingots and cook food.
- Torches: Essential for lighting up dark areas and preventing hostile mobs from spawning.
- Beds: To skip the night and set your spawn point.
The possibilities are truly endless. Each new item you craft opens up new avenues for exploration and creation. It’s a rewarding cycle of gathering, crafting, and building that defines the Minecraft experience.
Essential Tools to Craft First
While your crafting table opens up many possibilities, there are a few items that will make your early game much smoother. Prioritizing these will set you up for success.
The Wooden Pickaxe
This is arguably the most important tool to craft after your crafting table. Why? Because it’s the only way to mine stone, which you need to craft even better tools.
Wooden Pickaxe Recipe
| Slot 1 | Slot 2 | Slot 3 | Slot 4 | Slot 5 | Slot 6 | Slot 7 | Slot 8 | Slot 9 |
|---|---|---|---|---|---|---|---|---|
| Wooden Plank | ||||||||
| Wooden Plank | Stick | |||||||
| Stick |
To craft a wooden pickaxe, you’ll need three wooden planks and two sticks. Sticks are crafted by placing two wood planks vertically in a crafting grid (either your inventory or the table).
The Wooden Axe
An axe significantly speeds up the process of chopping down trees, which you’ll be doing a lot of!
Wooden Axe Recipe
| Slot 1 | Slot 2 | Slot 3 | Slot 4 | Slot 5 | Slot 6 | Slot 7 | Slot 8 | Slot 9 |
|---|---|---|---|---|---|---|---|---|
| Wooden Plank | Wooden Plank | |||||||
| Wooden Plank | Stick | |||||||
| Stick |
This recipe uses three wooden planks and two sticks.
The Wooden Shovel
While not as immediately critical as the pickaxe or axe, a shovel makes digging dirt, sand, and gravel much faster.
Wooden Shovel Recipe
| Slot 1 | Slot 2 | Slot 3 | Slot 4 | Slot 5 | Slot 6 | Slot 7 | Slot 8 | Slot 9 |
|---|---|---|---|---|---|---|---|---|
| Wooden Plank | ||||||||
| Stick | ||||||||
| Stick |
This recipe requires just one wooden plank and two sticks.
Tips for Beginning Minecraft Crafters
As you get more comfortable with crafting, here are a few tips to keep in mind. These are designed to make your experience smoother and more enjoyable, just like little home decor tricks that make a big difference!
- Always Keep Wood on Hand: Wood is the most fundamental resource. Always have a stack of logs and planks in your inventory or a nearby chest. You never know when you’ll need to craft more tools or building blocks.
- Upgrade Your Pickaxe: As soon as you get stone, craft a stone pickaxe. It mines faster and lasts longer than wooden ones. This principle applies throughout Minecraft – always aim to upgrade your tools and gear when possible.
- Organize Your Storage: As you gather more items, chests become essential. Crafting chests (made with eight wooden planks) allows you to store excess items and keep your inventory tidy.
- Experiment with Recipes: While this guide focuses on the crafting table, don’t be afraid to experiment in your 3×3 grid. Sometimes you’ll discover new recipes, and even if you don’t, it’s part of the fun! For an exhaustive list of all recipes, the official Minecraft Wiki is an excellent, authoritative resource: Minecraft Wiki – Crafting.
- Consider Your Environment: When you place your crafting table, think about where you might be doing a lot of crafting. Near your base, in a safe, well-lit area is usually best.
Applying these simple strategies will help you feel more in control and confident as you explore the vast possibilities of Minecraft. It’s all about building good habits from the start, much like organizing your craft supplies at home so you can find what you need quickly.

Frequently Asked Questions About Crafting Tables
Can I break a crafting table and pick it up?
Yes! Once you’ve placed a crafting table in the world, you can break it with your hand or any tool. It will drop as an item, and you can pick it up and place it again elsewhere.
What’s the difference between the 2×2 inventory crafting and the 3×3 crafting table?
The 2×2 inventory grid is very limited and can only make simple items like planks, sticks, or a crafting table itself. The 3×3 crafting table grid allows for much more complex recipes and is essential for most tools, armor, and advanced items in the game.
Do I have to use the same type of wood for planks?
No! For most crafting recipes that call for wooden planks, including the crafting table itself, you can mix and match any type of wooden planks (oak, spruce, birch, etc.) you have. The game recognizes them all as “wooden planks.”
How many crafting tables can I make from one log?
One wood log can be converted into four wooden planks. Since a crafting table requires four wooden planks, you can make one crafting table from a single wood log. However, you’ll usually want to craft more for different locations or as backups.
What happens if I place my crafting table in water or lava?
If you place your crafting table in water, it will simply sit there and function normally. If you place it in lava, it will burn up and be destroyed, so be very careful!
Is the crafting table necessary to play Minecraft?
Yes, the crafting table is absolutely essential. Without it, your crafting abilities are severely limited, and you won’t be able to progress very far in the game, craft most tools, weapons, armor, or build most structures. It’s your first major step towards survival and creativity.
Conclusion: Your Crafting Adventure Begins!
And there you have it! You’ve successfully learned how to make a crafting table in Minecraft. It’s a simple process, but it’s the gateway to everything else the game offers. From this single, fundamental block, you unlock the ability to create tools that let you mine deeper, weapons that protect you from danger, and eventually, the materials you’ll need to build magnificent structures and explore the farthest reaches of your world.
Remember this feeling of accomplishment. You’ve taken the first crucial step. Keep gathering, keep crafting, and most importantly, keep building your unique Minecraft story. The world is vast, and your imagination is the only limit. Happy crafting, adventurer!