Install a ceiling fan with light yourself! This easy guide breaks down the process into simple steps, equipping you with the confidence and skills to upgrade your home’s comfort and style, even if you’re a beginner.
Tired of stuffy rooms or dim lighting? A ceiling fan with a light can be a game-changer for both comfort and ambiance. But the thought of tackling this DIY project might feel a bit intimidating, right? Many homeowners struggle with the idea of working with electrical fixtures. You might worry about complex wiring or making a mistake. I get it! But guess what? With the right guidance, installing your own ceiling fan with a light is totally achievable and incredibly rewarding. You’ll be enjoying cooler air and brighter light in no time, and feeling a real sense of accomplishment. Ready to transform your space? Let’s walk through it, step by step!
Why Install a Ceiling Fan With Light?
Ceiling fans aren’t just about moving air; they’re a fantastic way to enhance your home’s functionality and aesthetic. Combining a fan with a light fixture offers dual benefits, making it a smart choice for any room.
Boost Comfort and Airflow
During warmer months, a ceiling fan circulates air, creating a cooling breeze effect that can make a room feel several degrees warmer without relying solely on air conditioning. This can lead to energy savings and a more comfortable living environment. In cooler weather, many fans have a reverse mode that pushes warm air trapped near the ceiling back down, helping to distribute heat more evenly.
Save Energy
By using a ceiling fan, you can often reduce your reliance on air conditioning. The National Renewable Energy Laboratory (NREL) notes that ceiling fans can make a room feel up to 4°F cooler, allowing you to set your thermostat a few degrees higher and save on energy costs. This makes them an eco-friendly and budget-conscious addition to your home.
Enhance Lighting and Style
A ceiling fan with an integrated light kit provides both illumination and air circulation from a single ceiling point, streamlining your decor. It’s a practical solution for rooms where a central light fixture is desired but additional air movement would be beneficial, such as living rooms, bedrooms, and kitchens. Plus, with the vast array of styles available, a ceiling fan can become a stylish centerpiece that complements your interior design.

Essential Tools and Materials
Before you begin, gather all your tools and materials. Having everything ready will make the installation process smoother and safer.
Tools You’ll Need:
- Screwdriver Set: Phillips head and flathead screwdrivers are essential for various screws.
- Wire Strippers/Cutters: For safely preparing electrical wires.
- Voltage Tester: Crucial for ensuring the power is off before you start working with electrical wires. A non-contact voltage tester is a user-friendly option.
- Ladder: A stable ladder is necessary to reach the ceiling safely.
- Pliers: Useful for gripping and twisting wires.
- Adjustable Wrench: For tightening nuts and bolts.
- Safety Glasses: To protect your eyes from debris.
- Work Gloves: For a better grip and protection.
- Measuring Tape: To ensure proper blade alignment and placement.
- Drill (Optional): Can be helpful for pilot holes if needed, but usually not required for standard installations.
Materials Included in Your Fan Kit:
Most ceiling fan kits come with everything you need, but it’s always good to check:
- Ceiling fan motor housing
- Fan blades and blade brackets
- Light kit (if applicable)
- Mounting bracket
- Downrod (the pipe connecting the fan to the ceiling mount)
- Canopy (decorative cover for the ceiling mount)
- Wire nuts
- Screws and hardware
- Optional remote control or wall control
Important Considerations Before You Start:
- Ceiling Support: The electrical box in your ceiling must be fan-rated. Standard light fixture boxes are not strong enough to support the weight and vibration of a ceiling fan. If you’re unsure, you may need to install a fan-rated brace. You can find guidance on installing fan braces from resources like The Home Depot’s DIY guides.
- Wiring: Ensure your ceiling box is wired for a fan and light. Some older homes or basic setups might only have wiring for a single light fixture. If you only have two wires (hot and neutral) and a ground, you might not be able to operate the fan and light independently without additional wiring or a special receiver.
- Ceiling Height: For safety and optimal airflow, the fan blades should be at least 7 feet from the floor. Most standard downrods work for ceilings 8-9 feet high. Taller ceilings may require a longer downrod.
Step-by-Step Guide to Installing Your Ceiling Fan With Light
Don’t worry, we’ll take this one step at a time. With a little patience and attention to detail, you’ll have your new fan up and running!
Step 1: Turn Off the Power!
This is the MOST important step. Go to your home’s electrical panel (breaker box) and find the breaker that controls the power to the room where you’ll be installing the fan. Flip it to the “OFF” position. To be absolutely sure, use your voltage tester on the existing wires in the ceiling box after removing the old fixture. No power should register. If you’re replacing an old fixture, remove it carefully before proceeding.
Step 2: Assemble the Fan Motor and Downrod
Lay out the fan motor and the parts for the downrod. Most fans require you to attach the downrod to the motor housing. This usually involves feeding the fan’s wires through the downrod, then securing the downrod to the motor with a pin and screws. Make sure these are TIGHT. Then, attach the canopy to the downrod, sliding it down over the motor housing. It will be used later to cover the ceiling mount.
Step 3: Mount the Ceiling Bracket
Your fan kit comes with a mounting bracket. Find the existing electrical box in the ceiling. If it’s not fan-rated, you MUST replace it with one that is. Securely attach the new mounting bracket to the fan-rated electrical box using the screws provided. Ensure it’s firmly attached, as it needs to support the weight of the fan.
Step 4: Hang the Fan Motor Assembly
Carefully lift the assembled fan motor and downrod up to the ceiling. Most mounting brackets have a hook or a slot designed to hold the fan temporarily while you make the electrical connections. This allows you to hang the fan assembly, freeing up your hands. Refer to your fan’s manual for the specific hanging mechanism.
| Fan Component | Purpose | Installation Point |
|---|---|---|
| Mounting Bracket | Secures the fan to the ceiling electrical box. | Attached to the fan-rated electrical box. |
| Downrod | Connects the fan motor to the ceiling mount. | Attaches to the fan motor and passes through the canopy. |
| Canopy | Covers the ceiling mount and wiring. | Slides down the downrod and attaches to the mounting bracket. |
Step 5: Make the Electrical Connections
This is where your wire strippers and wire nuts come in handy. Connect the wires from the ceiling to the wires from your fan. Typically, you’ll find:
- Black (Hot) Wire: Connect the black wire from your ceiling box to the black wire from the fan motor. If you have separate wires for the fan and light (often a blue wire for the light), you might connect these to different switches if your wiring allows, or connect the fan’s black and the light’s blue wire together to the ceiling’s hot wire for single-switch operation.
- White (Neutral) Wire: Connect the white wire from your ceiling box to the white wire from the fan.
- Green or Bare Copper (Ground) Wire: Connect the ground wire from the ceiling box to the ground wire from the fan bracket and the fan motor.
Use the provided wire nuts to secure each connection. Gently tug on each wire to ensure it’s held firmly. Your fan’s manual will have a specific wiring diagram – follow it closely!
Step 6: Secure the Canopy
Once the wiring is done and all wire nuts are secure, carefully tuck the wires up into the electrical box. Then, slide the canopy up to the ceiling, covering the mounting bracket and wiring. Secure the canopy to the mounting bracket, usually with screws. Ensure it’s snug against the ceiling.
Step 7: Attach the Fan Blades
Now for the blades! Attach the blade brackets to each fan blade using the provided screws. Then, attach the assembled blades and brackets to the fan motor. Again, make sure all screws are tight to prevent wobbling.
Step 8: Install the Light Kit
If your fan includes a light kit, you’ll typically connect its wiring (often to a blue wire from the fan motor and a ground wire) and then attach the housing of the light kit to the bottom of the fan motor assembly. Install the light bulbs and any glass shades. For more detailed instructions on light kit installation, consult your fan’s manual, as designs can vary.
Step 9: Restore Power and Test
With everything securely installed, go back to your electrical panel and turn the breaker back ON. Test all the functions of your new ceiling fan: the fan speeds (low, medium, high) and the light. Ensure everything works as expected from your wall switch or remote control.
Troubleshooting Common Installation Issues
Even with the best guides, sometimes things don’t go exactly as planned. Here are a few common hiccups and how to fix them.
Fan Wobbles
Cause: Blades are not balanced, not securely tightened, or the mounting is loose.
Solution: Ensure all screws holding the blades, blade brackets, and mounting bracket are tight. Most fans come with a balancing kit. Follow the kit’s instructions to attach weights to the blades to correct the wobble.
Fan Motor Not Running
Cause: Power not on, wiring issue, or a faulty capacitor/switch.
Solution: Double-check that the breaker is on and that you used your voltage tester to confirm power is reaching the box. Verify all wire connections are secure. If these steps don’t resolve it, the fan might have an internal issue, and you may need to contact the manufacturer for support or consider a replacement.
Light Not Working
Cause: Bulb issue, loose connection, or wrong wiring.
Solution: Ensure the light bulbs are correctly installed and not burnt out. Check the wire connections for the light kit specifically, making sure they are secure. If you have separate wires for fan and light, confirm they are connected correctly according to your fan’s diagram. For guidance on electrical safety and wiring, resources like the U.S. Consumer Product Safety Commission offer valuable information.
Fan Makes Noise
Cause: Loose screws, loose blades, or internal motor issue.
Solution: First, ensure all screws are tight. Check for any loose light shades or parts. If the noise persists, it might be an internal motor issue. Ensure the fan is properly hung and the canopy is flush against the ceiling.
Remember, if you’re ever unsure or uncomfortable, especially with electrical work, it’s always best to consult a qualified electrician. Safety first!
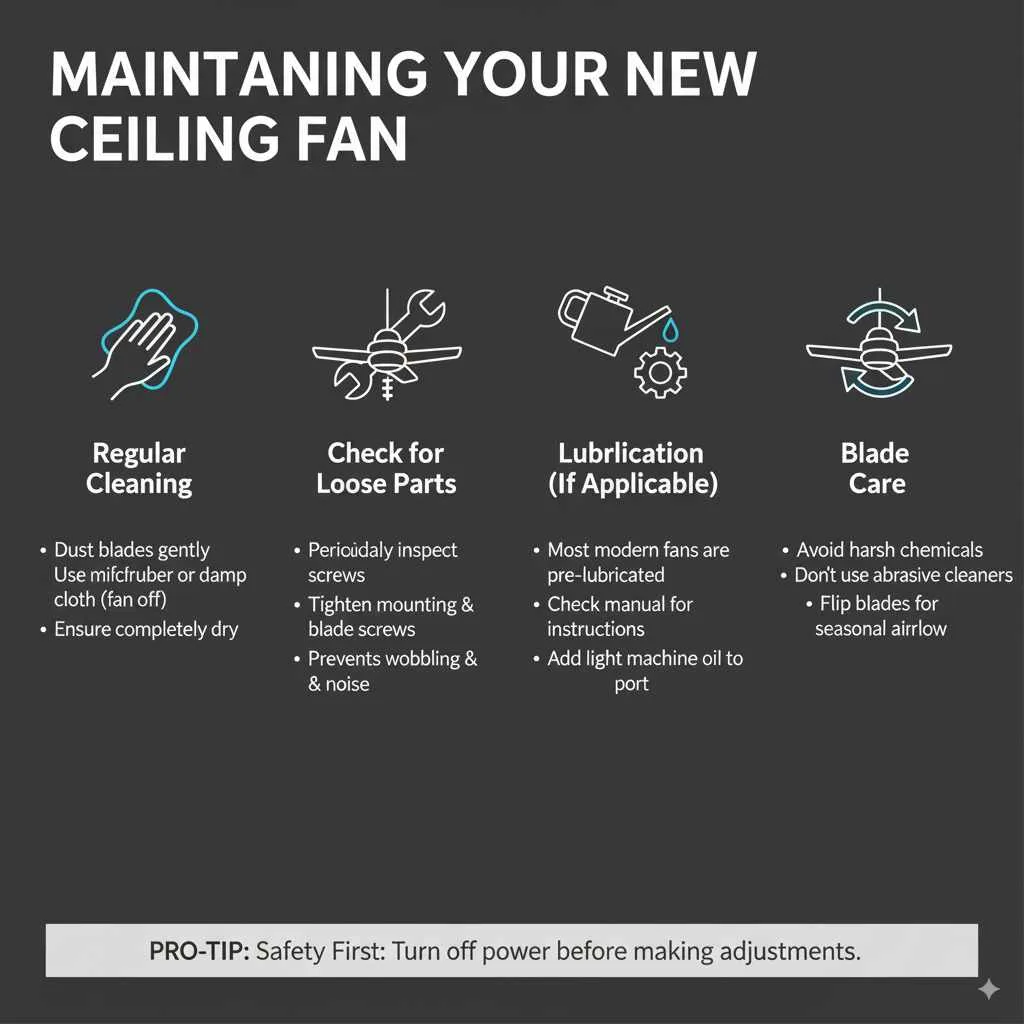
Maintaining Your New Ceiling Fan
Once your beautiful new fan is installed, a little regular maintenance will keep it running smoothly and looking great for years to come.
Regular Cleaning
Dust can accumulate on fan blades, affecting performance and appearance. Dust the blades gently with a microfiber cloth or a duster designed for ceiling fans. For a more thorough clean, you can use a damp cloth, but ensure the fan is off and completely dry before turning it back on.
Check for Loose Parts
Periodically (every few months), check that all screws, especially those attaching the blades and mounting bracket, are still tight. A gentle tightening can prevent wobbling and unusual noises.
Lubrication (If Applicable)
Most modern ceiling fans are permanently lubricated and do not require oiling. However, if your fan’s manual specifies lubrication, follow the instructions carefully. Typically, this involves adding a few drops of light machine oil to a specific port on the motor housing.
Blade Care
Avoid using harsh chemicals or abrasive cleaners on the fan blades, as this can damage the finish. If your blades are reversible, you can change the direction of the airflow for different seasons by flipping them (you’ll need to loosen the blade screws, flip, and re-tighten).
Frequently Asked Questions (FAQ)
Q1: Can I install a ceiling fan myself if I have no electrical experience?
Yes, you can! This guide breaks down the steps simply. The most critical part is ensuring the power is OFF and making the correct wire connections. If you’re uncomfortable with wiring, consider getting help from a friend with some electrical knowledge or hiring an electrician just for that part.
Q2: What is a “fan-rated” electrical box, and do I need one?
A fan-rated electrical box is designed to support the weight and vibration of a ceiling fan. Standard light fixture boxes are not strong enough. Yes, you absolutely need one for safe installation. If your current box isn’t fan-rated, you’ll need to replace it with one, often involving installing a fan brace to secure it to the ceiling joists.
Q3: How do I know if my ceiling wiring is compatible with a fan and light?
Typically, you’ll need a “hot” wire (usually black), a “neutral” wire (usually white), and a “ground” wire (green or bare copper). If you have separate wires (especially a different colored wire for the light and fan, or an extra wire), you can likely control the fan and light independently. Check your fan’s manual for specific wiring requirements.
Q4: My fan is wobbling. What should I do?
A slight wobble can be normal, but excessive wobbling means something is wrong. First, ensure all screws attaching the blades, blade brackets, and mounting bracket are tight. If it persists, use the balancing kit included with your fan. This involves attaching small weights to the blades to counteract the wobble.
Q5: How do I make sure the fan is balanced?
Balancing is usually done with a balancing kit. You’ll attach a clip to one blade, test the wobble, then move the clip to different blades until the wobble is minimized. Then, you attach a self-adhesive weight to the top of the blade at the point the clip indicated it was most effective.
Q6: What if my ceiling is sloped?
Many ceiling fans can be installed on sloped ceilings, but you may need a special mounting kit or a longer downrod to ensure the fan hangs level and the blades don’t hit the ceiling. Check your fan’s specifications or purchase an angle-mount adapter if needed.
Conclusion
See? You can absolutely do this! Installing a ceiling fan with a light might seem like a big DIY project, but by following these clear, step-by-step instructions, you’ve gained the knowledge and confidence to tackle it. You’ve learned about preparing your space, the tools and materials you’ll need, how to tackle the installation itself, and even how to troubleshoot common issues. Taking on projects like this not only enhances your home’s comfort and style but also gives you a fantastic sense of accomplishment. Enjoy your newly improved room with its cooling breezes and integrated lighting. Happy decorating, and enjoy your DIY success!