To change grill burners, first, ensure the grill is cool and the gas supply is off. You will need basic tools like a screwdriver and pliers. Carefully remove grates and heat tents, disconnect the old burners, install the new ones, and reassemble, always testing for leaks afterward to ensure safe operation and an even cooking flame.
If your backyard barbecue suddenly starts throwing uneven flames, smoking too much, or just not heating up like it used to, the culprit is often the burners themselves. These essential parts wear out from constant heat and exposure to grease. Don’t toss that grill yet! Learning how to change grill burners is a fantastic DIY skill that saves you money and brings your grill back to life.
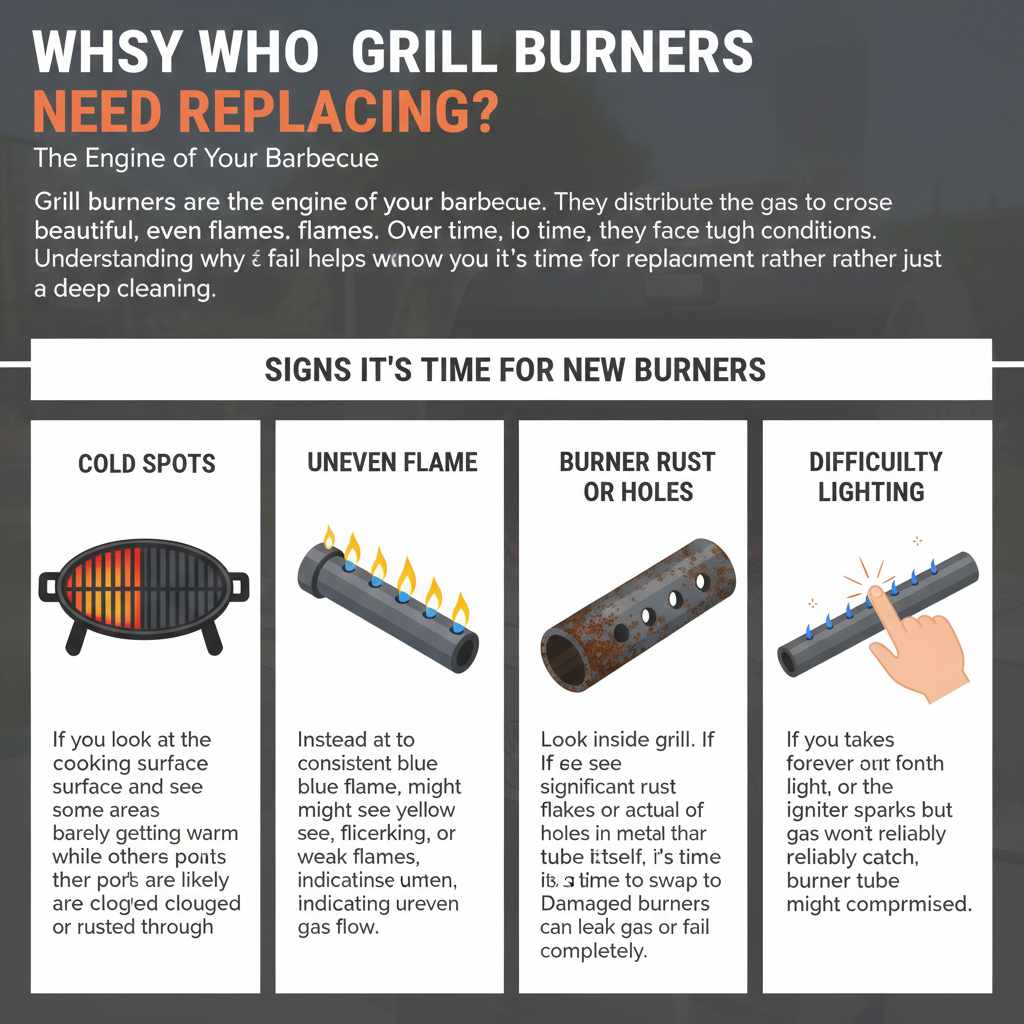
Why Do Grill Burners Need Replacing?
Grill burners are the engine of your barbecue. They distribute the gas to create those beautiful, even flames. Over time, they face some tough conditions. Understanding why they fail helps you know when it’s time for a replacement rather than just a deep cleaning.
Signs It’s Time for New Burners
When things go wrong under the hood of your grill, the symptoms are usually pretty clear. Pay attention to these warning signs:
- Cold Spots: If you look at the cooking surface and see some areas barely getting warm while others are scorching, the burner ports (the little holes where the flame comes out) are likely clogged or rusted through.
- Uneven Cooking or Flame: Instead of a consistent blue flame, you might see yellow, flickering, or weak flames, indicating uneven gas flow.
- Burner Rust or Holes: Look inside the grill. If you see significant rust flakes or actual holes in the metal of the burner tube itself, it’s time to swap it out immediately. Damaged burners can leak gas or fail completely.
- Difficulty Lighting: If it takes forever to light, or the igniter sparks but the gas won’t reliably catch, the burner tube might be compromised.
Understanding Burner Lifespan
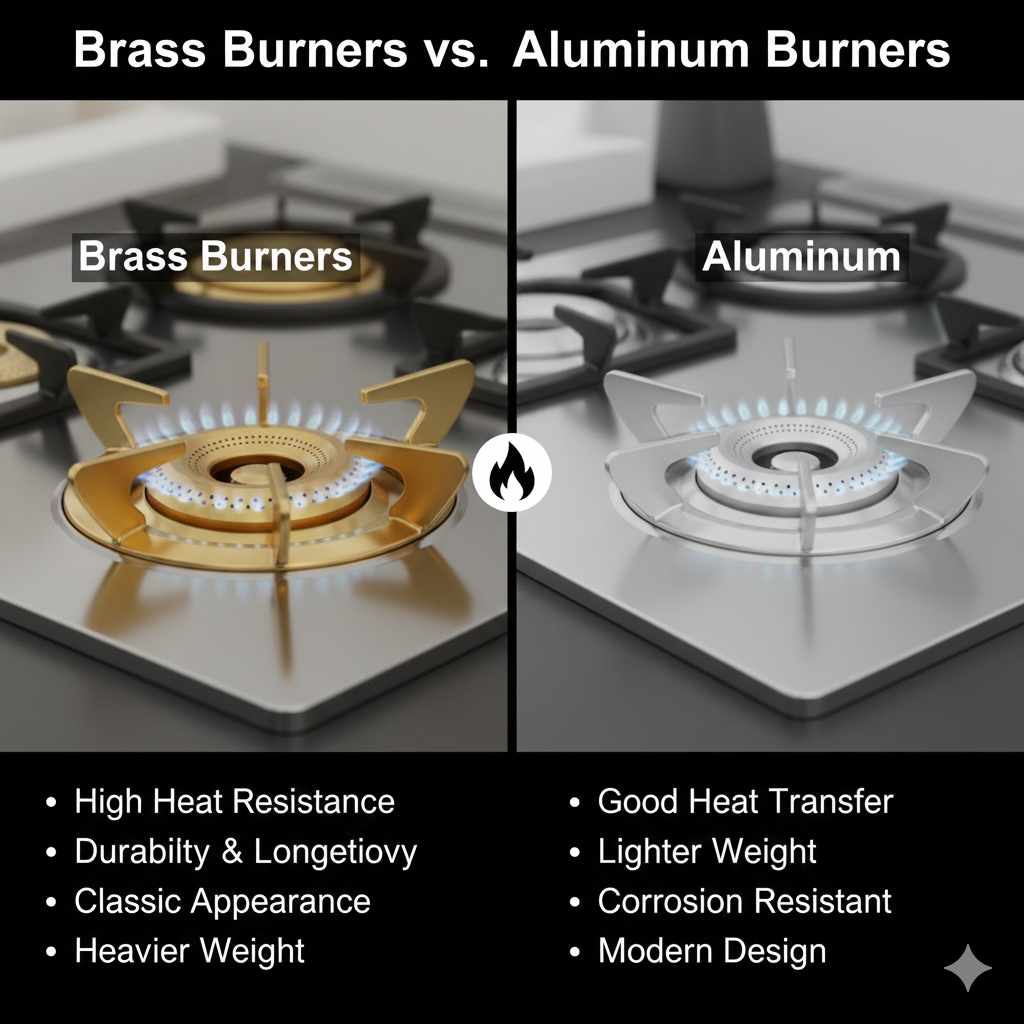
How long should burners last? That truly depends on how often you grill and the material the burners are made of.
| Burner Material | Typical Lifespan | Notes |
|---|---|---|
| Stainless Steel (Good Quality) | 5 to 10 years | Most common; offers good durability. |
| Cast Iron | 3 to 5 years | Prone to rust if not seasoned or maintained well. |
| Porcelain-Coated Steel | 4 to 7 years | The coating can chip, exposing the steel underneath to rust. |
Getting Ready: Essential Tools and Safety First
Before we start taking things apart, preparation is key. Safety is always my number one priority here, especially when dealing with gas components, even if the flow is turned off.
Safety Checklist: Before You Touch Anything
Never skip these critical safety steps. They are non-negotiable when working on a gas appliance.
- Allow the grill to cool down completely. This might take an hour or more after recent use. Hot metal can cause burns.
- Locate the main gas source. If you have a propane tank, securely turn the valve clockwise until it stops. If you have a natural gas line, turn off the shutoff valve leading to the grill, usually located near the connection fitting.
- Disconnect the fuel source. For propane, physically disconnect the regulator hose from the tank. For natural gas, ensure the external shutoff valve is closed.
- Ventilate the area. Work outside in a well-aired space.
Tools You Will Need
You don’t need a full mechanic’s toolbox for this job. Most grills use standard fasteners. Make sure you have these handy:
- Screwdriver Set (Phillips and flathead, as different brands use different screws).
- Pliers (Needle-nose are often helpful for clips or small nuts).
- Socket Set or Adjustable Wrench (Needed if the burner is bolted in place from underneath).
- Wire Brush (For cleaning up debris).
- Replacement Burners (Crucially, make sure these match your grill model!).
- Safety Glasses and Work Gloves.
Finding the Right Replacement Burners
This is where many DIYers get stuck. You cannot just buy any burner—it must fit your grill’s make and model perfectly. The manifold length, mounting points, and gas ports must align.
Pro Tip: The easiest way to ensure you get the right part is to look up the grill’s model number (usually on a sticker inside the grill cabinet) and search for an OEM (Original Equipment Manufacturer) or a reputable aftermarket replacement kit specifically for that model. Check resources like the Consumer Product Safety Commission (CPSC) guidelines for general appliance safety assurance.
Step-by-Step Guide: How to Change Grill Burners
We are going to take this one section at a time. Don’t rush; just follow the sequence, and you’ll have it done before you know it.
Step 1: Accessing the Burners (Removing Grates and Flavorizer Bars)
The first items you need to remove sit directly over the burners. These parts need to come out so you can reach the hardware holding the burners in place.
- Remove Cooking Grates: Simply lift the cooking grates out. Set them aside on a clean, protected surface.
- Remove Heat Tents/Flavorizer Bars: These metal pieces sit above the burners and vaporize drippings while protecting the burner tubes. They usually just lift straight up. Note how they sit; some may overlap.
Step 2: Dealing with the Control Panel and Knobs
Depending on your grill design (especially if you have side shelves or a complex control panel), you might need to access the burners from the front or the bottom.
Most common gas grills require removing the front control knobs. Gently pull them straight off the valve stems. If they are stuck, sometimes wiggling them slightly while pulling works, but never force them hard.
Step 3: Identifying and Disconnecting the Old Burners
Now you can see the burner tubes clearly. They are usually held in place by one of a few methods:
- Screws/Bolts: Look underneath the bottom shelf or inside the firebox. The burner may be secured by a screw or bolt going up into the frame. Remove this fastener.
- Clips or Tabs: Some burners slide into position and are held by simple metal clips slipped over the tube ends. Use a flathead screwdriver or needle-nose pliers to gently unhook the clip.
- Manifold Connection: This is the most important connection. The burner tube has an opening (the orifice holder) that slides over the valve stem connected to the control knob. You may need to carefully lift the burner tube away from this point. Be gentle; you don’t want to bend the valve stem itself.
Crucial Note on Igniter Wires: Many modern grills use electronic igniters. As you lift the burner, you might see a small wire running to it that sparks the gas. Note exactly where this wire attaches (it might clip onto the burner tube or attach to the side). Disconnect this wire by gently pulling the plastic connector apart—do not pull the wire itself.
Step 4: Removing the Old Burner Tube
Once all fasteners are removed and the igniter wire is free, carefully slide the old burner tube out. If it’s rusty or corroded, it might take some gentle rocking. If it has a small opening (a venturi opening) that connects to the gas valve, make sure you don’t lose the shield or gasket around that connection point, as these are important for proper gas mixing.
Step 5: Installing the New Burner Tubes
Installation is often the reverse of removal, but pay close attention to alignment, as this dictates gas flow.
- Alignment Check: Before sliding the new burner in, check its length against the old one. If it’s too long, it won’t fit. If it’s too short, it won’t reach the valve stem properly.
- Connect to Valve: Slide the gas orifice end of the new burner tube snugly onto the valve stem. It should sit flat and secure.
- Secure Fasteners: Reinstall any screws, bolts, or clips that hold the burner firmly in place against the grill’s body.
- Attach Igniter Wire:** Reconnect the small wire connector securely onto the new burner where the old one was attached.
Step 6: Reassembly and Final Checks
This is the satisfying part where you put everything back together.
- Replace the heat tents or flavorizer bars, ensuring they sit level over the new burners.
- Place the cooking grates back on top.
- Reattach the control knobs.
Testing for Gas Leaks: The Absolute Most Important Step
We have reassembled the system, but before firing up the grill for a cookout, we must verify that all the gas connections—especially where the new burner meets the valve—are sealed tight and safe.
The Soapy Water Test
This is the tried-and-true, simple method for checking gas connections for leaks. You are looking for bubbles, which indicate escaping gas.
- Prepare the Solution: Mix a solution of one part dish soap to three parts water in a spray bottle or small bowl.
- Reconnect Gas: Hook the propane tank back up or open the natural gas line valve. (Keep the grill control knobs OFF during this check!)
- Apply Solution: Thoroughly spray or brush the soapy water onto every joint you may have touched or disconnected during the installation. Focus especially on the connection point where the burner enters the gas manifold valve.
- Watch Closely: Watch for 30 seconds to a minute. If you see any stream of small or large bubbles forming where the soap solution is, you have a leak.
- Fixing a Leak: If you see bubbles, immediately turn the gas supply OFF. Gently tighten the connection slightly (do not overtighten!) and repeat the soap test. Keep repeating until no bubbles appear.
If the connections pass the soapy water test, you are safe to proceed. This check is vital for maintaining a safe grilling environment in your backyard.
Maintenance Tips for Extending Burner Life
Now that you’ve installed new parts, a little maintenance goes a long way toward preventing you from having to do this job again soon. Think of it like changing the oil in your car—it keeps the machinery running smoothly.
Regular Cleaning Habits
Cleaning your grill after every use, even a quick brush of the grates, prevents grease buildup that can eventually clog burner ports.
- Weekly Brush Down: After cooking (while the grill is still warm, but not blazing hot), use a good quality stainless steel brush to clean the grates.
- Monthly Deep Clean: Once a month, or seasonally, remove the grates and heat tents. Use a wire brush to gently scrub the exterior of the burner tubes. Clean out the ports (holes) using a small piece of wire or a dedicated burner cleaning tool to remove any carbon buildup or debris.
- Check for Blockages: When cleaning, look for spider webs, especially at the entry point (venturi tube) of the burner. Spiders love the smell of gas residue and their nests can completely block the flow.
The Importance of Proper Seasoning (For Cast Iron)
If your grill uses cast iron components (which can include burners or grates), applying a thin coat of high-heat cooking oil (like canola or flaxseed oil) after cleaning and heating the part will help prevent flash rust. This process seasons the metal, similar to curing a cast iron pan.
Troubleshooting Common Burner Installation Issues
Even the best guides can sometimes lead to a hiccup. Here are a few issues beginners commonly face when learning how to change grill burners and how to fix them easily.
Issue 1: Burner Will Not Light Even After Installation
If you have gas flowing (you can smell it slightly) but no ignition:
- Check Igniter Connection: Did the tiny igniter wire become disconnected? Reattach it firmly, ensuring clean metal-to-metal contact if necessary.
- Check Alignment: Is the tip of the burner perfectly aligned with the valve stem? If the burner is slightly too high or too low, the gas might be leaking out instead of being sprayed toward the igniter spark point.
- Check the Battery: If your grill uses a battery-powered electronic ignition module (often a button on the control panel), replace the battery. A weak battery often results in a faint, useless spark.
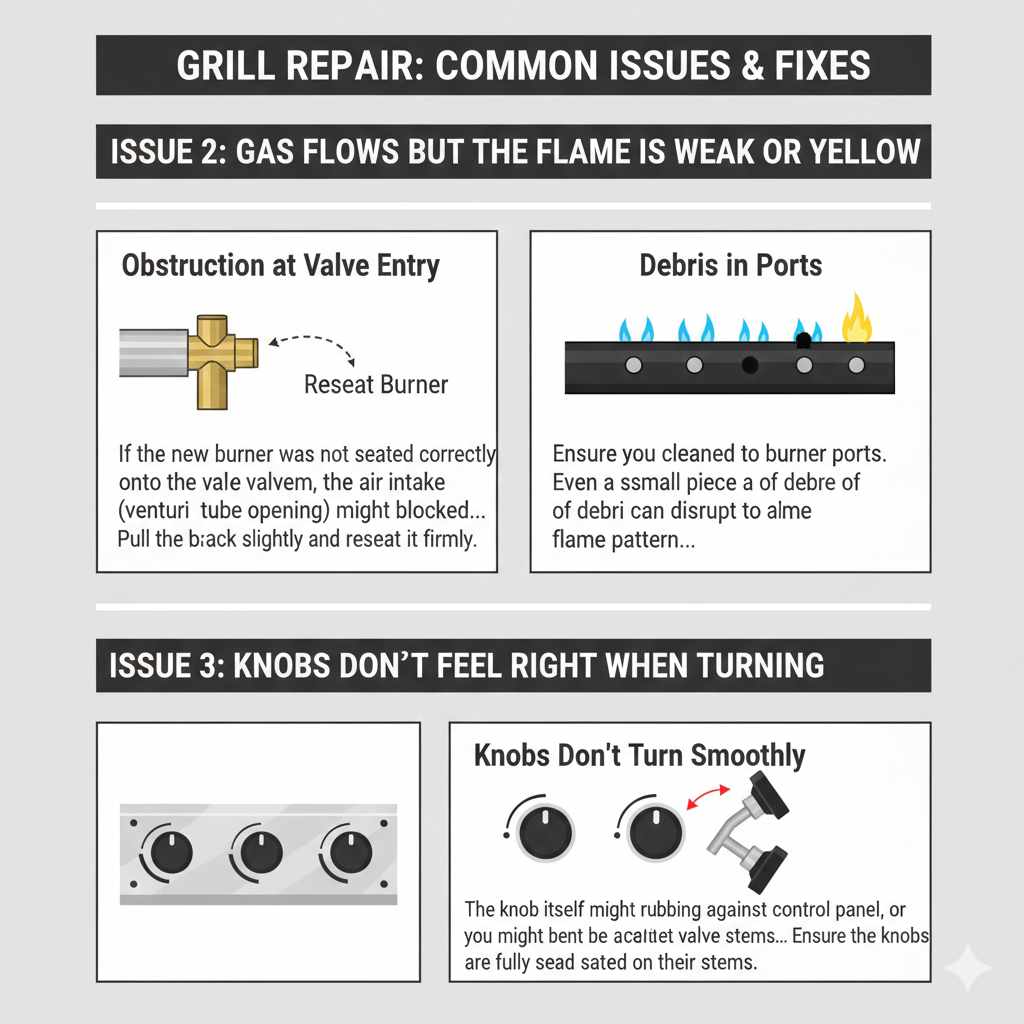
Issue 2: Gas Flows But The Flame is Weak or Yellow
This points to an issue with air mixing with the gas (the venturi system).
- Obstruction at Valve Entry: If the new burner was not seated correctly onto the valve stem, the air intake (venturi tube opening) might be blocked by the valve housing, preventing proper air/gas mix. Pull the burner back slightly and reseat it firmly.
- Debris in Ports: Ensure you cleaned the burner ports. Even a small piece of debris can disrupt the flame pattern across the entire tube.
Issue 3: Knobs Don’t Feel Right When Turning
If the control knobs won’t turn smoothly or seem to stick:
- The knob itself might be rubbing against the control panel, or you might have accidentally bent the valve stems slightly while maneuvering the old burner out.
- Ensure the knobs are fully seated on their stems. They usually have a small D-shaped hole that must align perfectly with the stem.
Understanding Grill Components (A Quick Reference)
When working inside your grill, knowing the name of the part being replaced helps immensely when ordering supplies. Here is a quick breakdown of related components beside the burner itself:
| Component Name | What It Does | Why It Fails |
|---|---|---|
| Flavorizer Bar / Heat Shield | Vaporizes drippings to create smoke flavor and protects the burner from direct heat. | Rusts through from direct heat and grease exposure. |
| Orifice/Jet | A very small, precisely drilled opening where the gas enters the burner tube from the valve. | Corrosion or debris can widen or clog the hole, disrupting flow. |
| Valve Stem | The shaft inside the control knob assembly that regulates gas flow to the burner. | Usually reliable, but can bend if too much force is applied during burner removal. |
Frequently Asked Questions (FAQ) for Beginner Grill Owners
Q1: Can I clean my old burners instead of replacing them?
A: Sometimes, yes! If the burners only have clogged ports and no significant rust holes, you can clean them thoroughly with a stiff wire brush and compressed air. However, if you see rust, replacement is necessary for safety and effectiveness.
Q2: Do I need to replace the regulator and hose when I replace the burners?
A: Not usually. You should only replace the regulator/hose assembly if you notice obvious cracks, bulges in the hose, or if you are having persistent low-pressure issues that the burner replacement didn’t fix.
Q3: How long should I let the gas remain off during this repair?
A: As soon as you turn the gas off and disconnect the supply, the system pressure dissipates quickly. You only need to keep the gas off while you work on removing and replacing the components. Remember to turn it on slowly for the leak test afterward.
Q4: What is the difference between a gas crossover tube and a main burner?
A: Main burners are what you replace; they run under the cooking area. A crossover tube often connects two main burners so that a single control knob can operate both simultaneously. If you have these, you must disconnect the crossover tube carefully when swapping out the main tubes.
Final Thoughts: Fire Up Your Grill with Confidence
Replacing your grill burners might seem like a daunting repair at first, but as you’ve seen, it’s a completely manageable DIY project when approached with patience, the right tools, and a strong focus on safety. By understanding the warning signs of failing burners, choosing the correct replacements, and carefully following each step—from shutdown to leak testing—you can restore your grill’s performance without the expense of buying a brand-new unit.
More importantly, learning how to change grill burners puts you back in control of your outdoor cooking experience. You’ll enjoy more even heat, reliable ignition, and that perfect sear that makes backyard grilling so satisfying. With regular cleaning and basic maintenance, your new burners can last for years, keeping your grill ready whenever inspiration strikes.
So don’t let uneven flames or weak heat ruin your cookouts. Take the time to do the repair right, trust the process, and fire up your grill knowing you handled it yourself. Here’s to safer grilling, better flavor, and many great meals ahead—happy grilling!