Baking a perfect green bean casserole is easy! Follow these simple steps to nail the creamy texture, tender beans, and crispy topping every time. We cut through the confusion so you can serve a classic favorite with confidence.
Making a great green bean casserole often feels like it hides some secret ingredient only seasoned pros know. Maybe your last batch turned out too watery, or perhaps the top wasn’t crunchy enough. Don’t sweat it! This classic dish should be comforting, not complicated. Think of this as getting the owner’s manual for your oven, tailored just for this beloved side dish. We are going to walk through every step clearly, ensuring your casserole is creamy, savory, and perfectly golden brown. Let’s ditch the guesswork and get baking!
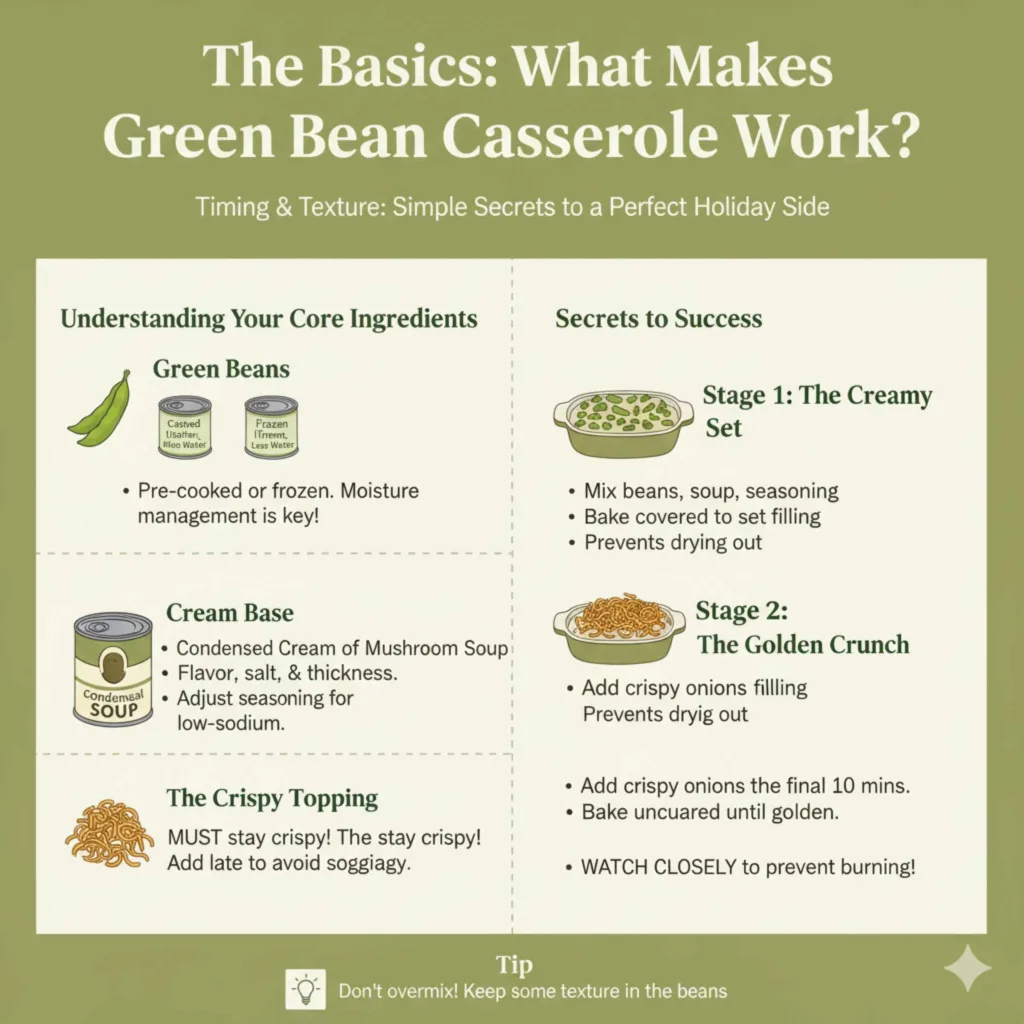
The Basics: What Makes Green Bean Casserole Work?
Green bean casserole, a staple often associated with holiday tables, relies on a simple formula: green beans, a creamy binder, and those famous crispy onions. The “secrets” aren’t about exotic spices; they are about managing moisture and heat so these three elements truly shine. As someone who loves clear steps, whether I am changing my oil or making dinner, I find success comes from preparation.
Understanding Your Core Ingredients
Before we mix anything, knowing your ingredients prevents future problems. In the automotive world, using the wrong oil weight causes engine trouble. In the kitchen, using the wrong type of canned product causes soggy casserole!
- Green Beans: Most recipes call for canned or frozen. Canned beans are pre-cooked and softer, releasing more water. Frozen beans are often slightly firmer. Either works, but managing the moisture they release is key.
- Cream Base: Typically, this is condensed cream of mushroom soup. This soup provides flavor, salt, and thickness. If you use “low-sodium” soup, you might need to adjust seasoning later.
- The Crispy Topping: Usually French fried onions. These MUST stay crispy! They go on late, or they absorb moisture and become chewy disappointments.
Essential Tools for Success
You don’t need specialized gear, just the basics. Having the right size dish ensures even baking. For reference, standard casseroles are usually baked around 350°F (about 175°C). You can check national temperature guidelines for safe food handling via resources like the Centers for Disease Control and Prevention (CDC), though for a casserole like this, the baking time ensures it heats through properly.
Here is what you need on hand:
- 9×13 Inch Baking Dish: Slightly smaller dishes will make the casserole too thick, increasing bake time and risking uneven cooking.
- Large Mixing Bowl: To combine everything without making a mess.
- Measuring Cups and Spoons: Precision helps, especially with the liquid.
- Rubber Spatula: Great for folding ingredients gently.
- Oven Thermometer (Optional but Recommended): Ovens lie! An external thermostat ensures you are truly hitting that 350°F mark.
Step-by-Step: How to Bake Green Bean Casserole Like a Pro
We are breaking this down into three main phases: Preparation, Mixing, and Baking. Follow these steps closely, and you will have a beautiful side dish ready for the table.
Phase 1: Preparation—Managing Moisture
This is the most overlooked step, and it’s where most beginner casseroles fail. Excess water equals a soupy mess.
If Using Canned Green Beans:
- Open two cans (about 14.5 oz each) of cut green beans that are packed in water or brine.
- Drain them THOROUGHLY in a colander.
- The Key Secret: Press them! After draining, gently press the beans against the side of the colander with the back of a spoon or spatula to release as much residual liquid as possible.
If Using Frozen Green Beans:
- You don’t need to thaw them completely, but we do need to lower their surface moisture.
- Steam or briefly blanch the frozen beans for just 2-3 minutes—just long enough to take the icy chill off. You are not trying to cook them through, just remove the ice crystals.
- Immediately drain them well and pat them lightly with a paper towel if they seem overly wet.
Phase 2: The Creamy Mix
This is where we build the creamy center. Remember, we are aiming for a thick coating, not a soup. The standard recipe uses one can (10.5 oz) of condensed cream of mushroom soup.
Assembling the Base Ingredients:
- In your large mixing bowl, combine the drained green beans with the can of condensed cream of mushroom soup.
- Add your liquid adjustment. If the mixture seems very thick, you might add 1/4 cup of milk or half-and-half. If it seems loose, skip the milk entirely.
- Stir in your seasonings: typically 1 teaspoon of soy sauce (for depth!), 1/2 teaspoon of black pepper, and maybe a dash of garlic powder. Do NOT add salt yet, as the soup and soy sauce are already salty.
- Gently fold in about half of your crispy fried onions now. Folding gently keeps the remaining topping ready for the top layer later.
Pro Tip: Taste a tiny bit of the mixture now. Does it need more pepper? A little more savory flavor? This is the last time you can mix in seasoning before baking. Once it’s in the oven, changes are very hard to make!
Phase 3: Baking Strategy for the Perfect Crunch
The timing of adding the crispy onions determines everything. We use a two-stage baking approach.
Table 1: Casserole Baking Schedule
| Time Stage | Action | Purpose |
|---|---|---|
| Initial Bake (20-25 Minutes) | Spread mixture evenly in the lightly greased 9×13 dish. Bake uncovered at 350°F (175°C). | Allows the inside to heat through and set slightly without burning the topping. |
| Topping Stage (5-7 Minutes) | Remove from oven. Sprinkle remaining crispy onions evenly over the top. | Prepares the surface for browning. |
| Final Bake (5-10 Minutes) | Return to the oven until the casserole is bubbly around the edges and the topping is golden brown. | Achieves the signature golden, crunchy finish. |
- Preheat Check: Ensure your oven has been fully preheated to 350°F (175°C). Patience here saves the dish later.
- First Bake: Pour the mixture into your prepared dish. Bake for 20 to 25 minutes. You are looking for gentle bubbling at the edges.
- The Crunch Application: Take the dish out. Sprinkle the rest of your French fried onions evenly over the entire surface.
- Final Check: Return it for another 5 to 10 minutes. Watch carefully! These onions burn fast. Pull it out the moment they hit that perfect, rich golden-brown color.
Advanced Secrets: Takes Your Casserole from Good to Legendary
Once you have the basic technique down, these small tweaks elevate your dish far beyond the standard recipe found on the back of a soup can. These are the real “secrets” that seasoned cooks use.
Secret 1: Enhance the Cream Base
While condensed soup is the easy route, you can build complexity by doctoring the base.
- Mushroom Freshness: If you have time, sauté 4-6 ounces of fresh sliced mushrooms (cremini work well) in butter until soft and release their liquid. Add these sautéed mushrooms to your soup before mixing. This adds real texture and deepens the umami flavor.
- Dairy Upgrade: Instead of just milk or water to thin the soup slightly, use sour cream or plain Greek yogurt (about 1/4 cup). This adds a slight tang that cuts through the richness of the soup, making the whole dish taste fresher.
Secret 2: The Power of Umami Boosters
Umami is that deep, savory satisfaction we crave, and a few pantry staples can deliver it without making the casserole taste like anything other than “better.”
Try adding one (or a mix) of these to your base mix:
- 1 teaspoon Worcestershire sauce.
- 1 teaspoon Dijon mustard.
- A dash of dried thyme (this pairs beautifully with mushrooms).
Secret 3: Control That Topping Temperature
Crispy fried onions are delicious, but they are delicate. Often, if the internal casserole temperature is too low when you add the topping, the heat from the oven focuses too much on browning the onions, leaving the center cold. If you bake the casserole for the full time (25 minutes) and it’s already hot inside, you only need the final 5 minutes for the topping.
If you baked the casserole slightly longer initially (say, 30 minutes), you may need to switch the oven setting right before adding the onions.
The Broiler Trick (Use with Extreme Caution!)
If your casserole is hot in the middle but the topping isn’t browning fast enough, move the dish to the very top rack and turn on the broiler for 1 to 2 minutes. Watch it like a hawk! Broilers are intense. As soon as the onions look deep golden, pull it out immediately. This technique is fast, but one minute too long means burnt onions.
Customizing Your Casserole: Variations and Substitutions
Part of enjoying homemade cooking is making it your own. Just like customizing your vehicle for performance or comfort, you can adjust these ingredients to suit your taste or dietary needs.
Vegetable Swaps
While green beans are the core, you can mix in other vegetables for texture and nutrition. Always pre-cook these additions so they don’t release significant water during the main bake.
- Carrots: Slice thinly or dice and blanch them until tender-crisp.
- Mushrooms: Sautéed fresh mushrooms are always welcome (see Secret 1).
- Water Chestnuts: If you like a bit of crunch inside the casserole, these canned additions are great. Drain them well before mixing.
Dairy and Cream Substitutions
If you are avoiding dairy or simply want to try something new, substitutions are possible.
Table 2: Cream Base Alternatives
| For Standard Cream of Mushroom Soup | When to Use It | Notes |
|---|---|---|
| Cream of Celery or Cream of Chicken Soup | If you prefer a slightly different base flavor. | Maintain the same amount (10.5 oz can). |
| Plain White Sauce (Béchamel) | For a fully homemade binder, avoiding processed ingredients. | Requires making a roux (butter/flour) and adding milk/broth, seasoning heavily. |
| Dairy-Free Cream Substitute | For vegan or dairy-sensitive needs. | Use full-fat canned coconut milk (the solid part) or a store-bought dairy-free condensed soup alternative. Adjust seasoning. |
Topping Alternatives (Beyond Fried Onions)
If you run out of French fried onions or just want something different, try these:
- Crushed Crackers: Use Ritz or saltines, crush them finely, and mix with 1 tablespoon of melted butter before sprinkling on top for the last 10 minutes.
- Breadcrumbs & Cheese: Use Panko breadcrumbs mixed with grated Parmesan cheese. This offers a sharper, cheesier crust.
- Potato Chips: For a truly unconventional, crunchy salty topping, crush plain, ridged potato chips and scatter them on top for the final 5 minutes.
Troubleshooting Common Casserole Issues
Even with the best secrets, sometimes things don’t go perfectly. Here are fixes for the most common hiccups people face when trying out a new recipe.
Issue 1: My Casserole is Watery!
This is almost always a moisture issue from the beans. If time allows, next time, press the beans harder. If it’s already baked and watery, here is the rescue:
- Remove the crispy topping (gently scrape it off and save it).
- Return the casserole to the oven, uncovered, for 10–15 minutes. This allows some of the surface liquid to evaporate.
- If it’s still too loose, mix 1 tablespoon of cornstarch with 2 tablespoons of cold water until smooth. Stir this slurry into the hot casserole base.
- Return it to the oven for 5 minutes to thicken. Then, reapply the topping and bake briefly to heat through.
Issue 2: The Top Burned Before the Center Was Hot
This means your oven temperature was too high, or you added the topping too early.
- Immediate Fix: Gently remove the burnt topping. If the casserole base looks hot and bubbly, replace the topping with fresh, untoasted crispy onions (or use a buttered cracker mixture). Bake on a lower rack for 5 minutes.
- Prevention: Always use that two-stage baking process—bake the creamy base first before adding the delicate topping.
Issue 3: The Casserole Seems Dry
This happens if you used frozen beans but didn’t add enough liquid, or if you overcooked it past the point of bubbling.
- Rescue: Stir in 1/4 cup of warm milk or broth gently around the edges. Cover the dish tightly with foil (this traps steam) and bake at 325°F (160°C) for about 15 minutes until it steams itself back to moisture.
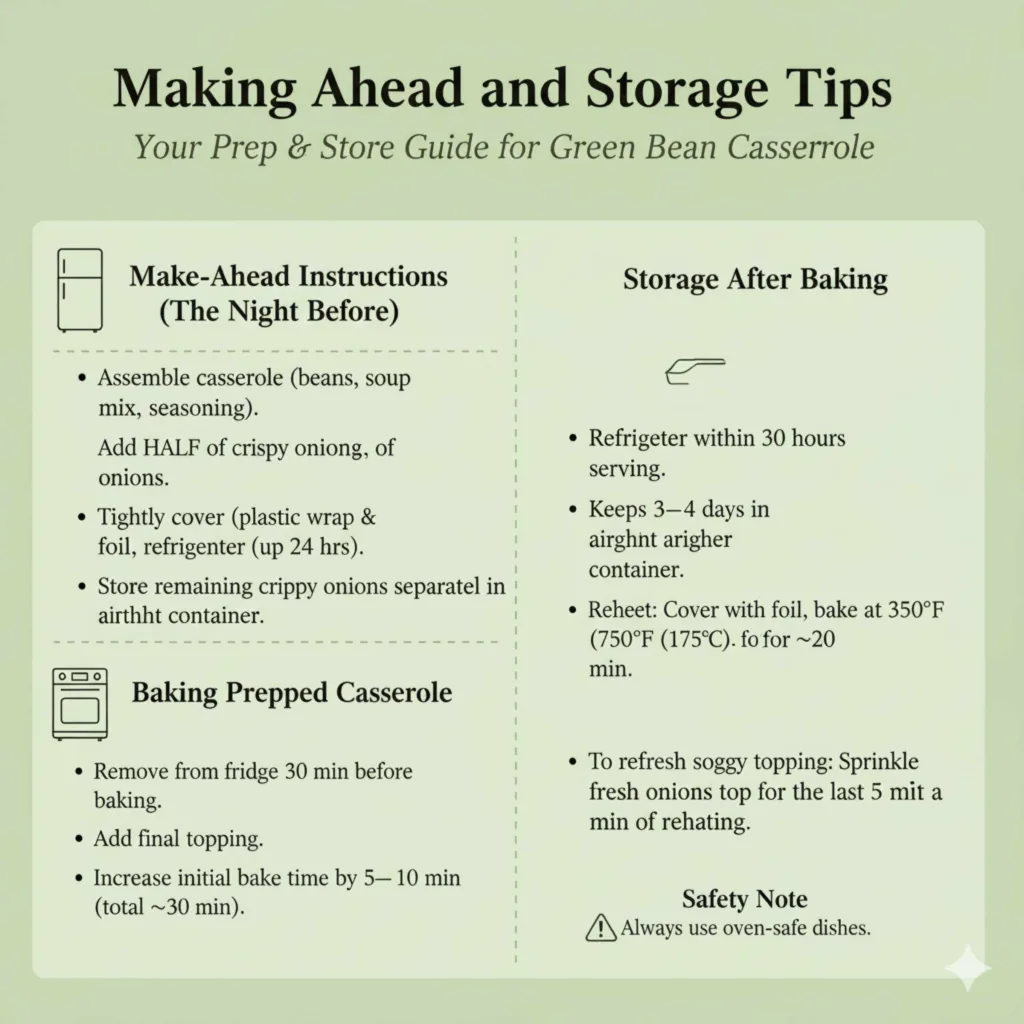
Making Ahead and Storage Tips
The beauty of this dish, just like many great foundational recipes, is that you can prepare it ahead of time. Think of this like prepping your car’s fluids ahead of a long trip; it saves time later.
Make-Ahead Instructions (The Night Before)
You can assemble the entire casserole—beans, soup mix, seasonings, and the first half of the onions—in the baking dish. Tightly cover the dish with plastic wrap, then probably foil over that, and refrigerate for up to 24 hours. Keep the remaining half of the crispy onions stored separately in an airtight container at room temperature.
When ready to bake, pull the casserole from the fridge about 30 minutes before you plan to cook it so it loses the deep chill. Add the final topping and increase the initial baking time by about 5–10 minutes (so try 30 minutes initially) before proceeding with Stage 2 (adding the topping).
Storage After Baking
Leftover casserole stores wonderfully, provided you haven’t left it out too long. Follow standard food safety guidelines—refrigerate within two hours of serving. It keeps well in an airtight container in the fridge for 3–4 days.
To reheat, cover the dish loosely with foil and bake at 350°F (175°C) until heated through (about 20 minutes). If the top is soggy, sprinkle on a fresh handful of untoasted (or lightly baked plain) crispy onions before the last 5 minutes of reheating for a refresh.
Frequently Asked Questions (FAQ) for Beginner Casserole Bakers
Q1: Can I use fresh green beans instead of canned or frozen in a casserole?
A: Yes, you can! Fresh green beans require more prep. You must trim them and blanch or steam them until they are tender-crisp—about 5 to 7 minutes in boiling water—before mixing them into the creamy base. This ensures they fully cook in the oven without becoming hard.
Q2: How do I keep the crispy onions from getting soggy?
A: The secret is timing. Only add half the onions during the initial mixing (if you choose to), and save the remaining half to sprinkle on top only for the final 5 to 10 minutes of baking time. This quick burst of heat caramelizes them without allowing them time to soak moisture.
Q3: My casserole needs more flavor. What is a simple fix?
A: The easiest flavor boost is adding savory liquids. Mix in 1 teaspoon of soy sauce and 1/2 teaspoon of Worcestershire sauce into the creamy base. These add depth (umami) without altering the texture significantly.
Conclusion:
A perfect green bean casserole doesn’t rely on mystery or advanced culinary skills—it comes down to understanding moisture, timing, and balance. By properly draining or pre-cooking your beans, building a flavorful yet controlled creamy base, and adding the crispy topping at the right moment, you eliminate the most common causes of soggy or bland results. The two-stage baking method alone transforms this dish from hit-or-miss to consistently excellent.
Once you master the basics, small upgrades—like umami boosters, fresh mushrooms, or alternative toppings—allow you to personalize the casserole without sacrificing its classic comfort. Whether you’re making it ahead for a holiday table or throwing it together for a weeknight dinner, this guide gives you full control over texture, flavor, and presentation.
In short: green bean casserole isn’t complicated—it’s precise. Follow the steps, respect the timing, and you’ll serve a creamy, savory, perfectly crunchy classic with total confidence every time!