Making bread can seem tricky, especially when you’re aiming for something cute for Valentine’s Day. Many people worry about getting the dough just right or making the shapes look perfect. Don’t worry! Baking Cute Valentine’s Day Bread Recipes to Bake at Home can be easier than you think. We’ll explore simple, step-by-step instructions to create adorable treats. Get ready to impress your loved ones with delicious, homemade bread that looks as good as it tastes. Let’s get started!
Simple Bread Recipes for Valentine’s Day
Finding the right recipe is key when baking for a special occasion. We’ll start with bread recipes that are easy to follow, even if you’re new to baking. These recipes use basic ingredients you probably already have in your kitchen, like flour, yeast, sugar, salt, and water. The focus is on simplicity so you can enjoy the process and the results. These recipes also focus on the core skills needed. You’ll learn how to measure ingredients accurately, how to knead dough properly, and how to tell when your dough has risen enough. Getting these basics down will make the entire baking experience more fun.
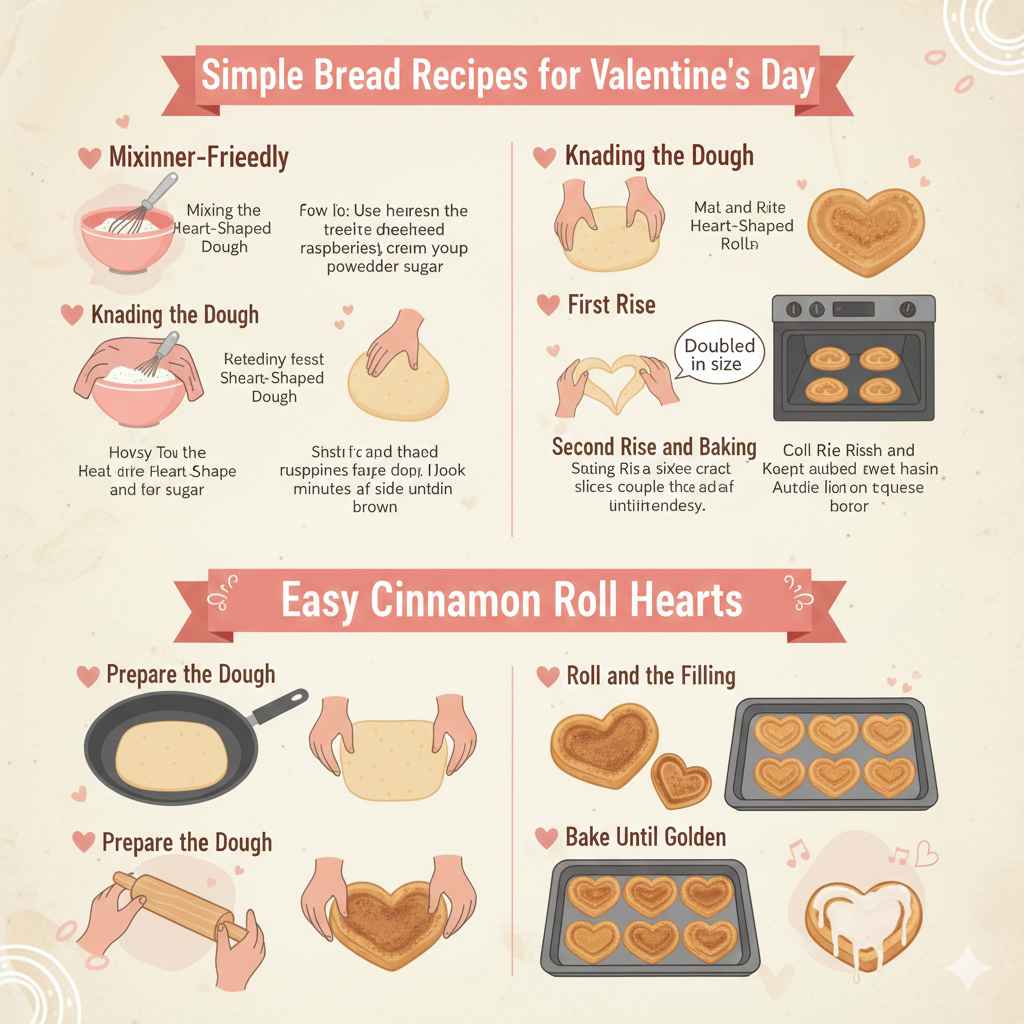
Beginner-Friendly Heart-Shaped Rolls
Heart-shaped rolls are a classic for Valentine’s Day. They are simple to shape and always look charming. The recipe uses a basic bread dough that you can easily adapt with different flavors or toppings. Whether you prefer a plain roll or want to add seeds or a sweet glaze, these heart-shaped rolls are adaptable to your taste. They’re perfect to make with kids.
- Mixing the Dough: Start by combining warm water, sugar, and yeast in a bowl. Let it sit for a few minutes until it becomes foamy. This shows the yeast is active. Next, add flour and salt. Mix until the ingredients form a shaggy dough.
- Mixing the dough properly is about getting the right consistency. The foam shows the yeast is doing its thing! A shaggy dough means it is not completely mixed, but it’s a good start. Adding flour slowly will help you to reach the right texture.
- Kneading the Dough: Turn the dough onto a lightly floured surface. Knead for about 5-7 minutes, until it becomes smooth and elastic. The kneading develops gluten, which gives the bread its structure.
- Kneading is a key step! It’s how you build strength in the dough. Smooth and elastic dough bounces back a little when you press it. This means the gluten is forming. Gluten is important for a nice texture.
- First Rise: Place the dough in a greased bowl, turning to coat. Cover and let it rise in a warm place for about an hour, or until doubled in size. This allows the yeast to work its magic, creating air pockets and flavor.
- The first rise is about letting the yeast do its job. A warm place helps speed things up. The dough will become bigger, with lots of tiny bubbles inside. That’s how you know it’s ready for the next step.
- Shaping the Hearts: Punch down the dough and divide it into equal pieces. Roll each piece into a ball. Then shape each ball into a heart by making a dent in the top with your finger and curving the bottom into a point.
- Shaping the rolls is the fun part! You can adjust the size to match what you like best. Making the little dent in the top of the heart gives it that perfect shape. This step makes the rolls look great.
- Second Rise and Baking: Place the heart-shaped rolls on a baking sheet. Cover and let them rise for another 30 minutes. Preheat your oven. Bake until golden brown.
- The second rise lets the hearts get a bit puffy before baking. The golden-brown color tells you they are done, and inside, they’ll be nice and soft. Enjoy your beautiful heart-shaped rolls!
Easy Cinnamon Roll Hearts
Cinnamon rolls are always a hit, and turning them into hearts is a sweet way to celebrate Valentine’s Day. This recipe uses a pre-made dough, making it quick and easy. You’ll be able to create delicious, visually appealing treats with minimal effort. The combination of cinnamon sugar, butter, and a simple icing glaze makes these cinnamon roll hearts irresistible. They’re a great way to show your affection.
- Prepare the Dough: Start with pre-made dough. Roll it out into a rectangle. This saves a lot of time.
- Using ready-made dough is fine and saves time. Roll the dough out. Make sure it’s a rectangle shape, ready for the filling.
- Make the Filling: Mix together melted butter, cinnamon, and sugar. Spread this mixture evenly over the rolled-out dough. This creates that delicious cinnamon flavor.
- The cinnamon-sugar filling is the heart of the cinnamon roll. The right mix of cinnamon, sugar, and butter makes the perfect balance of sweet and spice.
- Roll and Shape the Hearts: Roll the dough tightly into a log. Cut the log into equal pieces. Shape each piece into a heart by curving the ends.
- Rolling the dough evenly makes sure each heart has the right amount of filling. Shaping the pieces into hearts is a bit easier than you might think!
- Bake Until Golden: Place the heart-shaped cinnamon rolls on a baking sheet. Bake until they are golden brown.
- The baking process is what gives the rolls their final form. The oven makes them rise. The golden color is the sign they are ready.
- Glaze with Icing: While the rolls are cooling, make a simple icing glaze with powdered sugar and milk. Drizzle the glaze over the rolls.
- The icing glaze adds a final touch. It is that sweet taste that completes the rolls. The contrast between the icing and the rolls tastes great.
Flavor Variations for Valentine’s Day Bread
Now that you have the basic recipes down, let’s explore ways to add extra flavor and flair. Experimenting with different ingredients can bring your baking to the next level. Try adding chocolate chips, berries, or nuts. Even different spices can alter the taste significantly. These variations not only make the bread more delicious but also add a visual appeal that’s perfect for the occasion. Customizing your bread allows you to create unique treats tailored to your loved ones’ preferences.
Chocolate-Covered Dough
Chocolate and Valentine’s Day go hand-in-hand. This variation enhances the flavor of your bread, creating a rich experience. You can incorporate chocolate in several ways, such as adding chocolate chips to the dough or glazing the baked bread with melted chocolate. Whether you prefer milk, dark, or white chocolate, this is an excellent choice for any chocolate lover. It adds an extra layer of sweetness and enjoyment to your bread.
- Chocolate Chips: Adding chocolate chips to the dough during the kneading phase. This creates pockets of melted chocolate within the bread.
- Chocolate chips are a simple addition, making the bread more chocolatey inside. They melt as the bread bakes, creating little explosions of flavor.
- Chocolate Swirl: Mixing cocoa powder into part of the dough to create a swirl effect. You can layer the doughs, twist them together, or simply marble them.
- Creating a chocolate swirl is a bit more creative. The mix of chocolate dough with regular dough makes a beautiful pattern. It is an interesting visual twist.
- Chocolate Glaze: Drizzling melted chocolate over the finished bread. This is an elegant way to finish and add extra richness.
- Chocolate glaze adds a shiny look and more chocolate flavor. It’s a sweet touch that’s simple to do but looks great.
- Chocolate Filling: Using a chocolate ganache or chocolate pastry cream as a filling for rolls or loaves. This creates a decadent treat.
- A chocolate filling inside the bread makes it luxurious. The inside will be extra rich. This is a treat for chocolate fans.
Berry Infusion
Berries bring a fresh taste and a pop of color to your Valentine’s Day bread. Whether you choose strawberries, raspberries, or blueberries, these fruits add sweetness and a visual charm. Adding berries can be as simple as folding them into the dough or as creative as making a berry jam filling. These additions are perfect for the occasion.
- Fresh or Frozen Berries: Gently fold fresh or frozen berries into your dough during the final stages of mixing. Be careful not to overmix, as this can break the berries.
- Folding berries in at the end keeps them intact. It’s important to be gentle so they don’t get crushed. The berries will burst as the bread bakes.
- Berry Swirl: Create a berry swirl by making a jam or puree and layering it with the dough. The colors are very appealing.
- A berry swirl looks beautiful. A mix of dough and berry jam or puree creates a colorful effect that is both flavorful and visually striking.
- Berry Filling: Use berry jam or preserves as a filling. This gives a burst of berry flavor in every bite.
- A berry filling gives each bite a taste of berry goodness. It’s perfect if you like your bread bursting with fruit.
- Berry Glaze: Make a glaze using berry juice or puree for a final touch. This gives a beautiful color and flavor.
- A berry glaze is easy to do and looks great! It is a colorful addition and completes the bread with extra flavor.
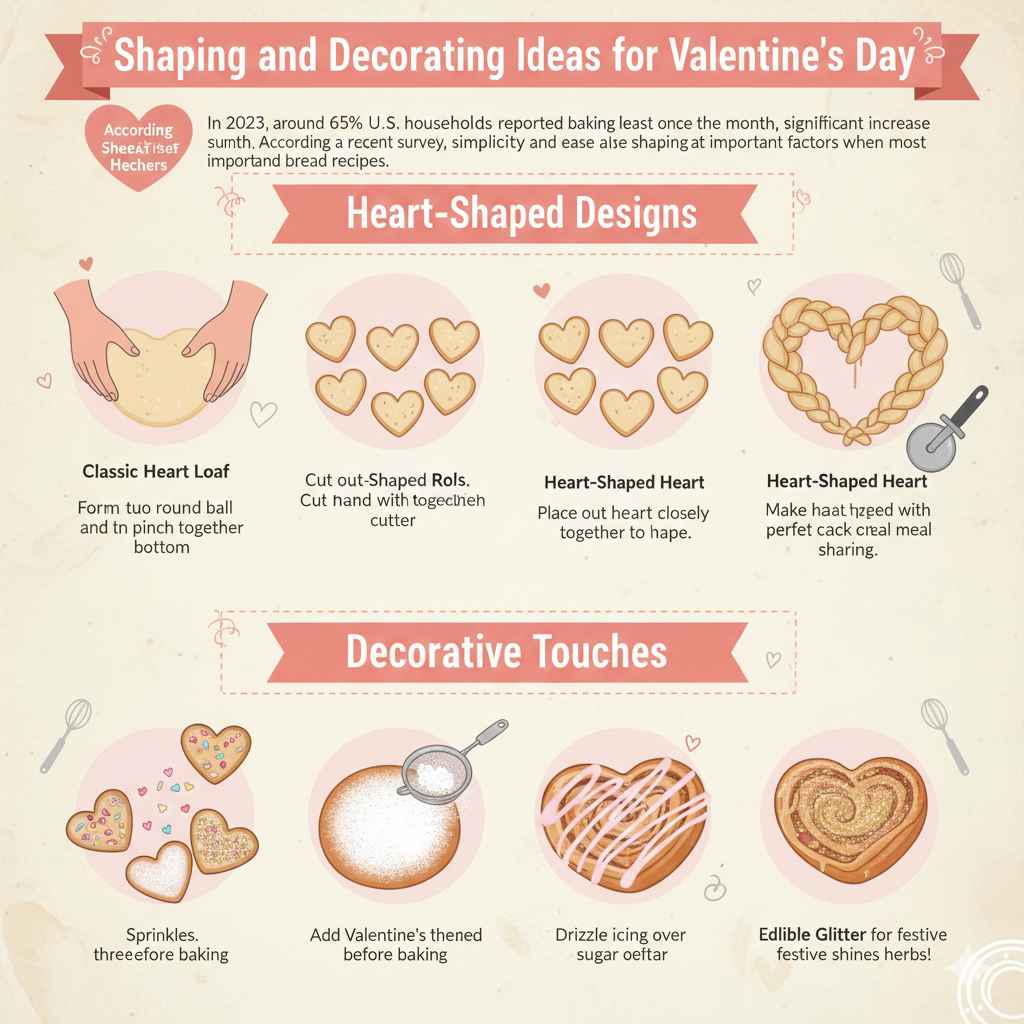
Shaping and Decorating Ideas for Valentine’s Day
The shapes and decorations are how you make your bread truly unique. The best part of baking for Valentine’s Day is creating bread that looks beautiful. You can shape your dough into hearts, roses, or even create a woven pattern. Decorations like sprinkles, icing, and edible glitter add a festive touch. These details can transform a simple bread into a stunning centerpiece that shows your care and attention.
Heart-Shaped Designs
Shaping bread into hearts is a classic and easy way to celebrate Valentine’s Day. Start by simply cutting out heart shapes with a cookie cutter. You can also create more intricate designs by using different techniques. Here are some techniques you can explore to make heart-shaped loaves and rolls.
- Classic Heart Loaf: Shape the dough into a heart by hand. Form two round balls and pinch them together at the bottom. The loaf looks beautiful and is easy to do.
- A hand-shaped heart loaf is simple to do. It looks great. The homemade shape shows how much care you put into it.
- Heart-Shaped Rolls: Cut out heart shapes with a cookie cutter. Place them closely together on a baking sheet to bake.
- Using a cookie cutter makes it easy to have uniformly shaped rolls. They look elegant.
- Braided Heart: Braid the dough and then curve it into a heart shape. This adds a special twist.
- Braiding adds a lot of detail. The shape becomes very special. It is perfect for those that like to be creative.
- Heart-Shaped Pizza: Make a pizza shaped like a heart. A creative meal perfect for sharing.
- Pizza shaped like a heart is a creative idea. The best meals are made by you.
Decorative Touches
Decorations can elevate your bread from simple to stunning. Simple additions like sprinkles or a dusting of powdered sugar can make a big impact. Using food coloring or edible glitter gives a festive touch. These details will add that extra charm to your creations.
- Sprinkles: Add Valentine’s Day-themed sprinkles before baking. Sprinkles always enhance the look.
- Sprinkles are perfect and easy to do. A bit of color goes a long way. They always look great and festive.
- Powdered Sugar: Dust the bread with powdered sugar after baking. This adds elegance and sweetness.
- Powdered sugar makes bread look beautiful. It is simple but adds that touch of elegance that works.
- Icing: Drizzle icing over the bread. You can get creative with colors and patterns.
- Icing is a way to customize. It adds sweetness and color. The patterns add flair.
- Edible Glitter: Sprinkle edible glitter for a festive look. This makes the bread shine!
- Edible glitter is perfect if you want to make your bread sparkle. It adds a touch of magic.
Troubleshooting Common Baking Issues
Even with the best recipes, things can go wrong. Addressing these issues can make the difference between a successful bake and a disappointing one. Here, we’ll cover common problems like why your dough isn’t rising, what to do if it’s too sticky, and how to fix over-baked bread. Don’t let these challenges discourage you. With a bit of knowledge and some simple fixes, you’ll be able to create perfect Valentine’s Day bread every time.
Dough Doesn’t Rise
One of the most frustrating problems is when the dough doesn’t rise. This can ruin the entire baking process. Understanding what can cause this issue and knowing how to troubleshoot it will help save your baking.
- Yeast Issues: Your yeast might be old or not active. Make sure the yeast is fresh and active. Test the yeast by activating it in warm water with sugar.
- Old yeast does not work! Fresh yeast will always get the job done. Make sure it’s active. That foamy water means it works.
- Temperature: The temperature of the water can be too hot or too cold, which will kill or slow the yeast. Make sure the water is warm, about 105-115°F (40-46°C).
- Yeast likes a warm environment! Too hot, it’s killed; too cold, it’s slow. Warm water helps the yeast.
- Proofing Time: The dough might not have risen long enough. Give the dough enough time to rise in a warm environment.
- Give the yeast time to work. Rushing things won’t work. Patience is key when it comes to bread.
Sticky Dough
Sticky dough can be a challenge to work with. It’s often frustrating to handle. Knowing how to handle sticky dough will make the process easier. This ensures your bread turns out as beautiful as intended. Here’s what you can do:
- Add Flour: Gradually add a little more flour until the dough becomes less sticky. Don’t add too much flour, or your bread will be dry.
- Adding flour can fix a sticky dough. A bit more flour helps, but do it little by little. You’ll get the right texture.
- Kneading: Knead the dough for a longer time. This helps develop the gluten. This makes the dough less sticky.
- Kneading the dough properly works wonders! It’s how the bread gets its structure. This will make it easier to work with.
- Resting: Let the dough rest for a few minutes. This allows the flour to absorb the water. It’s a good tip.
- Resting the dough can help. Just a few minutes is all you need. This helps the dough lose its stickiness.
Over-Baked Bread
Over-baked bread can be dry and tough. Baking times vary, and ovens are sometimes inaccurate. Knowing the signs of over-baking and what to do can save your bread. The tips in this section will help you prevent and deal with over-baked bread.
- Check Baking Time: Keep a close eye on your bread while it’s baking. Start checking for doneness a few minutes before the recipe suggests.
- Checking the bread is important. It is important to know the right time to pull the bread out. Set a timer and check often.
- Temperature Issues: Ovens can vary. Use an oven thermometer to ensure your oven is baking at the correct temperature.
- Ovens can be wrong about the temperature! Make sure your oven is at the correct temperature. That is how your bread will cook evenly.
- Cooling: Let the bread cool completely. Cover it to trap moisture. This can make the texture better.
- Letting the bread cool makes a big difference. Cover it while it cools. It can make the bread softer.
In 2023, around 65% of U.S. households reported baking at least once a month, with a significant increase during holidays and special occasions.
According to a recent survey, home bakers cite recipe simplicity and ease of shaping as the most important factors when choosing bread recipes.
Frequently Asked Questions
Question: Can I use different types of flour?
Answer: Yes, you can. You can also experiment with bread flour, all-purpose flour, or a mix of whole wheat flour for a different texture.
Question: How can I store the bread to keep it fresh?
Answer: Wrap the bread tightly in plastic wrap or store it in an airtight container to prevent it from drying out. You can also freeze it for longer storage.
Question: Can I prepare the dough in advance?
Answer: Yes, you can. Prepare the dough, let it rise, and then refrigerate it for up to 24 hours. Remove it from the refrigerator and let it come to room temperature before shaping and baking.
Question: Are there gluten-free options for these recipes?
Answer: Yes, you can adapt these recipes using gluten-free flour blends. Ensure the blend has good binding properties for the best results.
Question: How do I know when the bread is done baking?
Answer: The bread is done when it is golden brown and the internal temperature reaches around 190-200°F (88-93°C). You can also tap the bottom of the loaf; it should sound hollow.
Final Thoughts
Baking Cute Valentine’s Day Bread Recipes to Bake at Home doesn’t have to be hard. With simple recipes, creative ideas, and some helpful tips, you can create delightful treats to celebrate. We’ve explored easy-to-follow recipes, including heart-shaped rolls and cinnamon roll hearts. You’ve discovered different flavor variations, from chocolate additions to berry infusions. We’ve also explored fun techniques for shaping and decorating, ensuring your bread looks as great as it tastes. Remember to experiment and have fun! Take on the challenge and make something special for your loved ones. Get in the kitchen, grab your apron, and bake some love. Happy baking!