Generally, to loosen a bolt or screw with a ratchet, you turn it counter-clockwise. However, always confirm the direction by checking the ratchet mechanism itself.
Ever found yourself staring at a ratchet, wrench in hand, and second-guessing which way to turn? It’s a surprisingly common moment of hesitation! We all want to get our projects done smoothly, and those little confusions can slow us down. Don’t worry, figuring out which way is loosen on a ratchet is a simple skill that opens up a world of DIY possibilities, from furniture assembly to quick home repairs. We’ll walk through it step-by-step, making sure you feel confident and ready to tackle any fastening task. Let’s get those bolts moving in the right direction!
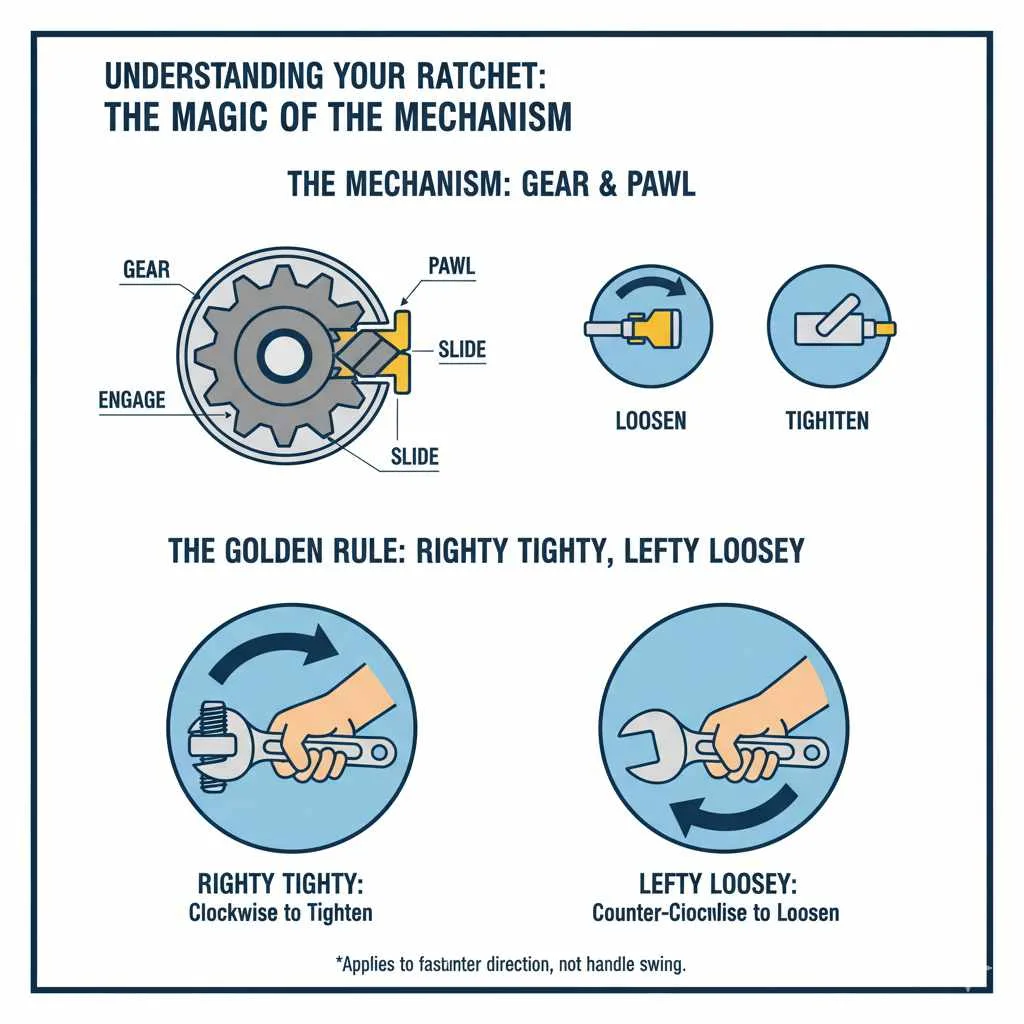
Understanding Your Ratchet: The Magic of the Mechanism
A ratchet is one of those wonderfully clever tools that makes a big difference. Instead of having to lift and reposition your wrench after every tiny turn, a ratchet lets you keep it in place and just move the handle back and forth. That clicking sound? That’s the sound of efficiency! The core of a ratchet is a gear and a pawl mechanism. The pawl is a small, spring-loaded piece that catches on the teeth of the gear. By shifting the direction the pawl engages, you can control whether the wrench tightens or loosens a fastener.
Identifying the Directional Switch
Most ratchets have a small switch, often a lever or a button, located near the head of the tool. This is your main directional control.
The Lever: This is the most common type. You’ll see a small lever that can be pushed in one of two directions.
The Button: Some ratchets use a push-button mechanism, often found on the back of the head. Pressing the button changes the direction.
The Golden Rule: “Righty Tighty, Lefty Loosey”
This old-fashioned saying is your best friend when working with screws, bolts, and nuts.
Righty Tighty: To tighten something, you generally turn it to the right (clockwise).
Lefty Loosey: To loosen something, you generally turn it to the left (counter-clockwise).
However, when using a ratchet, this rule applies to the direction you want the fastener to turn, not necessarily the direction you swing your ratchet handle. The ratchet mechanism does the grabbing and turning for you.
How to Determine Which Way to Loosen on a Ratchet
So, you’ve got your ratchet, and you need to loosen a bolt or nut. Here’s how to be sure you’re doing it right:
Step 1: Locate the Directional Switch
Take a good, close look at your ratchet. Find that little selector switch. It’s usually a small metal lever or sometimes a button.
Step 2: Understand the Switch Positions
Tighten (Clockwise): When the switch is set for tightening, the ratchet will grab the bolt head and turn it clockwise when you move the handle in that direction, and it will “click” freely when you move the handle the other way (counter-clockwise).
Loosen (Counter-Clockwise): When the switch is set for loosening, the ratchet will grab the bolt head and turn it counter-clockwise when you move the handle in that direction, and it will “click” freely when you move the handle the other way (clockwise).
Step 3: Set the Switch for Loosening
To loosen a fastener, you need to set the switch to the “loosen” position. On most ratchets, this means positioning the lever so that the intended direction of loosening (counter-clockwise) is the direction the ratchet will engage.
A Simple Test: A great way to confirm is to attach the ratchet to a bolt and gently try to turn it in both directions.
1. Attach the ratchet securely to the bolt head or nut.
2. Set the switch to one position.
3. Gently try to move the handle counter-clockwise.
If the bolt turns counter-clockwise and you hear clicking when you move the handle clockwise, you’ve found your loosen setting!
If the ratchet head just spins freely (clicks without turning the bolt) when you try to move it counter-clockwise, then the switch is set for tightening.
4. Flip the switch to the other position.
5. Gently try to move the handle counter-clockwise again. This time, the bolt should turn counter-clockwise.
Step 4: Apply Steady Pressure
Once you’ve confirmed the correct setting, grip the handle firmly and apply steady, consistent pressure in the direction that loosens the fastener (counter-clockwise). Avoid jerky movements, which can strip the bolt head or damage the nuts and bolts.
Different Types of Ratchet Mechanisms
While the lever switch is most common, other mechanisms exist, and it’s good to be aware of them.
The Quick-Release Mechanism
Many modern ratchets come with a quick-release button on the back of the head. This button is primarily for ejecting sockets, but sometimes the absence of a distinct lever switch means the directional control is solely reliant on the position the lever would have been if it were there, or it’s an all-in-one mechanism.
For ratchets with a quick-release button:
The directional switch is usually integrated with the quick-release mechanism or is a visible lever near it.
If there’s no visible lever, look for markings, often a subtle arrow, near the socket attachment point. The quick-release button often also acts as the directional selector when pressed or toggled in specific ways.
Always perform the gentle test (as described in Step 3 above) to confirm the rotation for loosening.
Fine-Tooth vs. Standard Tooth Ratchets
It’s also worth noting that ratchets come with different numbers of teeth inside the head, which affects the arc needed to engage the next tooth.
Standard Tooth: Might have 24 teeth. This means you need a larger swing arc (15 degrees) to move to the next tooth.
Fine-Tooth: Can have 36, 48, 72, or even more teeth. This allows for a much smaller swing arc (e.g., 5 degrees for 72 teeth), making them ideal for working in tight spaces where you have very little room to move the handle.
Regardless of tooth count, the directional mechanism works the same way. The fine-tooth feature just provides more convenience in confined areas.
Common Ratchet Mistakes to Avoid
Even with clear instructions, beginner mistakes can happen. Here are a few to watch out for:
Forcing the Switch: Never try to force the directional switch if it feels stuck. There might be an obstruction, or the ratchet head might be under tension from a bolt. Release tension and try again.
Using the Wrong Size Socket: Always ensure your socket fits snugly onto the bolt head or nut. A loose socket can slip, rounding off the fastener and making it difficult or impossible to remove.
Pulling Instead of Pushing: While some tasks might require pulling, often for better control, pushing the handle away from you can be more stable, especially when loosening. Experiment with what feels most secure for the given situation.
Ignoring the Click: The clicking sound is normal when the ratchet is set to engage. If you hear clicking when you should be turning the bolt, double-check your directional switch.
Over-Tightening: While this article focuses on loosening, remember not to overtighten when reassembling. Use a torque wrench for critical applications found in automotive or engineering projects. For general home use, find a “snug” feeling, and then a little bit more, but avoid straining.
Essential Tools for Loosening and Tightening
Beyond the ratchet itself, a few other items can make your work much easier and more effective.
Your Ratchet Set
A good set of ratchets and sockets is a cornerstone of any DIY toolkit. Look for sets that include:
Common socket sizes (SAE and Metric).
Extensions (to reach bolts that are recessed).
A universal joint adapter (for angled access).
The American Society of Mechanical Engineers (ASME) provides standards for tools, which can be a good reference when selecting quality equipment. You can explore some of their guidelines on their website, asme.org.
Penetrating Oil
If a bolt or nut is stubborn and seems stuck, a spray of penetrating oil (like WD-40 or similar products) can work wonders. Let it sit for a few minutes to allow it to seep into the threads.
NASA has even explored the science behind how lubricants work in various environments, highlighting the importance of these little helpers.
Work Gloves
Protect your hands! Good work gloves offer grip and keep your hands free from grease, dirt, and minor scrapes.
Safety Glasses
Always wear safety glasses when working with tools. You never know when a stray piece of metal or debris might fly off. Prioritizing safety is always a stylish and smart choice!
Putting It Into Practice: Common DIY Scenarios
Let’s see how this applies to real-life situations around your home.
Scenario 1: Assembling Flat-Pack Furniture
Many pieces of furniture come with bags of nuts, bolts, and screws, along with an Allen wrench or a small ratchet.
1. Identify the fastener type: Are you dealing with a bolt and nut, or a screw?
2. Select the correct socket size for your ratchet.
3. Set the ratchet to loosen (counter-clockwise for removal, clockwise to tighten).
4. Follow the “Lefty Loosey, Righty Tighty” rule for the fastener itself. If you’re removing bolts, you’ll be turning them counter-clockwise.
5. Use the ratchet’s rocking motion to quickly remove or install fasteners.
Scenario 2: Changing a Light Fixture
When replacing an old light fixture, you might need to remove mounting screws holding it in place.
1. Turn off the power at the breaker box! Safety first!
2. Identify the screws holding the fixture.
3. Use the appropriate socket on your ratchet.
4. Set the ratchet to loosen (counter-clockwise).
5. Gently remove the screws.
Scenario 3: Basic Bike Maintenance
From adjusting your seatpost to tightening a fender, a ratchet can be super handy for bicycle upkeep.
1. Identify the bolt or nut you need to adjust.
2. Use the correct socket or wrench attachment. Many bike components use standard sizes, but some may require specific bike tools.
3. Set your ratchet to loosen (counter-clockwise) for removal or tightening (clockwise) for installation.
4. Apply steady pressure.
Troubleshooting Stubborn Fasteners
Sometimes, a bolt or nut just doesn’t want to budge. Don’t get discouraged! Here are some extra tips:
Apply Penetrating Oil: As mentioned, this is your first line of defense. Let it soak!
Heat (Used with Caution): For metal-to-metal connections (not near plastic or painted surfaces!), a quick burst of heat from a heat gun (not a torch, unless you really know what you’re doing) can sometimes expand the metal enough to break the bond. Always exercise extreme caution with heat.
Impact Driver (Manual or Powered): An impact driver delivers a sharp, rotational force coupled with a downward thrust, which is excellent for breaking loose stubborn fasteners. Manual impact drivers look like a large screwdriver you hit with a hammer. Powered impact drivers are electric tools.
Breaker Bar: For very stubborn bolts where a ratchet might break, a long breaker bar provides more leverage. It doesn’t have the ratcheting mechanism, so it requires repositioning, but it’s built for force.
Vice Grips: If the head of the bolt or nut is damaged, vice grips can sometimes get a strong enough hold to turn it.
The Anatomy of a Ratchet Head Explained
Let’s dive a bit deeper into what’s happening inside that head. Understanding this can demystify the process.
| Component | Function | Importance for Loosening |
| :————– | :———————————————————————— | :—————————————————————————————————– |
| Pawl | Small, spring-loaded tooth that engages the gear. | Determines the direction of force; when set to loosen, it engages when you turn counter-clockwise. |
| Gear (Ring Gear) | Toothed wheel that the pawl engages with. | Provides the mechanism for rotational engagement. |
| Drive Shaft | Connects the gear to the socket. | Transmits the rotational force from the gear to the fastener. |
| Selector Switch | Lever or button that reverses the pawl’s engagement with the gear. | The critical control to set the ratchet for loosening (typically counter-clockwise engagement). |
| Springs | Provide tension for the pawl and sometimes the selector switch. | Ensure the pawl makes proper contact with the gear teeth. |
| Socket Retainer | Ball bearing or spring clip to hold the socket in place. | Keeps the socket attached to the drive shaft. |
Understanding these parts helps you appreciate how the simple act of flipping a lever or pressing a button translates into a powerful tool for assembly and disassembly. Always ensure your socket is properly seated on the drive shaft.
When to Consider a Professional
While this guide empowers you to tackle many tasks, there are times when calling in an expert is the wisest choice:
Extremely Damaged Fasteners: If a bolt head is completely stripped or rusted shut, and you’ve tried all troubleshooting methods, a mechanic or handyman might have specialized tools.
Critical Components: For essential parts of vehicles, plumbing, or structural elements where incorrect tightening or loosening could cause significant damage or safety hazards, consult a professional.
* Lack of Confidence: If you’re feeling unsure or overwhelmed by a particular task, it’s always okay to seek help. There’s no shame in knowing your limits and getting expert assistance.

Frequently Asked Questions (FAQ)
Q1: Is the direction the same for all types of ratchets?
Yes, the principle is the same. You are always setting the ratchet mechanism to engage when turning in the direction that loosens the fastener. For most standard bolts and screws, this is counter-clockwise. Always test your ratchet to confirm its specific behavior.
Q2: My ratchet switch is stuck. What should I do?
First, ensure there’s no tension on the ratchet from a bolt. If it’s completely free, try wiggling it gently. Sometimes a bit of graphite lubricant or a light spray of penetrating oil can help. If it remains stuck, the internal mechanism might be damaged, and it’s best to get a new ratchet rather than force what could break.
Q3: What if the bolt is really tight and won’t budge?
This is when penetrating oil, a longer breaker bar for leverage, or an impact driver can be very helpful. Ensure you have the correct socket size and that it’s seated firmly to avoid rounding the bolt head.
Q4: Can I use my ratchet to tighten as well as loosen?
Absolutely! The directional switch on your ratchet allows you to set it for both tightening (clockwise) and loosening (counter-clockwise). Simply flip the switch to the desired function.
Q5: How do I know if I have the right size socket?
A socket is the right size if it fits snugly onto the bolt head or nut without wobbling. If it’s too loose, it can slip and strip the fastener. If it’s too tight, it won’t fit at all. Most socket sets are clearly marked with their size.
Q6: Why does my ratchet click when I’m trying to loosen a bolt?
If your ratchet is clicking while you are trying to turn the bolt in the loosening direction, it means the directional switch is set incorrectly. It’s currently set to tighten, so it’s spinning freely in the loosening direction. Flip the switch to make it engage and turn the bolt.
Conclusion
Mastering the simple directional switch on your ratchet is a fantastic step towards becoming more independent and capable around your home and with your projects. Remember our guiding phrase: “Lefty loosey, righty tighty,” and always double-check by testing the direction. With clear awareness of your tool and a steady hand, you can confidently tackle assembly, repairs, and maintenance tasks, transforming potential frustration into satisfying accomplishment. So next time you reach for that ratchet, you’ll know exactly which way to turn. Happy building, fixing, and creating!