
Bolded Quick Summary (Top of Article)
Installing composite decking is an achievable DIY project! Following a few key steps for subframe preparation, board laying, and securing with hidden fasteners will ensure a beautiful, low-maintenance deck. This guide breaks down the process simply, making your dream deck a reality without the pro cost.
Dreaming of an outdoor space that’s both stylish and incredibly easy to care for? A composite deck might be just the answer! Many homeowners feel intimidated by DIY projects, especially anything involving structural elements or large surfaces. You might look at a deck and think, “That’s a job for the professionals.” But what if I told you that with a little planning and some straightforward guidance, you can absolutely install your own composite decking? It’s more accessible than you might think, and the result? A gorgeous, durable deck that will make your backyard the envy of the neighborhood for years to come.
Forget the endless sanding and staining that traditional wood decks demand. Composite decking offers a beautiful, low-maintenance alternative that’s perfect for busy lifestyles and those of us who’d rather spend our weekends relaxing than doing chores. This guide is designed to make the process feel less like a daunting task and more like an exciting home improvement adventure. We’ll walk you through everything, from understanding your materials to the satisfying final board.
Ready to transform your outdoor living area? Let’s get started on creating that beautiful, functional deck you’ve always wanted. We’ll cover everything, from preparing your foundation to laying those stunning composite boards with confidence.
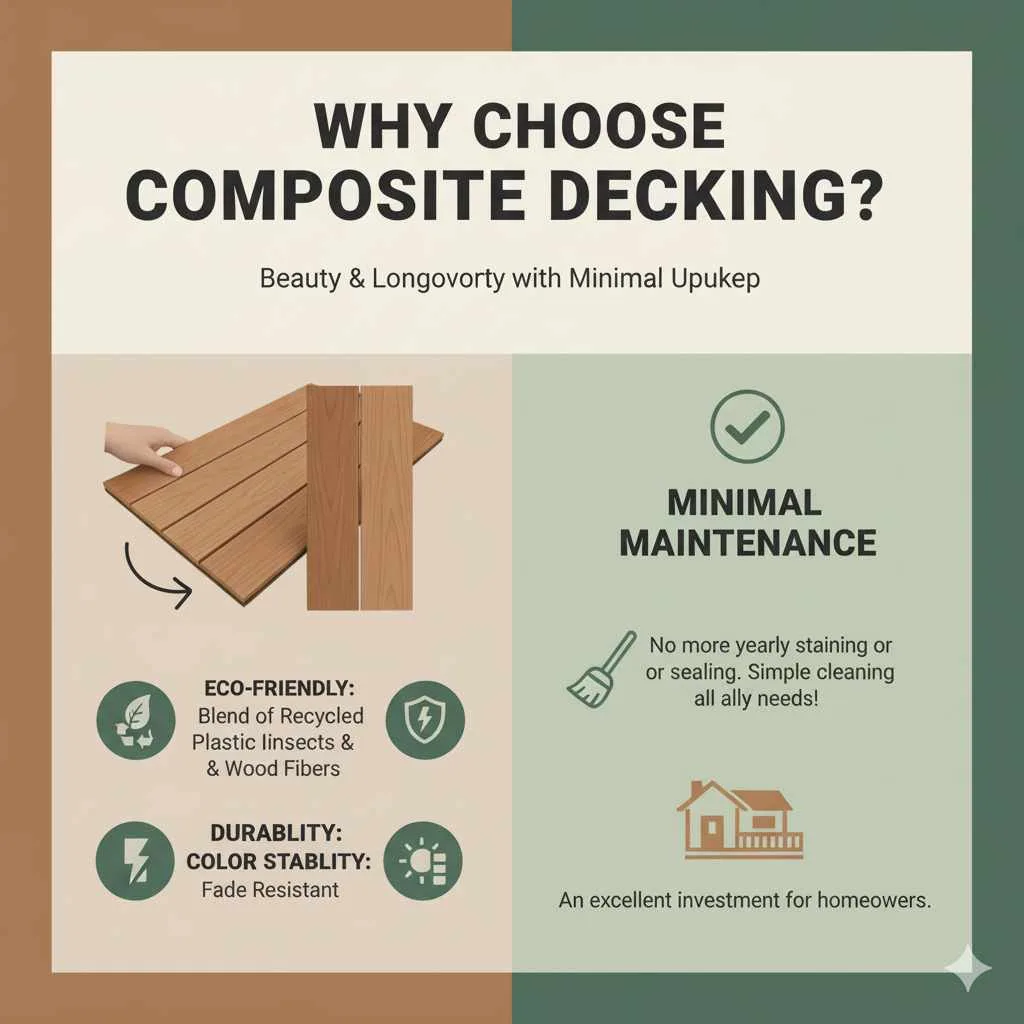
Why Choose Composite Decking?
Before we dive into the installation, let’s quickly touch upon why composite decking has become such a popular choice. Unlike traditional wood, composite decking is made from a blend of recycled plastic and wood fibers. This means it’s resistant to rot, decay, insects, and splintering. Plus, it holds its color much better than wood, resisting fading from harsh sun exposure. The best part? Minimal maintenance! No more yearly staining or sealing. A simple cleaning is usually all it needs to stay looking its best. This makes it an excellent investment for homeowners looking for beauty and longevity with minimal upkeep.
Understanding the Basics: What You’ll Need
Getting ready for your composite decking project is key to a smooth installation. Taking the time to gather the right tools and materials will save you time and frustration down the line. Think of it as setting yourself up for success!
Essential Tools for Composite Decking Installation
Having the right tools at the ready makes all the difference. Here’s a list of what you’ll likely need:
- Measuring Tape: For accurate measurements of your deck area and boards.
- Pencil: To mark measurements and cut lines.
- Level: Crucial for ensuring your subframe and deck boards are perfectly flat.
- Circular Saw: For cutting composite boards to size. You might need a fine-tooth blade recommended for composite materials to get clean cuts.
- Drill/Driver: For pre-drilling pilot holes (essential even with hidden fasteners) and driving screws.
- Miter Saw (Optional but Recommended): For making precise angle cuts, especially for fascia boards.
- Safety Glasses: Always protect your eyes when cutting or drilling.
- Work Gloves: To protect your hands.
- Speed Square or Combination Square: For marking straight lines and 90-degree angles.
- Broom or Leaf Blower: For cleaning the subframe and deck surface.
- Clamps: Handy for holding boards in place temporarily.
- Subflooring Chisel or Pry Bar: Useful for adjustments.
- Caulk Gun and Exterior-Grade Sealant: For sealing edges and penetrations.
Composite Decking Materials
Your composite decking planks are the star, but you’ll also need:
- Composite Decking Boards: Choose a reputable brand and style you love.
- Substructure/Framing: This is typically pressure-treated lumber for the joists and beams. Ensure it meets local building codes. You can find guidance on deck framing from the BuildingGreen resource, which discusses durable framing options.
- Hidden Fastener System: This is key for that clean, screw-free look. There are several types, like clip systems or screw-through-the-groove systems.
- Deck Screws: Use screws specifically designed for composite decking or that are exterior-rated and corrosion-resistant.
- Rim Joists/Fascia Boards: These are used to finish the edges of your deck.
- Joist Tape (Optional): Self-adhering tape applied to the tops of joists to protect them from moisture.
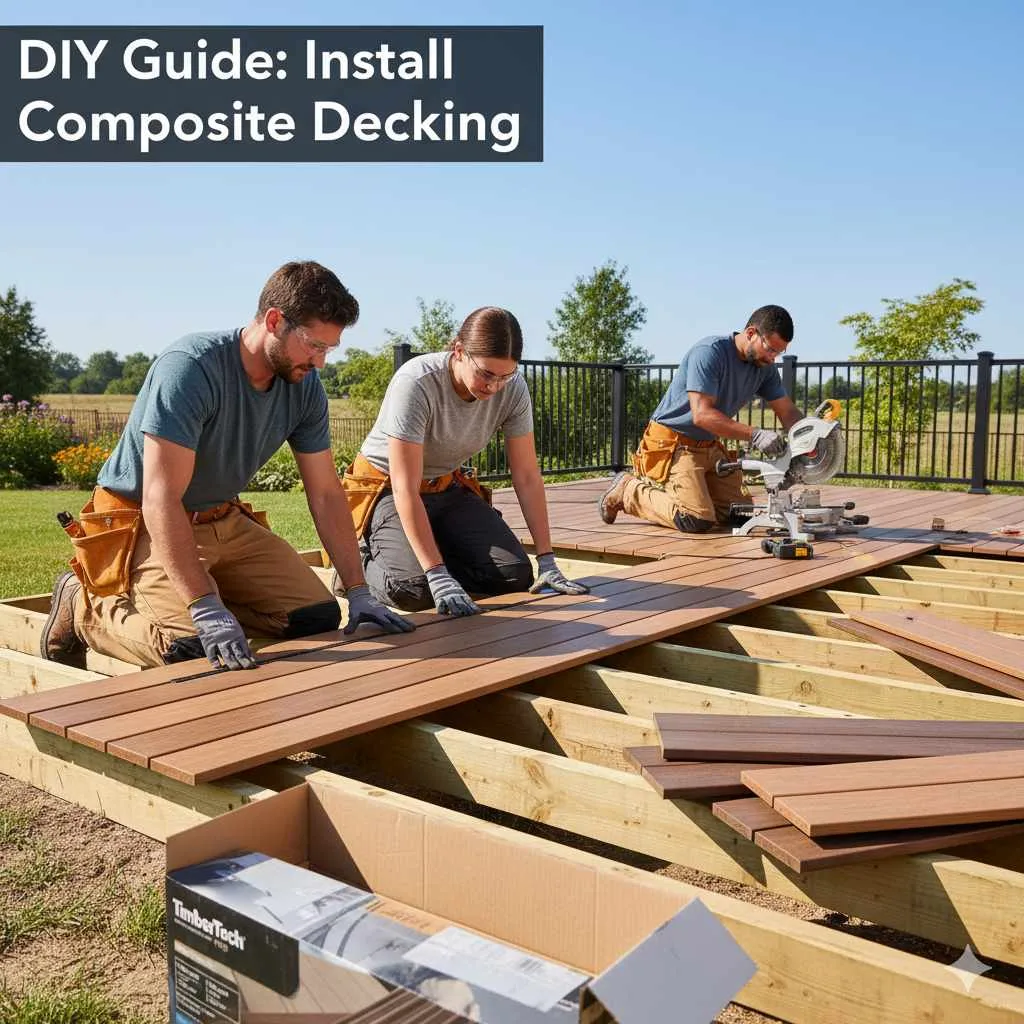
Step-by-Step Installation Guide: Your Effortless Journey
We’ve broken down the installation process into manageable steps. It might seem like a lot, but by focusing on each phase, you’ll find it’s quite straightforward. Remember, patience and precision are your best friends here!
Step 1: Prepare Your Subframe (The Foundation)
A strong, level subframe is the backbone of your deck. If you’re building from scratch, this involves setting posts, beams, and joists. If you already have a suitable subframe, you’ll need to ensure it’s in excellent condition, level, and free from any debris.
- Check Existing Frame: Inspect your current deck frame. Are the joists spaced correctly for your composite decking? (Commonly 16 inches on center, but always check manufacturer recommendations). Is everything level and square? Make any necessary repairs or adjustments.
- Install Joist Tape (Recommended): Apply joist tape along the top of each joist. This protects the wood from moisture that can get trapped under the deck boards, significantly extending the life of your frame.
- Clear the Area: Sweep or blow away all leaves, dirt, and debris from the subframe. A clean surface is essential for proper board placement and helps prevent moisture buildup.
- Ensure Proper Ventilation: Good airflow under the deck is crucial to prevent mold and rot. Make sure there’s adequate space between the ground and the bottom of the joists, typically at least 18 inches, and that there are no obstructions blocking airflow. For more on deck building codes and best practices, the American Wood Council (AWC) website offers extensive resources.
Step 2: Plan Your Board Layout
Before you start laying boards, it’s wise to do a dry run or mock layout. This helps you visualize the finished product and identify any potential issues, like needing awkward cuts at the beginning or end of a run.
- Determine Decking Direction: Decide which direction your boards will run. Typically, they run perpendicular to the joists.
- Measure and Plan for Cuts: Measure the width of your deck. If the width isn’t a perfect multiple of your board length, you’ll need to rip (cut lengthwise) the last board. Plan your starting point to minimize waste or awkward cuts. Sometimes starting with a cut board is more efficient.
- Consider Expansion Gaps: Composite decking expands and contracts with temperature changes. Manufacturer instructions will specify the required gap between boards and at the ends. Don’t skip this – it’s vital to prevent warping.
Step 3: Install the First Deck Board
Getting that first board perfectly straight and secure is foundational for the rest of your deck. This is where your level and measuring tape are constantly in use!
- Align the First Board: Place your first composite deck board along the edge of the deck, perpendicular to the joists. Ensure it’s flush with the rim joist or an overhang you’ve planned.
- Secure the Edges: For the very first and last boards that run parallel to the joists, you might need to face-screw them (screwing directly through the face of the board into the joist). Pre-drill pilot holes to prevent the composite from cracking. Use screws recommended by your decking or fastener manufacturer.
- Check for Straightness: Throughout this process, constantly check that the board is perfectly straight using your level. Any deviation here will be amplified with each subsequent board.
Step 4: Install Composite Decking with Hidden Fasteners
This is where the magic of a clean, screw-free surface happens! There are a few common types of hidden fastener systems, but the principle is similar: they engage with a groove in the side of the composite board or clip into place between boards.
Common Hidden Fastener Systems and Installation
Let’s look at the most prevalent types:
| Fastener Type | Description | Installation Method | Pros | Cons |
|---|---|---|---|---|
| Groove/Edge Fasteners (e.g., CAMO Edge Screws) | These systems use specialized screws that are driven through the edge groove of the board into the joist at an angle. | Use a specialized tool to pre-drill the angled hole and drive the screw through the groove. | Strong hold, clean look, relatively fast installation. | Requires a specific tool and screws. |
| Concealed Clip Systems (e.g., Trex Hideaway, TimberTech Fastenator) | These systems feature clips that fit into the grooved edges of the boards and are then screwed into the joist. | Insert clips into the grooves of the board, align with joists, and screw down. Some systems are trigger-activated for speed. | Create consistent gaps, very clean look, often simple to install. | Can be more expensive, some systems have specific spacing requirements. |
| Plugs/Dowels Systems | These involve drilling a larger hole, inserting a dowel, and then filling the hole with a colored plug matching the deck board. Usually combined with other hidden fastening methods underneath. | Used in conjunction with other hidden fasteners; the plug system hides the fastener head. | Extremely clean, almost invisible fastening. | Labor-intensive, can be costly, requires advanced planning. |
General Steps for Hidden Fastener Installation:
- Follow Manufacturer Instructions: THIS IS CRUCIAL. Each hidden fastener system has specific installation requirements regarding spacing, tools, and technique. Always refer to the manual that came with your fasteners.
- Position the Board: Lay your next composite deck board down, ensuring it’s properly spaced from the previous board according to the manufacturer’s recommendations for expansion and for the fastener system.
- Engage the Fastener:
- For Clip Systems: Place the clips into the grooves on both sides of the board where it meets a joist, then screw them into the joist according to system instructions.
- For Groove Screws: Use the specialized jig and screws to drive the screw through the groove of the board and into the joist. Ensure the screw goes in at the correct angle.
- Tap into Place: Sometimes, you might need to gently tap the board into place with a rubber mallet to ensure it sits flush against the previous board or the clips.
- Repeat: Continue laying boards, securing them one by one with your chosen hidden fastener system, always measuring and checking for level and straightness.
Step 5: Installing Fascia Boards and Finishing Touches
The fascia boards are what give your deck a professional, finished look by covering the cut ends of the deck boards and the sides of the joists.
- Measure and Cut Fascia: Measure the length of each side of your deck that needs a fascia board. Cut your composite fascia boards to size using a miter saw for clean, square cuts.
- Attach Fascia Boards: You can attach fascia boards using specialized composite screws or finish nails that are rated for exterior use and match your deck’s color as closely as possible. For a clean look, many people pre-drill and then use screws that can be left visible or covered with a plug system. Ensure the fascia is flush with the front of your deck boards or has a consistent overhang.
- Trim Around Obstructions: If you have posts, railings, or other elements that penetrate your deck surface, carefully cut your composite boards to fit around them. You may need to use a jigsaw for these more intricate cuts. Seal any cut edges as recommended by the manufacturer for optimal durability.
- Final Clean-Up: Once all boards are laid and secured, and fascia is in place, give your new deck a thorough cleaning. Sweep away any dust or debris.
Maintaining Your Beautiful New Deck
One of the greatest joys of composite decking is its ease of maintenance. Say goodbye to stressful upkeep!
- Regular Cleaning: A simple sweep with a broom or a rinse with a hose will take care of most dirt and debris.
- Occasional Washing: For tougher spots or mold in shaded areas, use a mild soap (like dish soap) or a deck cleaner specifically designed for composite materials mixed with water. Use a soft brush or cloth. Always rinse thoroughly with a hose. Avoid harsh chemicals or abrasive scrubbers that could damage the surface.
- Debris Removal: Promptly remove leaves, snow, or ice from the deck surface. Allowing moisture to sit can encourage mold or mildew growth, especially in humid climates.
For comprehensive cleaning advice, many composite decking manufacturers provide care and cleaning guides on their websites.

FAQ: Your Composite Decking Questions Answered
Q1: How long does composite decking last?
A: High-quality composite decking, when properly installed and maintained, can last anywhere from 25 to 50 years or even longer. Manufacturers often offer lengthy warranties to back this up.
Q2: Can I install composite decking on my own?
A: Absolutely! Many homeowners successfully install composite decking as a DIY project. While it requires careful planning and execution, this guide breaks down the process into manageable steps. The use of hidden fasteners simplifies the finishing considerably.
Q3: What’s the difference between composite and wood decking for DIYers?
A: Composite decking is generally easier to maintain as it doesn’t require staining or sealing. It also resists rot, insects, and splintering. Wood decking, while potentially cheaper upfront, demands significant ongoing maintenance. For a DIYer aiming for low effort and long-term beauty, composite is often the simpler choice.
Q4: Do I need a special saw blade for composite decking?
A: Yes, it’s highly recommended to use a carbide-tipped blade with a fine tooth count (often 60 teeth or more) specifically designed for cutting composite materials. This helps prevent chipping and ensures a cleaner cut, making installation easier and the finished product look better.
Q5: How do hidden fasteners work for composite decking?
A: Hidden fasteners are designed to attach deck boards from the side or the groove, rather than through the face of the board. This creates a smooth, uncluttered surface without visible screw heads, offering a cleaner aesthetic. They typically work by clipping between boards or screwing through the grooved edge into the joists.
Q6: What is the typical cost difference between composite and wood decking?
A:composite decking generally has a higher upfront material cost compared to standard pressure-treated wood. However, when you factor in the cost and labor of regular maintenance (staining, sealing, repairs) required for wood decks over time, composite decking can often be more cost-effective in the long run. Lumber prices can fluctuate significantly, so always compare current quotes.
Q7: Is it okay for composite decking to expand and contract?
A: Yes, composite decking materials naturally expand and contract with changes in temperature. It’s essential to leave the manufacturer-recommended gaps between boards and at the ends to accommodate this movement. Failing to do so can lead to warping or buckling.
Conclusion: Your Beautiful Deck Awaits!
See? Installing composite decking is an entirely achievable project for the enthusiastic DIYer. We’ve walked through the essential preparation, the tool gathering, and the step-by-step installation using intuitive hidden fastener systems. You’ve learned how to create a strong foundation, lay your boards with precision, and finish with elegant fascia, all while aiming for that seamless, screw-free look.
The beauty of composite decking lies not just in its stunning appearance and resistance to the elements, but also in its low-maintenance nature. Imagine more time spent enjoying your gorgeous new deck, and less time spent worrying about upkeep. This project is a fantastic way to add value and beauty to your home, and the sense of accomplishment you’ll feel surveying your handiwork will be immense.
So, take a deep breath, gather your tools, and trust the process. Embrace the journey of building something wonderful for your home and family. Your dream deck is no longer just a dream – it’s a blueprint for your


Leave a Reply