
Mount your TV effortlessly with simple steps! This guide ensures a secure and sleek setup for a perfect viewing experience at home.
Ever feel a little daunted by setting up a new TV? You’re not alone! Deciding where to place your TV and how to mount it can seem like a big task. Will it be stable? Will it look good? The good news is, with a few straightforward steps, you can have your TV mounted perfectly, transforming your living space into a cozy entertainment hub. Let’s ditch the stress and get your screen ready for movie nights or binge-watching sessions!
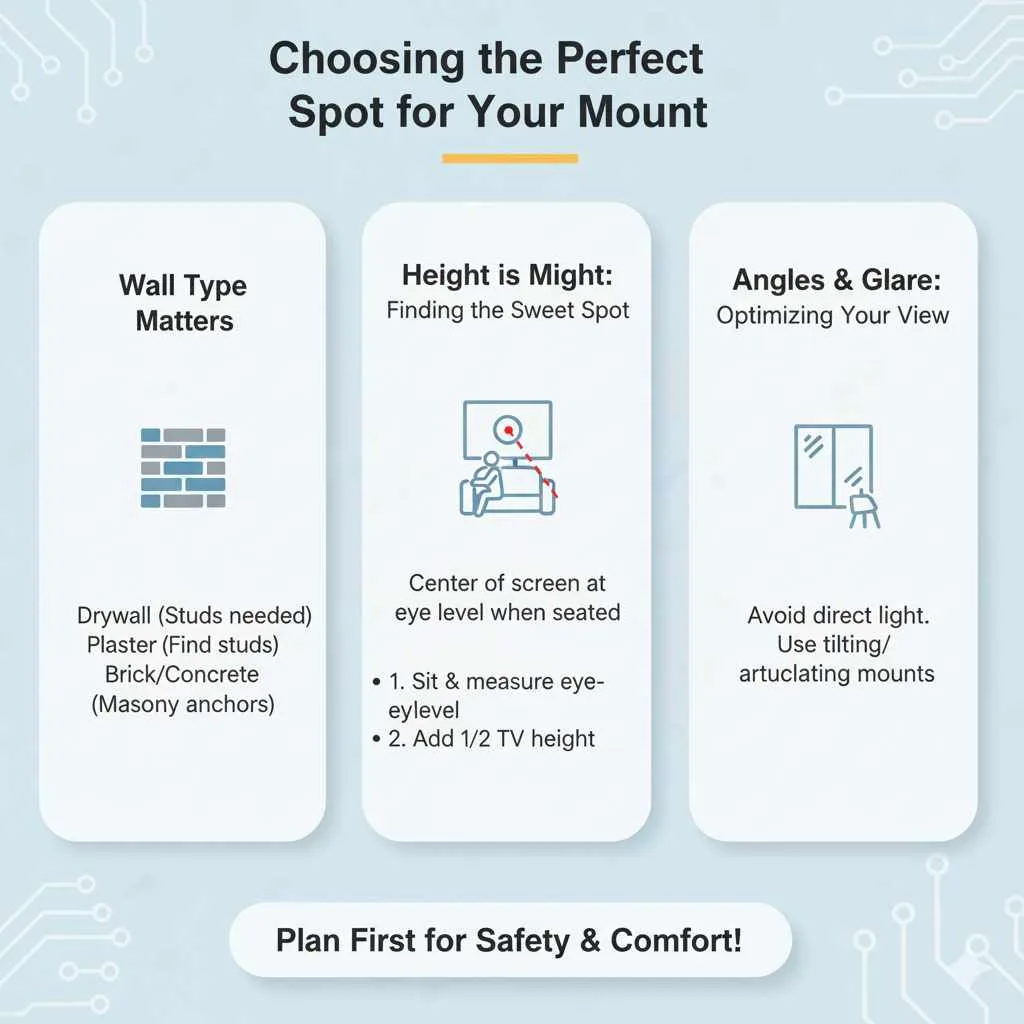
Choosing the Perfect Spot for Your Mount
Before we grab any tools, let’s think about the best place for your TV. This is more than just finding a wall; it’s about creating an enjoyable viewing experience and ensuring safety. Consider how light falls in the room, where you’ll be sitting, and what’s behind the wall.
Wall Type Matters
Not all walls are created equal when it comes to mounting a TV. The material of your wall will determine the type of hardware you need and how much weight it can support. It’s crucial to know what you’re working with to ensure a secure mount.
- Drywall: The most common type in homes. It requires finding wall studs (the sturdy wooden beams behind the drywall) for secure mounting. Without studs, you’ll need special heavy-duty drywall anchors.
- Plaster: Similar to drywall but often found in older homes. It can be more brittle, so finding studs is even more important.
- Brick or Concrete: These walls are very strong and can support heavy loads. You’ll need specific masonry anchors and a powerful drill for installation.
If you’re unsure about your wall type, a quick tap test can help. Drywall and plaster walls will sound hollow when tapped, while a solid thud indicates a stud or a masonry wall. For absolute certainty, especially with heavy TVs, consult a professional or a reliable building guide.
Height is Might: Finding the Sweet Spot
The ideal height isn’t too high or too low. You don’t want to crane your neck or miss the action! A good rule of thumb is to have the center of the TV screen at eye level when you’re seated in your favorite spot. This provides the most comfortable and immersive viewing experience. Measure the distance from your seating area to the floor and aim for that height to be the center of your screen.
To get a more precise measurement, you can:
- Sit on your couch and have someone measure the height from the floor to your eye level.
- Add half the height of your TV to that measurement. This will give you the approximate height for the center of your TV.
Angles and Glare: Optimizing Your View
Think about where the sun shines into your room throughout the day and where potential glare from windows or lights could be an issue. Try to position the TV so that direct light doesn’t hit the screen, especially during peak viewing times. If you have a tilting or articulating mount, you’ll have more flexibility to adjust the angle later to combat glare.
Gathering Your Tools and Hardware
Having all your tools ready before you start makes the process much smoother. Don’t worry if you don’t have everything; most of these are common household items or easily found at your local hardware store.
Essential Tools for the Job
- Stud Finder: Absolutely crucial for mounting on drywall or plaster walls. It helps you locate the wooden studs behind the wall.
- Level: Ensures your TV is perfectly straight. A wobbly TV is a visual distraction!
- Drill and Drill Bits: For creating pilot holes and screwing in lag bolts or anchors. Make sure you have the correct drill bit size for your hardware.
- Measuring Tape: For accurate placement and height measurements.
- Pencil: For marking drill points.
- Screwdriver Set: Both Phillips and flathead might be needed for attaching brackets to the TV.
- Socket Wrench or Adjustable Wrench: To tighten lag bolts securely.
- Safety Glasses: Protect your eyes from dust and debris.
- Optional: A helper to hold the TV mount or assist with holding the TV.
Understanding Mount Types and What They Include
TV mounts come in various styles, each with its own advantages. Most mounts are designed to be compatible with the VESA (Video Electronics Standards Association) mounting holes found on the back of most TVs. When you buy a mount, it will typically come with:
- The main bracket that attaches to the wall.
- Arms or a plate that attach to the back of your TV.
- A variety of screws, bolts, and washers—including ones for mounting to different wall types (studs, concrete) and attaching to various TVs.
It’s important to check the packaging to see what hardware is included. Manufacturer manuals are your best friend here and will detail which screws are for which purpose.
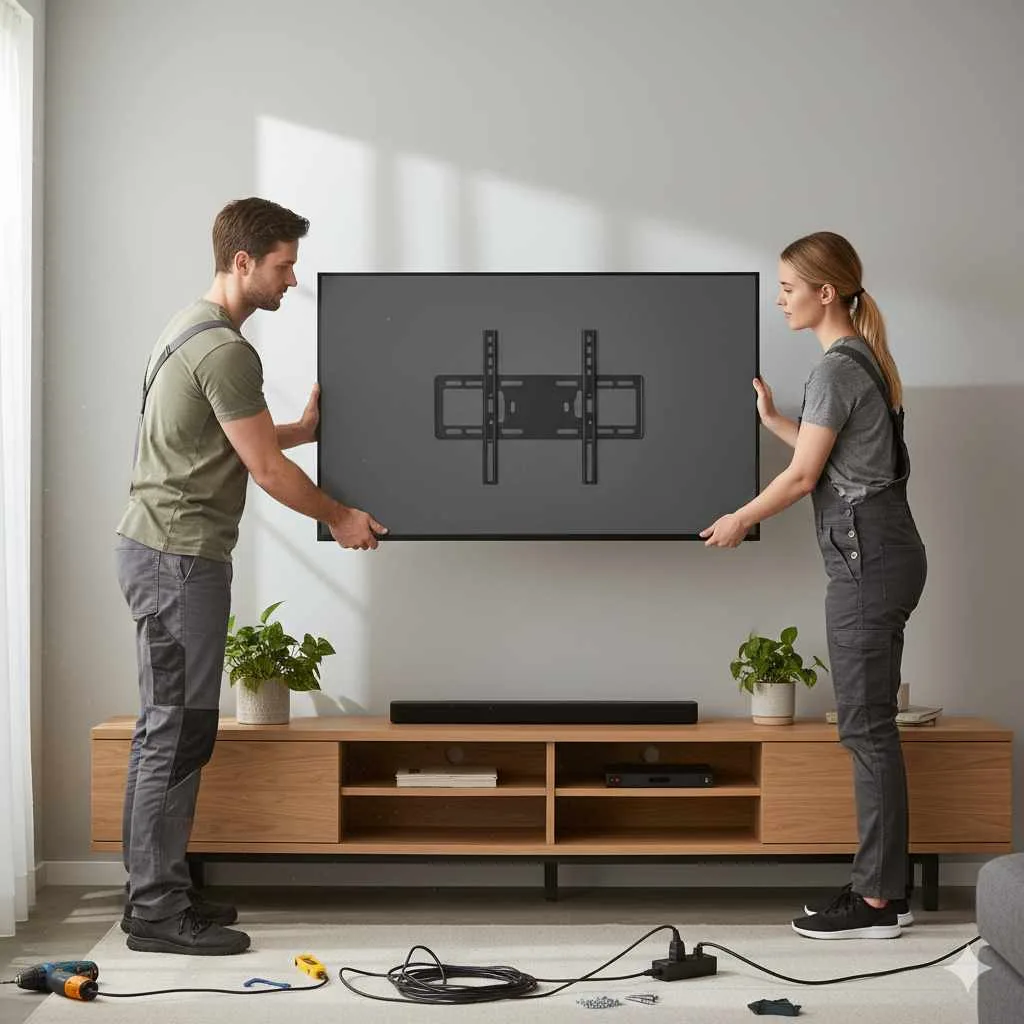
Step-by-Step Guide: How to Mount Your TV
Now for the fun part! Let’s get that TV up on the wall. This guide focuses on mounting to a standard drywall with studs, as it’s the most common scenario. We’ll cover other wall types later.
Step 1: Locate the Wall Studs
This is the most critical step for a secure drywall installation. Use your stud finder to scan the area where you plan to mount the TV. Most stud finders will beep or light up when they detect a stud. Mark the edges of the stud with your pencil. Ideally, you want to mount into the center of two studs for maximum support. Measure the distance between the center of the studs to ensure your mount will span them correctly. A standard stud spacing is 16 inches on center.
For more information on finding studs, the U.S. Department of Energy offers resources on home energy efficiency, which often involves understanding wall construction and finding studs.
Step 2: Attach the Mounting Brackets to the Wall
Hold the wall plate part of your mount against the wall where you want it, using your level to ensure it’s perfectly horizontal. Mark through the mounting holes onto the wall, ideally aligning with the center of your marked studs. You might need to pre-drill pilot holes. Use a drill bit that is slightly smaller than the lag bolts that came with your mount. Then, drive the lag bolts through the mount and into the studs using a socket wrench. Ensure they are very secure. Do not use the TV’s power cord or any other wires to help you locate studs; always use a dedicated stud finder!
Step 3: Attach the TV Brackets to Your TV
Lay your TV face down on a soft, clean surface (like a blanket or the TV’s original packaging foam) to avoid scratching the screen. Locate the VESA mounting holes on the back of your TV. Attach the vertical arms or plate of your mount to these holes using the screws provided by the mount manufacturer. Your TV mount kit will include a variety of screw sizes and spacers; consult your TV manual to determine the correct screw size and whether you need spacers. Only tighten them enough to be snug; overtightening can damage the TV.
Step 4: Mount the TV onto the Wall Plate
This step is much easier with a helper! Carefully lift the TV and align the brackets on the back of the TV with the wall plate. Most mounts have a hook-and-latch system or a similar secure locking mechanism. Once the TV is hanging on the wall plate, ensure it’s securely locked into place according to the mount’s instructions. Double-check that it feels stable and secure.
Step 5: Connect Cables and Final Adjustments
Now, plug in your power cords and A/V cables. If possible, use cable management solutions (like clips, sleeves, or in-wall routing kits) to keep things tidy and looking sleek. Once everything is connected, gently test the TV’s stability. Make any final tilt or swivel adjustments as needed for the best viewing angle. Congratulations, you’ve mounted your TV!
Mounting on Different Wall Types: What You Need to Know
While drywall with studs is common, you might have a different wall material. Here’s a quick rundown:
Mounting Directly to a TV Stand
This is a fantastic and often simpler alternative, especially for renters or those who prefer not to drill into walls. It involves attaching the TV to a stand designed to hold it, then securing the stand to the floor or wall for extra stability.
How to Mount a TV on a TV Stand
Mounting a TV directly onto a compatible TV stand is incredibly straightforward. Most modern TV stands come with their own mounting hardware or accommodate standard VESA patterns on the TV.
- Check Compatibility: Ensure your TV stand is designed to support your TV’s size and weight. Look for the VESA pattern compatibility.
- Attach Brackets to TV: Similar to wall mounting, lay your TV face-down on a soft surface. Attach the mounting brackets (usually provided with the stand) to the VESA holes on the back of your TV using the correct screws.
- Attach TV to Stand Column: Lift the TV and align its brackets with the upright column or support structure on the TV stand. Secure it using the hardware provided with the stand.
- Secure the Stand (Optional but Recommended): For safety, especially in homes with children or pets, use the anti-tip hardware (usually included with the stand) to secure the TV stand to a wall stud. This prevents accidental tipping.
This method offers great flexibility in placement and avoids permanent wall alterations.
Mounting on Brick or Concrete Walls
These walls offer excellent structural integrity. However, drilling into them requires different tools and hardware.
- Tools: You’ll need a hammer drill and masonry drill bits specifically designed for brick or concrete.
- Hardware: Use “wedge anchors” or “sleeve anchors” designed for masonry. These expand behind the wall to create a strong hold.
- Process: Drill holes using your hammer drill to the required depth. Insert the anchors, then attach the mount using the provided nuts and washers according to the anchor manufacturer’s instructions.
Mounting on Metal Studs
Metal studs are common in commercial buildings but can also be found in some residential constructions. They are less robust than wood studs and require specific hardware.
- Hardware: Use self-tapping metal screws or toggle bolts designed for metal studs. You may also need a special adapter plate to bridge the gap if the mount doesn’t sit flush.
- Process: You’ll need a drill with appropriate bits for metal. Pre-drill pilot holes and then use the self-tapping screws. Toggle bolts require a larger hole to be drilled first so the wings can pass through and expand behind the stud.
When in doubt about wall type or load-bearing capacity, it’s always best to consult a structural engineer or a professional installer. Resources like This Old House often provide helpful guides on identifying wall materials.
Choosing the Right Mount for Your Needs
Not all mounts are created equal, and the right one can enhance your viewing experience and room aesthetics. Consider these common types:
| Mount Type | Description | Best For | Pros | Cons |
|---|---|---|---|---|
| Fixed Mount | Keeps the TV flat against the wall, like a picture frame. | Sleek, minimalist look; rooms where viewing angle is always directly in front. | Slimmest profile, most secure for static viewing, often most affordable. | No tilting or swiveling. Can be difficult to access ports. |
| Tilting Mount | Allows the TV to tilt up or down. | Reducing glare from overhead lights or when mounting TV higher than eye level. | Helps manage glare and improves viewing from slightly varied heights. | Limited angle adjustment. |
| Full-Motion / Articulating Mount | Extends from the wall, tilts, and swivels. | Corners, large rooms, or when you need to view from multiple seating areas. | Versatile viewing angles, easy access to ports, good for corner installations. | Bulkier when extended, can be more expensive, requires careful installation to ensure stability through movement. You can find detailed VESA standards information at VESA.org. |
| Low-Profile Mount | Similar to fixed but designed for an even slimmer gap between TV and wall. | Creating a very clean, integrated look; thin TVs. | Ultra-slim appearance. | Very limited access to ports. |
Always check the weight capacity and VESA compatibility of any mount you consider. Your TV manual will list its weight and VESA size (e.g., 200x200mm or 400x400mm).
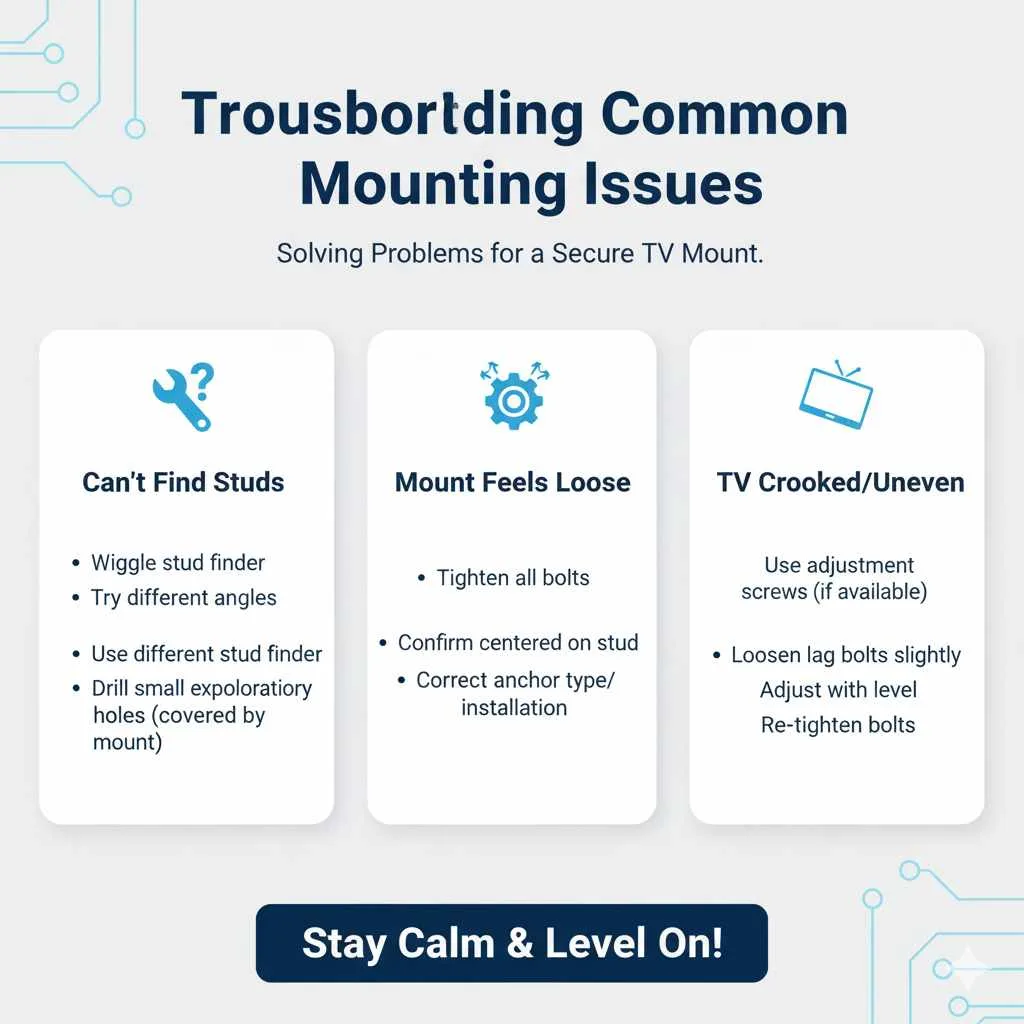
Troubleshooting Common Mounting Issues
Even with the best preparation, sometimes things don’t go exactly as planned. Here are a few common issues and how to tackle them:
- Can’t find studs: Wiggle the stud finder, try different angles, or use a different stud finder. If all else fails, and you’re comfortable, you can carefully drill small exploratory holes (which will be covered by the mount) to confirm stud locations.
- Mount feels loose: Ensure all bolts are tightened correctly. For drywall, confirm you are directly into the center of the stud. If using anchors, make sure they are the right type and properly installed.
- TV won’t attach securely to the mount: Double-check you’re using the correct screws and spacers for your TV model and the VESA holes.
- Uneven mount: If you notice the TV is slightly crooked after mounting, don’t panic! Many mounts have adjustment screws that allow for minor leveling corrections. If not, and it’s noticeable, you may need to loosen the lag bolts slightly, adjust with your level, and re-tighten.
Frequently Asked Questions (FAQ)
Q1: How high should I mount my TV?
A1: The center of the TV screen should ideally be at eye level when you are seated. A good starting point is about 40-45 inches from the floor to the center of the TV for standard seating heights.
Q2: Can I mount a TV on a plaster wall?
A2: Yes, you can, but it requires extra care. Always use a stud finder to locate the wooden studs behind the plaster and use appropriate hardware for wood studs. Plaster can be brittle, so avoid relying solely on anchors if possible.
Q3: What is VESA? Do I need to know my TV’s VESA size?
A3: VESA is a standard for the mounting holes on the back of TVs. Yes, you absolutely need to know your TV’s VESA size (e.g., 200x200mm, 400x400mm) to ensure your chosen TV mount will fit your television.
Q4: Do I need a professional to mount my TV?
A4: For most standard drywall installations, a confident DIYer can mount a TV with the right tools and this guide. However, if you have complex wall types (like concrete), are unsure about structural integrity, or want an in-wall cable management solution, hiring a professional is a wise choice.
Q5: How far apart should the studs be for mounting a TV?
A5: Standard wall stud spacing in most homes is 16 inches on center. Many TV mounts are designed to accommodate this spacing, but it’s always best to check the mount’s specifications.
Q6: Can I mount a TV if I rent my apartment?
A6: Yes! If drilling into walls is not allowed, mounting your TV on a compatible TV stand and using the provided anti-tip hardware to secure the stand to the wall is a great solution. This is secure and allows for easy removal when you move.
Conclusion
See? Mounting your TV doesn’t have to be a daunting chore. By taking the time to choose the right spot, gather your tools, and follow these simple steps, you’ll achieve a secure, stylish, and perfectly positioned TV setup. Whether you’re creating a cozy home theater or just optimizing your living room, a well-mounted TV can truly elevate your space and your viewing experience. So, stand back, admire your handiwork, and enjoy every moment on your newly set-up screen!


Leave a Reply